How to Stop Dark Hair from Disappearing Into Dark Backgrounds (A Photoshop Hair Highlighting Trick)

How to Stop Dark Hair from Disappearing Into Dark Backgrounds (A Photoshop Hair Highlighting Trick)

There’s a specific kind of frustration that hits when you’re retouching a portrait and the subject’s dark hair just… melts into a dark background. No separation, no dimension, no life. You’ve done everything right technically, and somehow the image still looks flat and muddy around the edges. I’ve been there more times than I’d like to admit, usually sitting in some coffee shop squinting at my laptop screen trying to figure out why a perfectly good photo looks like the subject is slowly being absorbed into a void.

Photoshop 2025's Remove Tool Just Got a Serious Upgrade — Here's What Actually Changed

Photoshop 2025's Remove Tool Just Got a Serious Upgrade — Here's What Actually Changed

There’s a particular kind of freelance pain that comes from spending fifteen minutes cleaning up a busy background with the Clone Stamp tool, only to realize the result looks like a crime scene painted by someone who’s never seen grass before. The Remove Tool changed that for me when it first showed up, but it always had a ceiling. Big objects, complex backgrounds, anything that required more than a light touch — it would choke.

How to Fake Dramatic Light on a Flat, Overcast Photo Using Lightroom and Photoshop

How to Fake Dramatic Light on a Flat, Overcast Photo Using Lightroom and Photoshop

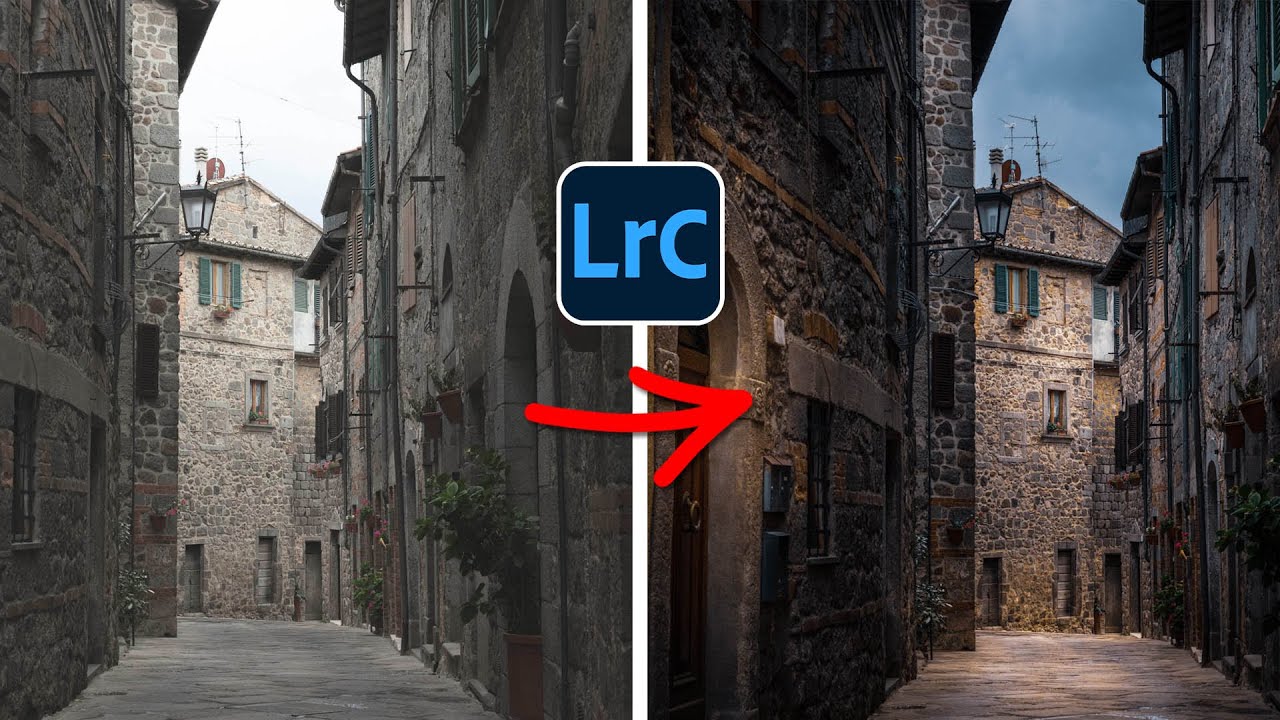
There’s a specific kind of frustration that comes from having a technically solid photo that just… sits there. Good composition, decent exposure, interesting subject. But the light was flat because it was an overcast Tuesday and the sky didn’t care about your shoot. I’ve been in that situation more times than I can count, and my usual move was to slap a preset on it and call it a day. That worked until clients started asking for something that actually looked intentional.

Stop Ruining Your Composites: How to Kill Halos and Fringes in Photoshop

Stop Ruining Your Composites: How to Kill Halos and Fringes in Photoshop

There’s a special kind of frustration reserved for spending an hour on a composite, stepping back to admire your work, and realizing there’s a glowing halo around every single tree. I’ve been there more times than I want to admit. You nail the selection, you paste in the new sky, and then that thin bright ring shows up like your Photoshop is personally trying to embarrass you. It’s one of those problems that’s easy to miss at 50% zoom and impossible to unsee once you spot it.

The Art of Making People Look Better Than They Actually Are (Legally)

The Art of Making People Look Better Than They Actually Are (Legally)

The Art of Making People Look Better Than They Actually Are (Legally) Let’s be honest: everyone wants to look better in photos. Your job as a Photoshop wizard is to deliver results that make people say “wow, you look amazing!” rather than “did you use a filter from 2009?” There’s a fine line between enhancement and looking like a plastic action figure, and I’m here to help you walk it.

The Dark Art of Photo Manipulation: Making People Look Better Than They Have Any Right To

The Dark Art of Photo Manipulation: Making People Look Better Than They Have Any Right To

The Dark Art of Photo Manipulation: Making People Look Better Than They Have Any Right To Look, I’m not going to pretend that photo manipulation is some noble pursuit. It’s basically digital lying. But it’s fun lying, and honestly, everyone’s doing it. Your Instagram influencer crush? Manipulated. That family photo where everyone actually looks happy? Manipulated. That picture of your breakfast that got 47 likes? Okay, probably not manipulated, but it should have been.

The Dark Art of Photo Manipulation: Making People Look Better Than They Actually Are

The Dark Art of Photo Manipulation: Making People Look Better Than They Actually Are

The Dark Art of Photo Manipulation: Making People Look Better Than They Actually Are Let’s be honest—we’re all here because reality is sometimes disappointing. Your client’s product photos are too dark. Your portrait subject has a mysterious third chin they swear isn’t usually there. The sunset you drove two hours to photograph looks about as inspiring as a spreadsheet. Enter photo manipulation: the noble art of making things look better without making them look obviously fake.

The Art of Not Getting Caught: Photo Manipulation Done Right

The Art of Not Getting Caught: Photo Manipulation Done Right

The Art of Not Getting Caught: Photo Manipulation Done Right Look, I’m going to be straight with you: photo manipulation gets a bad rap. Everyone’s suddenly a purist who swears they “don’t edit their photos” while conveniently forgetting about that Instagram filter they applied. The truth? Good manipulation is invisible. Bad manipulation makes people look like plastic aliens. I’m here to help you be in the first camp. The Golden Rule: Subtlety is Your Best Friend The biggest mistake I see is people treating Photoshop like a sledgehammer when they should be using it like a scalpel.

Healing Brush vs Clone Stamp: A Practical Comparison

Healing Brush vs Clone Stamp: A Practical Comparison

The Healing Brush and Clone Stamp look similar and do similar things, but they use fundamentally different algorithms. Using the wrong one creates problems that are often worse than the original blemish. Here’s when to reach for each one. How They Differ Clone Stamp copies pixels exactly from the source point to the destination. What you sample is what you get — texture, color, brightness, everything. Healing Brush copies texture from the source but matches the color and brightness to the destination.