
There’s a special kind of frustration reserved for spending an hour on a composite, stepping back to admire your work, and realizing there’s a glowing halo around every single tree. I’ve been there more times than I want to admit. You nail the selection, you paste in the new sky, and then that thin bright ring shows up like your Photoshop is personally trying to embarrass you. It’s one of those problems that’s easy to miss at 50% zoom and impossible to unsee once you spot it.
The good news is that fringes are a solved problem, and there are several different ways to attack them depending on what you’re working with. In this Matt Kloskowski tutorial, he rounds up a handful of his favorite fringe-removal techniques into one place, covering sky replacements and subject cutouts. Instead of a single silver bullet, he gives you a toolkit, which is exactly how I prefer to learn this stuff. One method won’t work on every image, so having options matters. Watch the full tutorial on YouTube
Here’s the sky replacement workflow he walks through, broken down into steps you can follow along with right now.
Step 1: Make Your Initial Sky Selection with the Quick Selection Tool
 Quick Selection Tool painting over the sky area
Grab the Quick Selection Tool and paint across the sky. Don’t overthink it here. Matt’s approach is path-of-least-resistance: the sky tends to be the easier region to isolate, so start there. You’re not going for perfection at this stage. You just need a rough read that Photoshop can work with. Paint in broad strokes across the sky and let the tool do its thing. The selection will be rough around trees, branches, and any detailed edges, but that’s fine because the next step exists specifically to fix that.
Quick Selection Tool painting over the sky area
Grab the Quick Selection Tool and paint across the sky. Don’t overthink it here. Matt’s approach is path-of-least-resistance: the sky tends to be the easier region to isolate, so start there. You’re not going for perfection at this stage. You just need a rough read that Photoshop can work with. Paint in broad strokes across the sky and let the tool do its thing. The selection will be rough around trees, branches, and any detailed edges, but that’s fine because the next step exists specifically to fix that.
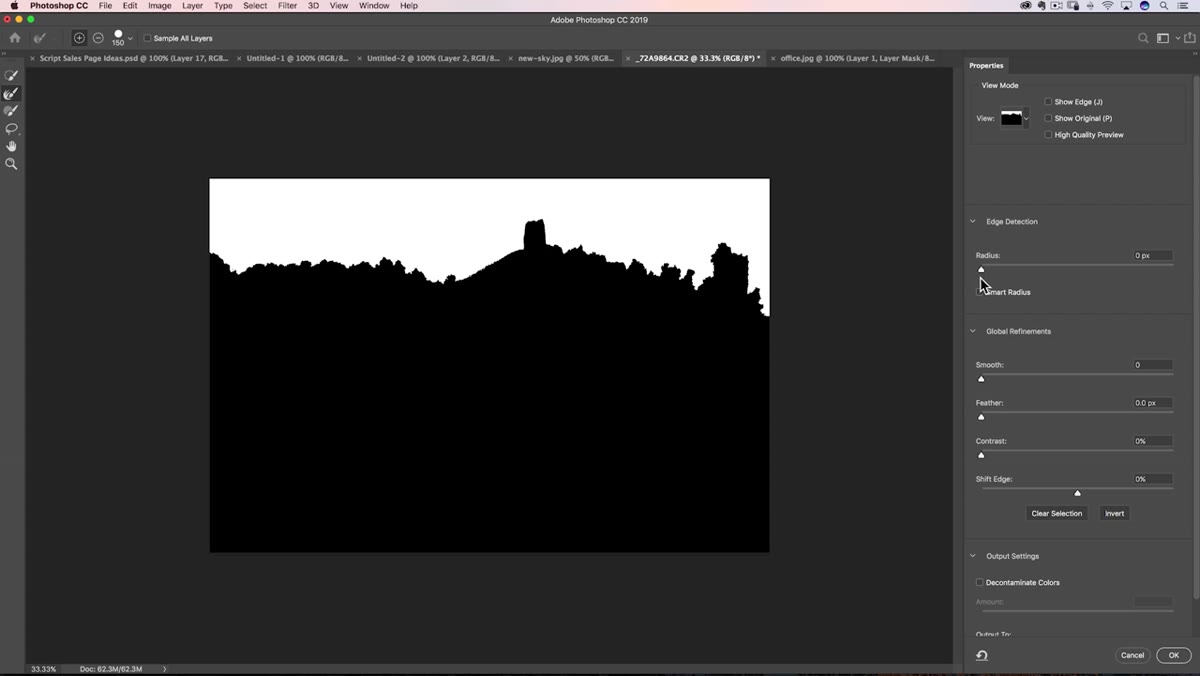
Step 2: Refine the Edges with Select and Mask
 Select and Mask dialog open with Refine Edge Brush Tool active
Once you have your rough selection, head up to Select > Select and Mask. When the dialog opens, switch to the second tool in the left toolbar: the Refine Edge Brush Tool. This is the one that does the heavy lifting. Paint over any areas that look rough or incomplete. In the tutorial, that means going over the tree canopy, which is full of small gaps and semi-transparent leaves that the quick selection missed entirely.
Select and Mask dialog open with Refine Edge Brush Tool active
Once you have your rough selection, head up to Select > Select and Mask. When the dialog opens, switch to the second tool in the left toolbar: the Refine Edge Brush Tool. This is the one that does the heavy lifting. Paint over any areas that look rough or incomplete. In the tutorial, that means going over the tree canopy, which is full of small gaps and semi-transparent leaves that the quick selection missed entirely.
What the Refine Edge Brush does is pretty remarkable. It analyzes the edges you paint over and figures out what’s foreground and what’s background in a way that straight selections just can’t. You’ll see the holes in the trees fill in and the edges tighten up in real time. Once you’re happy with the preview, set your output to Selection and click OK. You’re leaving the dialog with an active selection and nothing else.
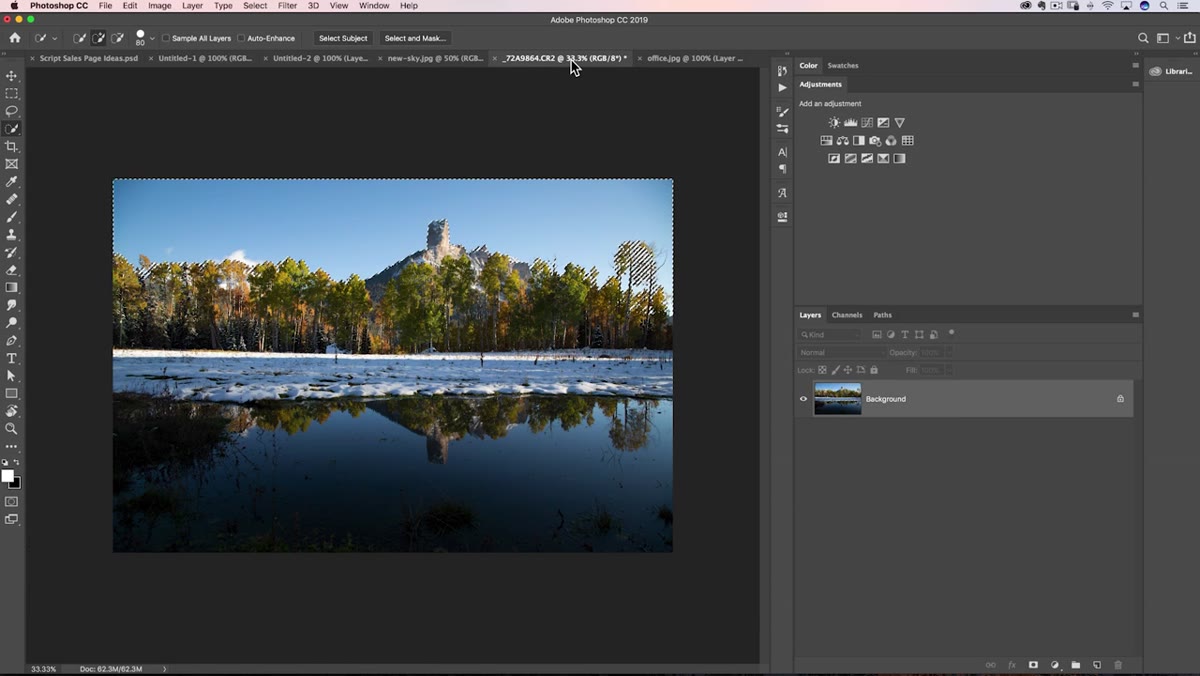
Step 3: Copy and Paste the New Sky Into the Selection
 Edit menu open showing Paste Special and Paste Into options
Switch over to your replacement sky image, select all, and copy it. Flip back to your main photo, then go to Edit > Paste Special > Paste Into. This is different from a regular paste. Paste Into drops the sky into its own layer and automatically generates a layer mask from whatever selection you had active. So your sky is now sitting exactly where the old one was, contained behind that mask, and it’s all non-destructive from the start.
Edit menu open showing Paste Special and Paste Into options
Switch over to your replacement sky image, select all, and copy it. Flip back to your main photo, then go to Edit > Paste Special > Paste Into. This is different from a regular paste. Paste Into drops the sky into its own layer and automatically generates a layer mask from whatever selection you had active. So your sky is now sitting exactly where the old one was, contained behind that mask, and it’s all non-destructive from the start.
From there, use Free Transform (Command/Ctrl + T) to reposition and scale the sky so it sits naturally in the frame. You want the horizon line to feel logical and the sky to fill the space without obvious tiling or stretching.
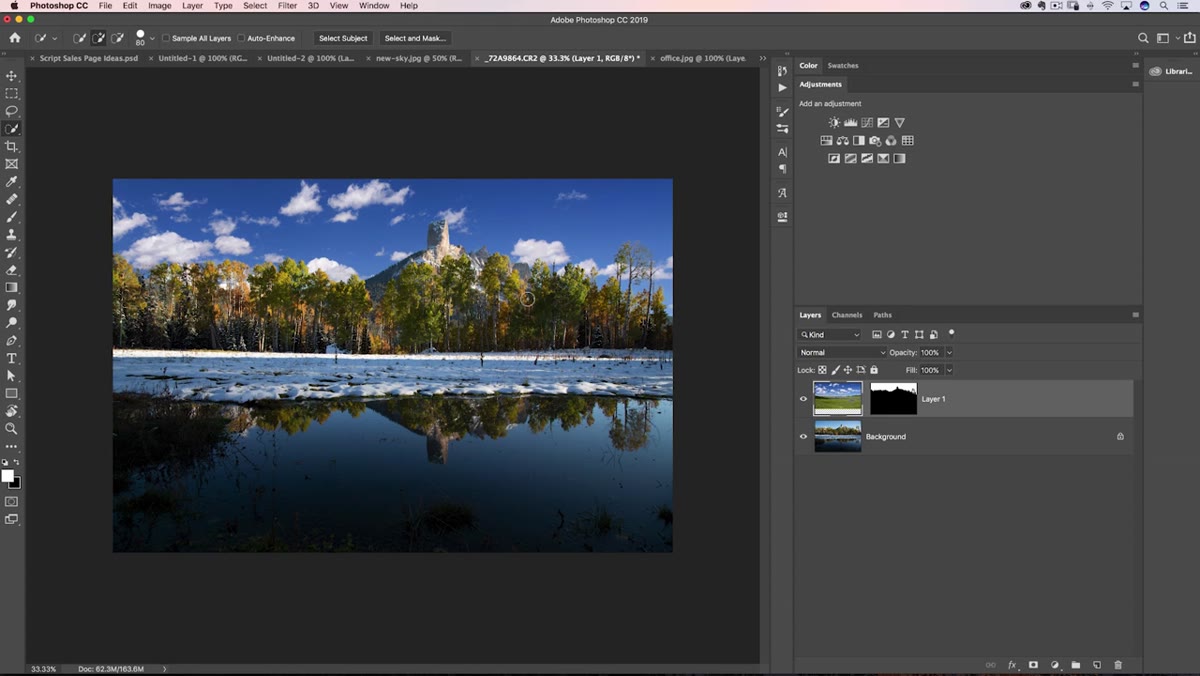
Step 4: Understand Why the Fringe Is Happening Before You Try to Fix It
 Composite showing bright fringe halo around tree edges
This is the step most tutorials skip, and it’s the most useful thing Matt covers. Before you reach for a defringe tool, look at what’s actually causing the problem. In the example, he’s replaced a washed-out, pale blue sky with a deep, saturated one. The selection edges weren’t perfectly clean, so thin slivers of the original bright sky are still peeking through, creating a luminous halo against the dark new background.
Composite showing bright fringe halo around tree edges
This is the step most tutorials skip, and it’s the most useful thing Matt covers. Before you reach for a defringe tool, look at what’s actually causing the problem. In the example, he’s replaced a washed-out, pale blue sky with a deep, saturated one. The selection edges weren’t perfectly clean, so thin slivers of the original bright sky are still peeking through, creating a luminous halo against the dark new background.
The fringe isn’t just a masking error. It’s a contrast mismatch. You’re forcing a bright edge against a dark field, and that’s always going to look wrong. Understanding this changes how you approach the fix.
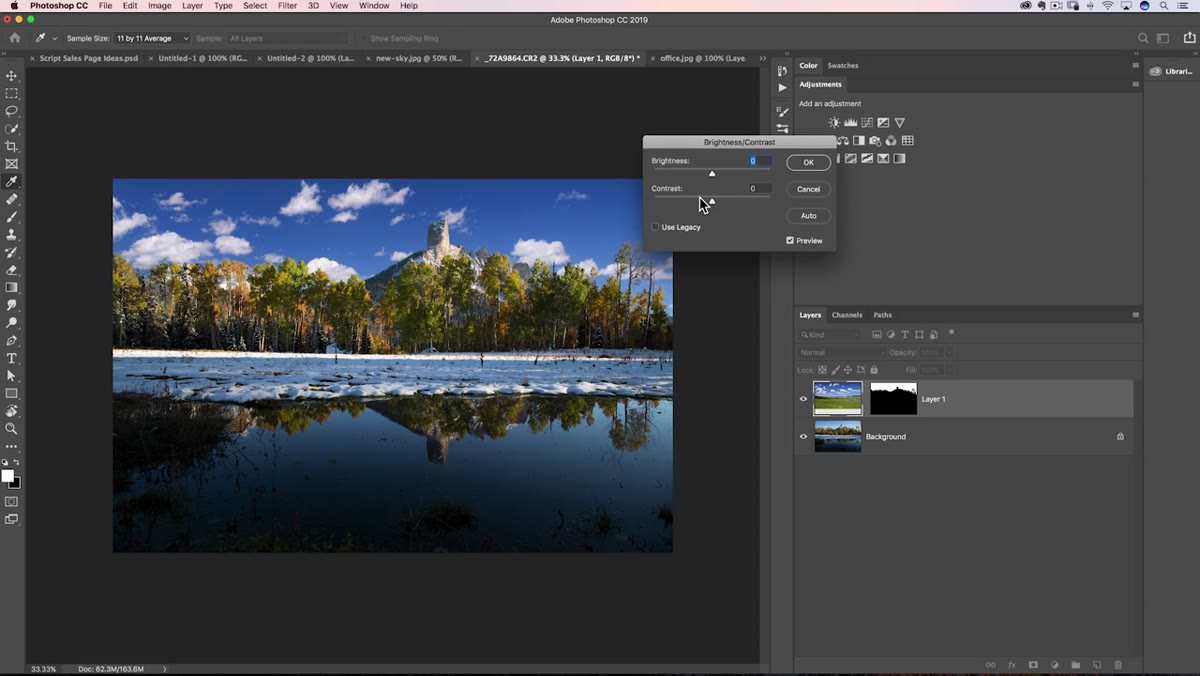
Step 5: Fix the Root Cause First, Brightness Matching the Replacement Sky
 Brightness/Contrast adjustment being applied to the sky layer
Here’s the practical fix Matt points out before reaching for any fringe-specific tools: if your replacement sky is dramatically darker or brighter than the original, adjust it before you try to defringe. With the sky layer selected, go to Image > Adjustments > Brightness/Contrast and nudge the brightness until the replacement sky is closer in value to the original. When the tonal difference between the two images shrinks, the fringe becomes far less visible, sometimes invisibly so.
Brightness/Contrast adjustment being applied to the sky layer
Here’s the practical fix Matt points out before reaching for any fringe-specific tools: if your replacement sky is dramatically darker or brighter than the original, adjust it before you try to defringe. With the sky layer selected, go to Image > Adjustments > Brightness/Contrast and nudge the brightness until the replacement sky is closer in value to the original. When the tonal difference between the two images shrinks, the fringe becomes far less visible, sometimes invisibly so.
He deliberately skips this step in the tutorial to demonstrate the worst-case scenario, which is smart. Showing the technique under hard conditions is more useful than only showing it when everything cooperates. But in actual client work, matching the sky’s brightness before masking will save you a ton of cleanup time on the back end. It’s one of those “work smart before you work hard” moves.
One Thing Worth Adding From Experience
The brightness-matching trick Matt mentions is genuinely underrated, and it’s one I’ve started applying earlier in my compositing process rather than treating it as a fix after the fact. If I’m pulling a sky from my library, I’ll do a rough brightness comparison before I even finalize the selection. If the values are wildly different, I’ll either choose a different sky or pre-adjust the brightness on the replacement before pasting it in. That way the selection errors that do exist are working with you instead of against you.
The other thing I’d add: the sky doesn’t have to match perfectly in terms of color to work. It needs to match in terms of tone and direction of light. I’ve seen technically impressive skies completely destroy a composite because the light was coming from the wrong side. Getting the brightness in the same ballpark, as Matt shows here, is step one. Checking the light direction is step two. Do both before you spend twenty minutes with a fringe brush.
The single biggest takeaway from this tutorial is that fringes are usually a symptom, not the root problem. Chasing them with defringe tools without addressing the underlying contrast mismatch is like turning up the radio to cover an engine noise. Match your tones first, refine your selection second, and you’ll often find the fringe is already mostly gone before you’ve applied a single dedicated fix.
Watch the full tutorial on YouTube for the portrait cutout examples Matt also covers, which bring in a different set of techniques worth adding to your toolkit.
Comments
Leave a Comment