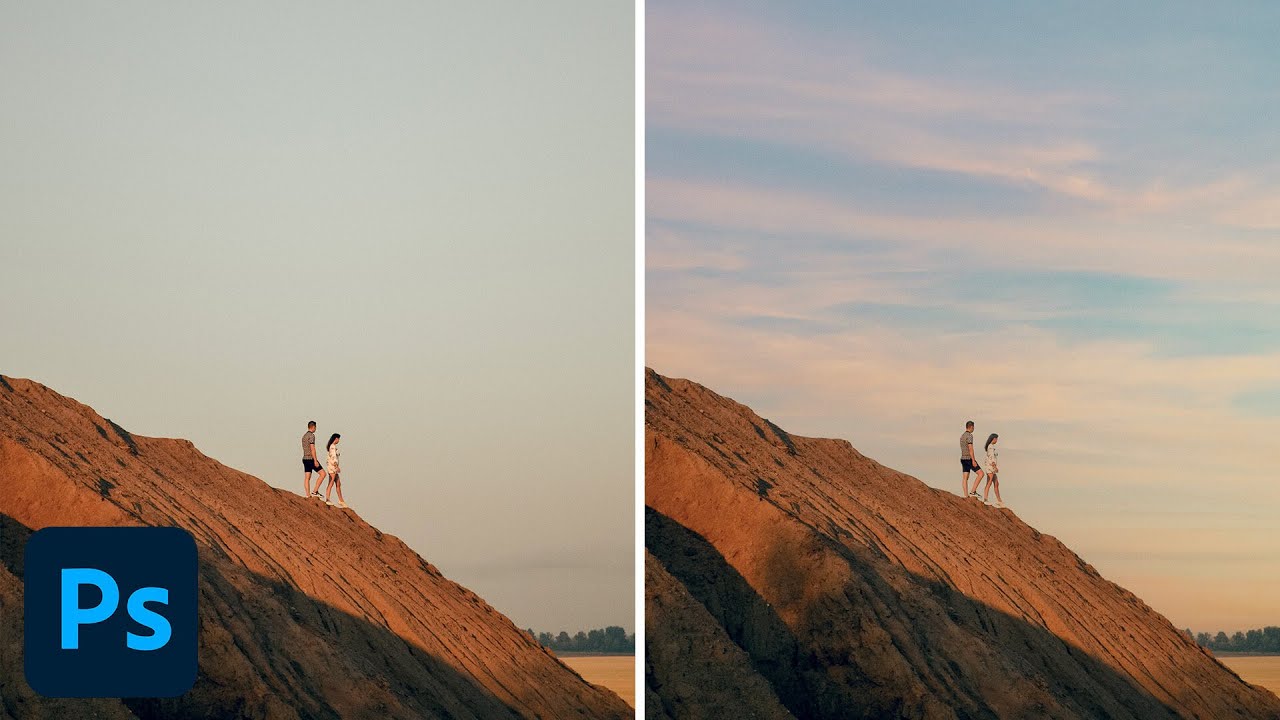
I used to spend embarrassing amounts of time hand-masking skies. We’re talking careful pen tool work, refine edge passes, the whole ritual. Then a friend watched me do it, said nothing, and later sent me a screenshot of a finished composite that took him 20 minutes. I had spent three days on mine. That specific kind of humiliation is what motivates me to actually learn the tools Photoshop has already built for me.
Sky replacement is one of those tools. It showed up in Photoshop a few versions back and I mostly dismissed it as a gimmick for people who don’t know how to use masks. Turns out I was wrong, and Aaron Nace from PHLEARN does a great job of showing exactly why in this tutorial. Watch the full tutorial on YouTube before or after following this breakdown. It’s a fast watch and the results are genuinely impressive.
What makes this technique worth your time is not just the automation. It’s the workflow that comes after, specifically how you blend the replaced sky so it actually looks like it belongs in the photo. That part is where most people stop short. Here’s how the whole thing works.
Step 1: Open the Sky Replacement Dialog
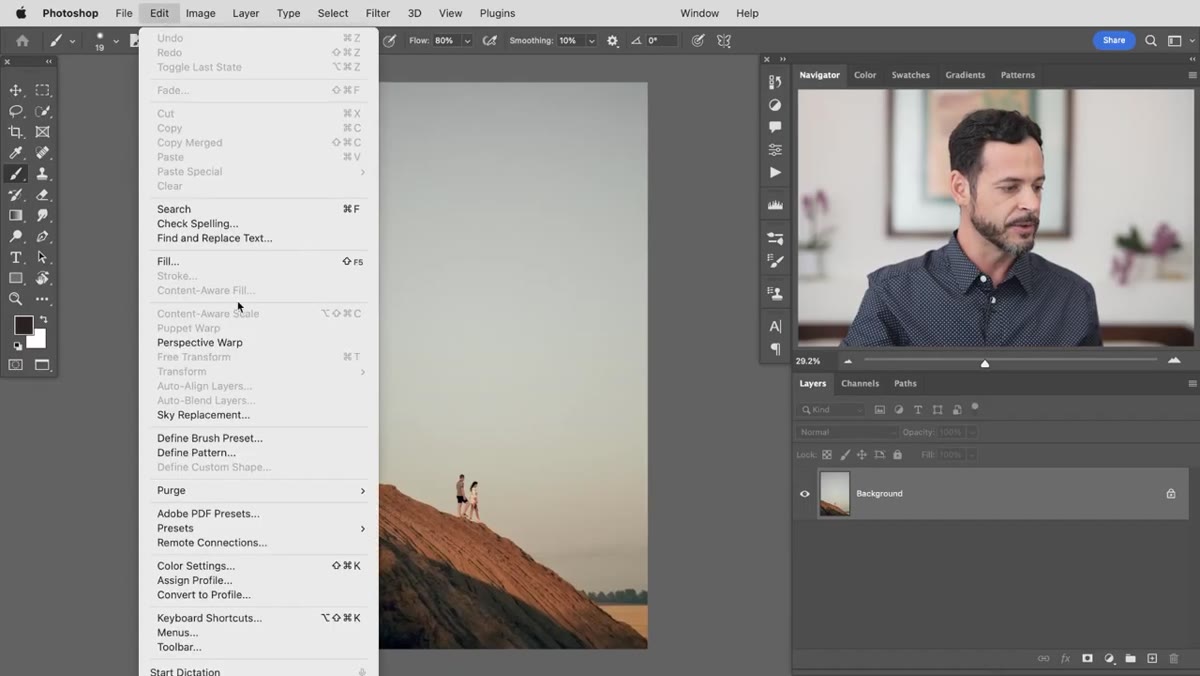 Edit menu open with Sky Replacement option highlighted
Navigate to Edit, then scroll down to Sky Replacement. That’s it. The dialog will open directly on your image and Photoshop will immediately detect the sky region and make a first attempt at swapping it out with one of its built-in options. The built-in skies are organized into folders like Blue Skies and Spectacular, and you can click through thumbnails to see live previews on your photo. It’s surprisingly snappy.
Edit menu open with Sky Replacement option highlighted
Navigate to Edit, then scroll down to Sky Replacement. That’s it. The dialog will open directly on your image and Photoshop will immediately detect the sky region and make a first attempt at swapping it out with one of its built-in options. The built-in skies are organized into folders like Blue Skies and Spectacular, and you can click through thumbnails to see live previews on your photo. It’s surprisingly snappy.
The previews update in real time, which makes it easy to audition options quickly. That said, the default library is limited. You’ll probably look through the built-ins and find that none of them quite match the mood you’re going for. That’s where the next step comes in.
Step 2: Create Your Own Sky Folder and Load Custom Images
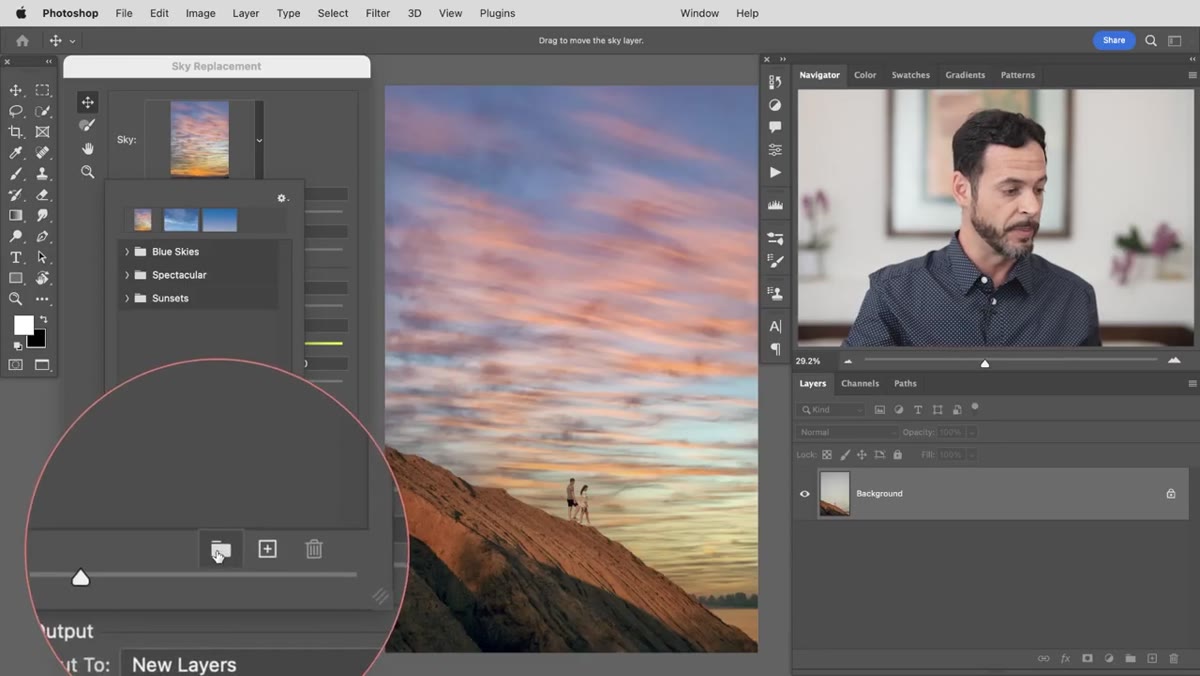 Sky Replacement dialog showing the group folder icon
In the sky selection panel, look for a small folder icon and click it to create a new group. Name it whatever makes sense to you, something like “My Skies” works fine. Then click the plus icon inside that new folder to browse for your own images. You can shift-click to select multiple files at once, so load up a batch rather than adding them one at a time.
Sky Replacement dialog showing the group folder icon
In the sky selection panel, look for a small folder icon and click it to create a new group. Name it whatever makes sense to you, something like “My Skies” works fine. Then click the plus icon inside that new folder to browse for your own images. You can shift-click to select multiple files at once, so load up a batch rather than adding them one at a time.
Aaron pulls his skies from Pexels, which is a solid free stock photo site with a good selection of high-resolution sky images. The key thing to look for when sourcing your own skies is matching the general brightness and direction of light to your base photo. If your original image has warm, low-angle light, a flat midday blue sky is going to fight it no matter how much you tweak the sliders. Rough tonal matching upfront saves a lot of fussing later.
Step 3: Select Your Sky and Dial In the Edge Blend
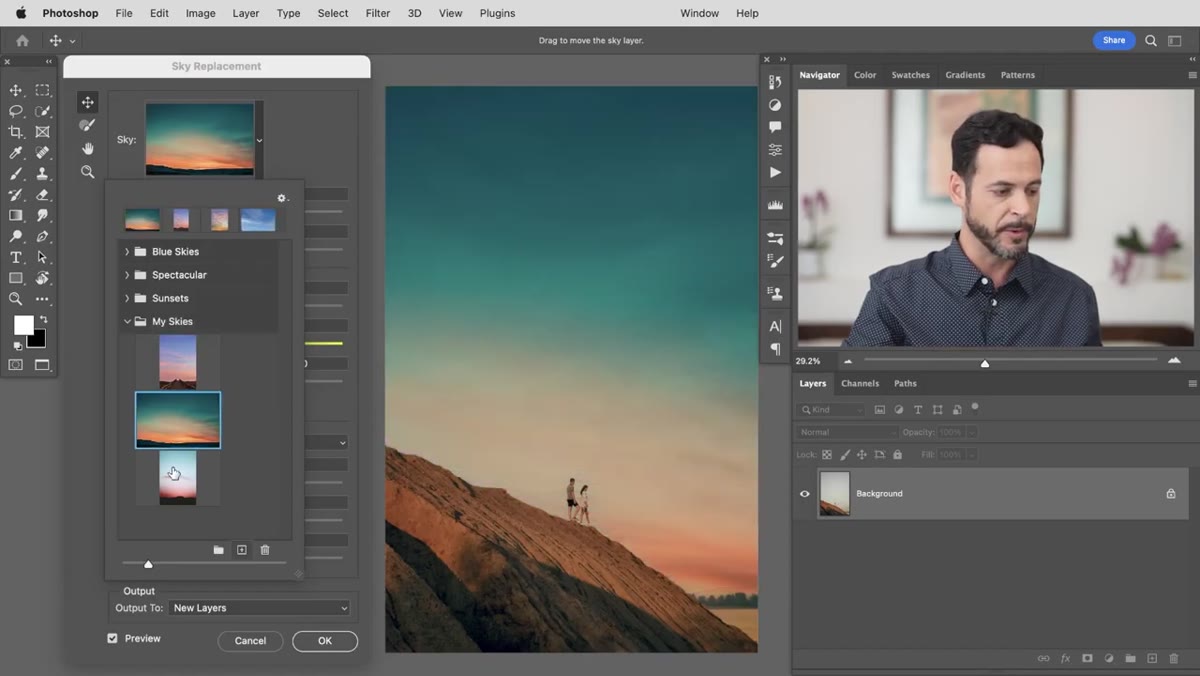 Custom sky loaded and showing in the preview with edge sliders visible
Once your custom skies are loaded, click through them to find the one that works best. After you pick one, your attention goes to the Edge Shift slider. Sliding this in or out adjusts how tight or soft the transition is between your new sky and the existing foreground. There’s no universal correct setting here. It varies by image depending on how much contrast exists between the original sky and the horizon line.
Custom sky loaded and showing in the preview with edge sliders visible
Once your custom skies are loaded, click through them to find the one that works best. After you pick one, your attention goes to the Edge Shift slider. Sliding this in or out adjusts how tight or soft the transition is between your new sky and the existing foreground. There’s no universal correct setting here. It varies by image depending on how much contrast exists between the original sky and the horizon line.
Push and pull this slider until the edge looks natural. If you’re working with a photo that has trees, buildings, or other irregular silhouettes along the horizon, you may need a softer edge to handle the complexity. If it’s a clean horizon line, you can get away with something tighter.
Step 4: Adjust Brightness, Color Temperature, and Scale
 Brightness and color temperature sliders being adjusted in dialog
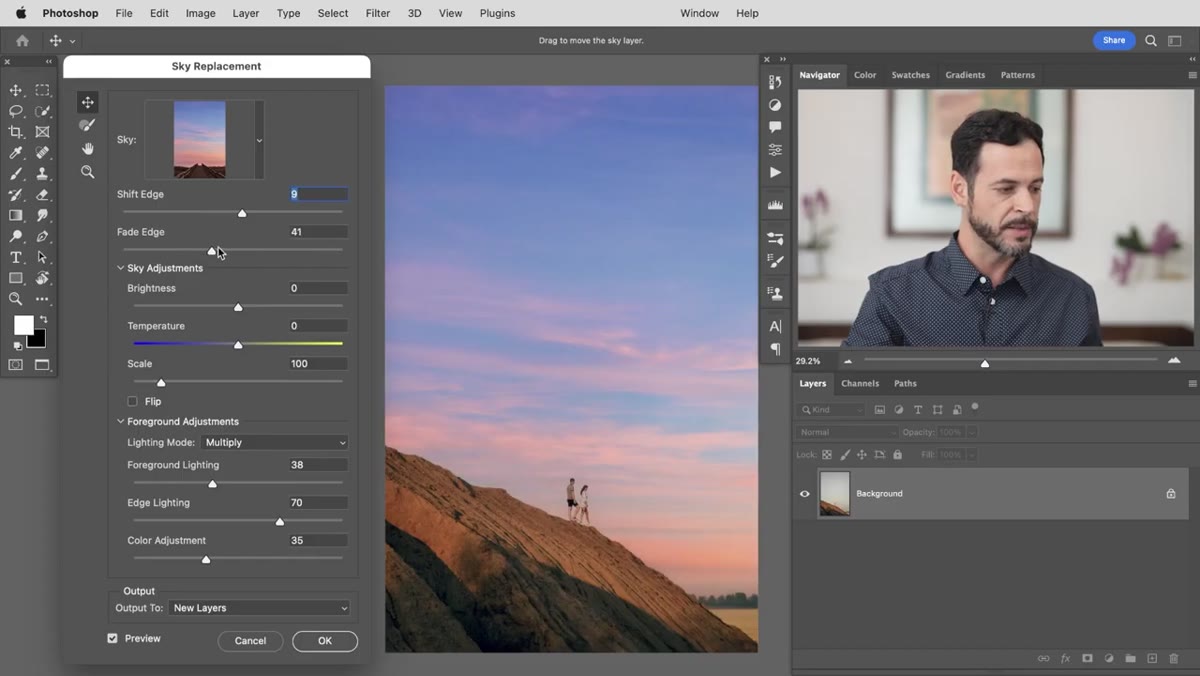
The Sky Replacement dialog includes sliders for brightness and color temperature for the sky itself. Brightness is straightforward. Bring it down if your replacement sky reads as too blown out compared to your foreground, or up if it’s sitting too dark. Color temperature lets you shift the sky cooler or warmer, which is useful for bridging the gap between the tones in your new sky and the light quality in your original photo.
Brightness and color temperature sliders being adjusted in dialog
The Sky Replacement dialog includes sliders for brightness and color temperature for the sky itself. Brightness is straightforward. Bring it down if your replacement sky reads as too blown out compared to your foreground, or up if it’s sitting too dark. Color temperature lets you shift the sky cooler or warmer, which is useful for bridging the gap between the tones in your new sky and the light quality in your original photo.
The Scale slider controls how large or zoomed in the sky image appears. Bringing it up fills more of the frame with dramatic cloud formations if your sky has them. You can also flip the sky horizontally, which is worth trying if the light direction in the sky image contradicts the light falling on your subjects.
Step 5: Output to New Layers and Keep Your Options Open
 OK button at bottom of dialog with Output to New Layers option selected
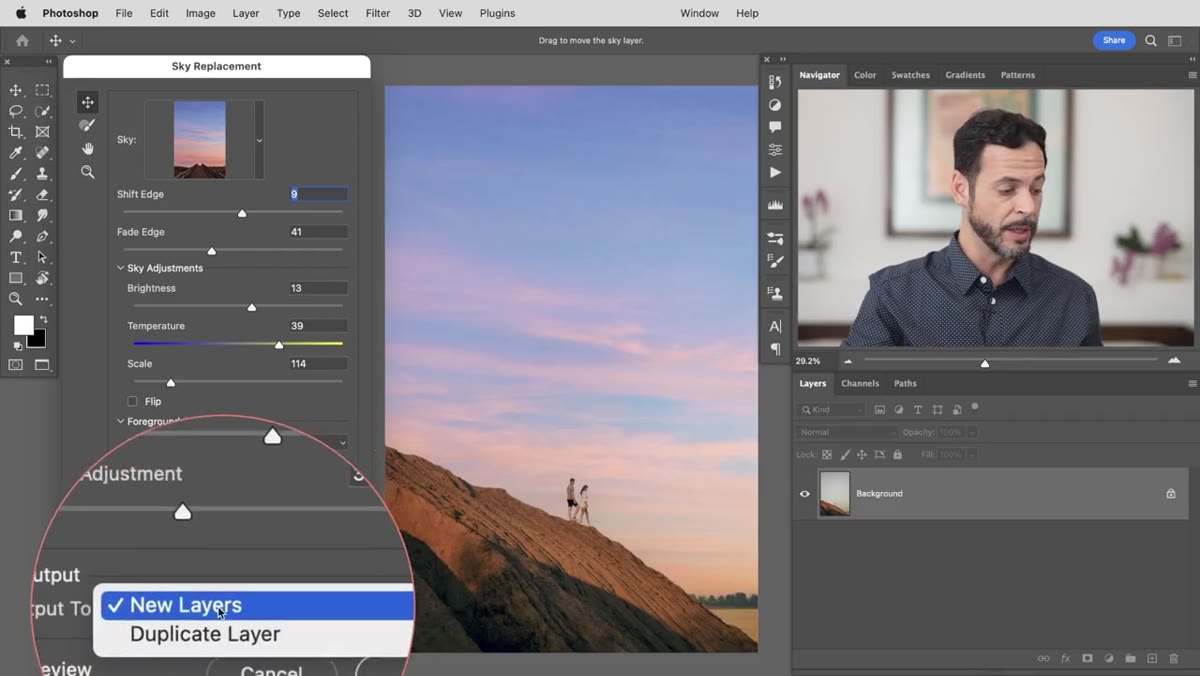
At the bottom of the dialog, make sure the output setting is set to New Layers, then hit OK. Photoshop will generate a Sky Replacement group in your layers panel. This group contains the masked sky layer plus any adjustments the dialog applied. You can toggle the whole group on and off to compare before and after, and you can go back in and tweak individual layers inside the group.
OK button at bottom of dialog with Output to New Layers option selected
At the bottom of the dialog, make sure the output setting is set to New Layers, then hit OK. Photoshop will generate a Sky Replacement group in your layers panel. This group contains the masked sky layer plus any adjustments the dialog applied. You can toggle the whole group on and off to compare before and after, and you can go back in and tweak individual layers inside the group.
Outputting to new layers rather than flattening is non-negotiable. You want to be able to go back. Always.
Step 6: Use a Levels Adjustment Layer to Finish the Blend
 Levels adjustment layer being added clipped to the sky layer
This is the step that separates a sky swap that looks composited from one that looks real. Add a Levels adjustment layer directly above the sky layer inside the Sky Replacement group, then clip it to the sky layer by holding Alt and clicking between the two layers. The small downward arrow icon confirms it’s clipped, meaning it only affects the sky and not the rest of the image.
Levels adjustment layer being added clipped to the sky layer
This is the step that separates a sky swap that looks composited from one that looks real. Add a Levels adjustment layer directly above the sky layer inside the Sky Replacement group, then clip it to the sky layer by holding Alt and clicking between the two layers. The small downward arrow icon confirms it’s clipped, meaning it only affects the sky and not the rest of the image.
Use the Levels panel to fine-tune contrast, brightness, and midtones in the sky independently. This is where you can really push the sky to feel like it was photographed in the same conditions as your subjects. Small adjustments here do a lot of heavy lifting for realism.
One Thing I’d Add: Check Your Foreground Color Casts
The dialog actually includes a Foreground Adjustments section that attempts to shift the color of the ground elements to match the new sky. It’s easy to overlook. I’d recommend experimenting with it, but doing the final color correction with a separate Hue/Saturation or Color Balance layer outside the Sky Replacement group. That way you have full control and can adjust it without re-opening the sky dialog. When the light in a sky image is dramatically different from the original, the foreground will look disconnected no matter how good the edge is. Fixing the foreground color is what closes that gap.
The single biggest takeaway here is this: the automated part is just the starting point. The real work is in the blending, specifically the edge tuning and that final Levels clip. Get those right and nobody will know the sky was ever anything different.
Watch the full tutorial on YouTube to see Aaron walk through all of this in real time. It’s one of those techniques that clicks much faster once you see the sliders moving.
Comments
Leave a Comment