There’s a specific kind of embarrassment that comes from sending a client a composite where the shadow falls in the completely wrong direction. The subject looks like they’re lit from the left, and the shadow is pointing left too. Rookie mistake, but I made it more than once before I started being deliberate about it. Shadows are one of those things that your eye catches immediately when they’re wrong, even if the person looking can’t explain why the image feels off. Get them right and the whole thing holds together. Get them wrong and it just looks like a bad Photoshop job, which, for those of us who do this professionally, is basically a personal insult.
I came across this technique in a Kelvin Designs tutorial on building and manipulating shadows in Photoshop, and it’s worth your time. Watch the full tutorial on YouTube before or after reading this breakdown. Kelvin walks through a full composite, using a road photo and a sky image, and uses the process to demonstrate how shadows need to respond to the actual light source in a scene. Not the fake light you want. The real one you’ve committed to.
The core lesson here isn’t just “add a drop shadow.” It’s about building a shadow system that respects angle, perspective, blur falloff, and opacity together. Miss one of those variables and the illusion collapses.
Step 1: Set Up Your Source Files
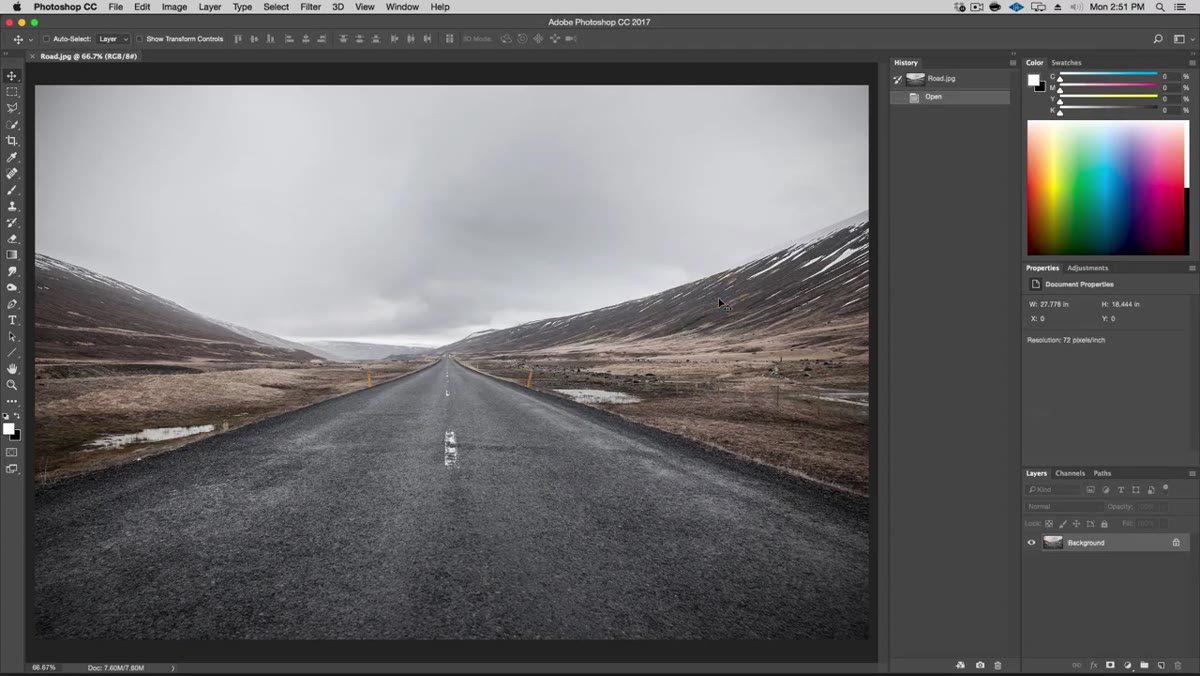 Two source files open in Photoshop, road and sky images side by side
Start with your two images open in Photoshop. In Kelvin’s example he’s working with a road photo and a sky image. The sky is noticeably larger than the road file, which matters in the next step. Name your layers clearly right from the start. “Sky” and “Road” isn’t glamorous, but future-you will appreciate not hunting through eight layers named “Layer 1 copy 3.” Seriously, label everything. This is the Photoshop habit that separates people who work efficiently from people who suffer.
Two source files open in Photoshop, road and sky images side by side
Start with your two images open in Photoshop. In Kelvin’s example he’s working with a road photo and a sky image. The sky is noticeably larger than the road file, which matters in the next step. Name your layers clearly right from the start. “Sky” and “Road” isn’t glamorous, but future-you will appreciate not hunting through eight layers named “Layer 1 copy 3.” Seriously, label everything. This is the Photoshop habit that separates people who work efficiently from people who suffer.
Step 2: Bring the Sky into the Composite and Scale It Down
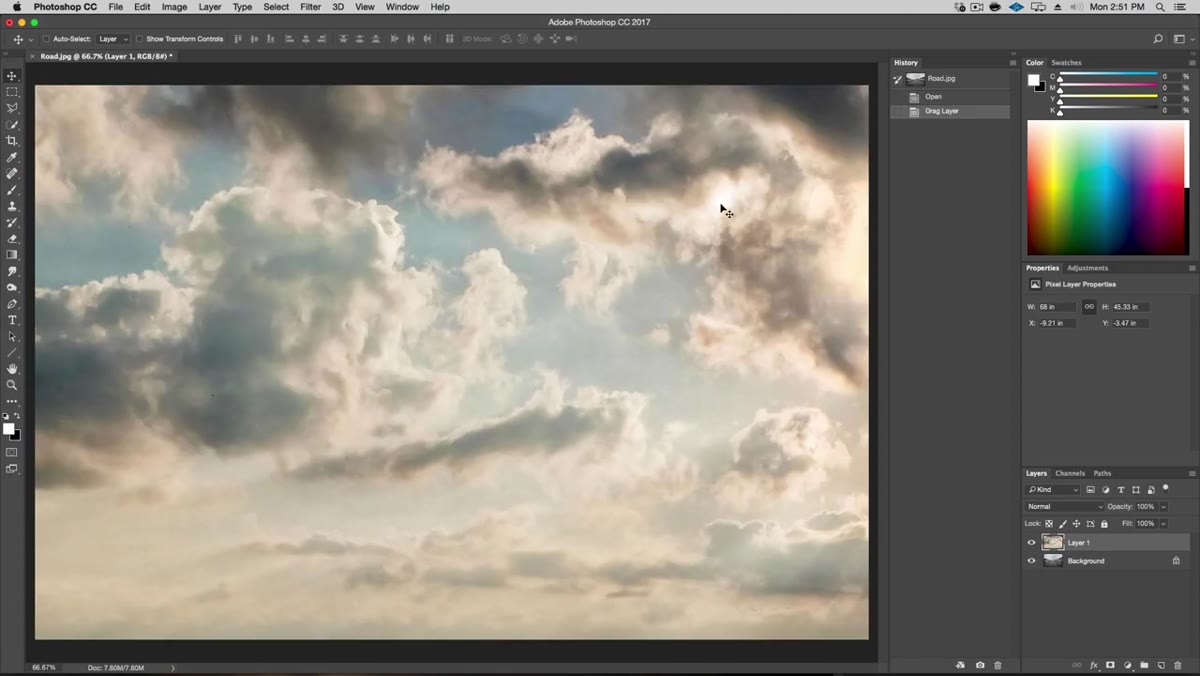 Sky layer being dragged into road document with Move tool
Use the Move tool to drag the sky layer into your road document. Once it’s there, set the sky layer to Multiply blend mode temporarily. This lets you see through it while you’re positioning and transforming, which makes the whole process much less of a guessing game. Then hit Command+T (Ctrl+T on Windows) to enter Free Transform. Hold Alt+Shift while dragging a corner handle to scale the image down from the center while keeping proportions locked. Alt centers the transform, Shift locks the ratio. Two keys, both doing real work.
Sky layer being dragged into road document with Move tool
Use the Move tool to drag the sky layer into your road document. Once it’s there, set the sky layer to Multiply blend mode temporarily. This lets you see through it while you’re positioning and transforming, which makes the whole process much less of a guessing game. Then hit Command+T (Ctrl+T on Windows) to enter Free Transform. Hold Alt+Shift while dragging a corner handle to scale the image down from the center while keeping proportions locked. Alt centers the transform, Shift locks the ratio. Two keys, both doing real work.
Step 3: Flip and Position the Sky to Establish Your Light Source
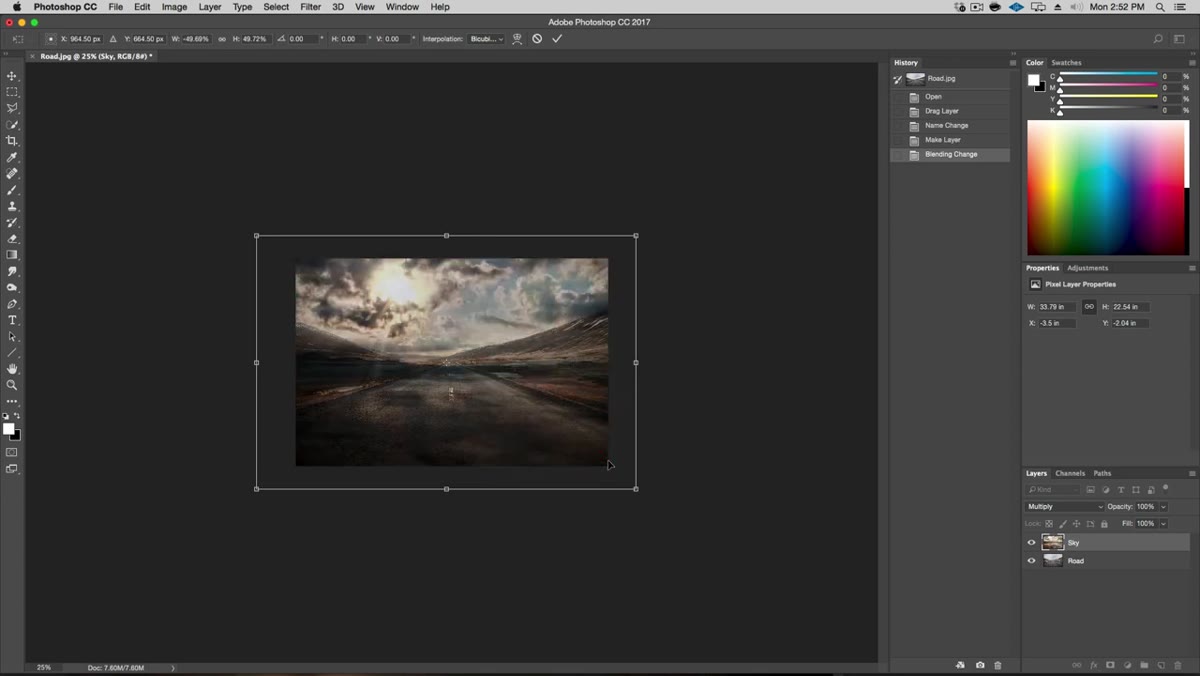 Flip Horizontal option visible in right-click context menu during Free Transform
This is the step that determines everything downstream, so don’t rush it. While still in Free Transform, right-click on the canvas and choose Flip Horizontal. Kelvin does this to put the sun on the left side of the frame, which then becomes the anchor for every shadow decision that follows. Move the sky so the sun sits at the far left edge, nearly out of frame. Use the arrow keys for pixel-level nudging rather than dragging. Once you’re happy with the horizon line alignment, press Return to commit the transform, then bring the blend mode back to Normal.
Flip Horizontal option visible in right-click context menu during Free Transform
This is the step that determines everything downstream, so don’t rush it. While still in Free Transform, right-click on the canvas and choose Flip Horizontal. Kelvin does this to put the sun on the left side of the frame, which then becomes the anchor for every shadow decision that follows. Move the sky so the sun sits at the far left edge, nearly out of frame. Use the arrow keys for pixel-level nudging rather than dragging. Once you’re happy with the horizon line alignment, press Return to commit the transform, then bring the blend mode back to Normal.
The point here is simple but easy to skip: decide where your light is coming from before you do anything else. Everything else is just executing that decision consistently.
Step 4: Convert to Smart Object Before Anything Else
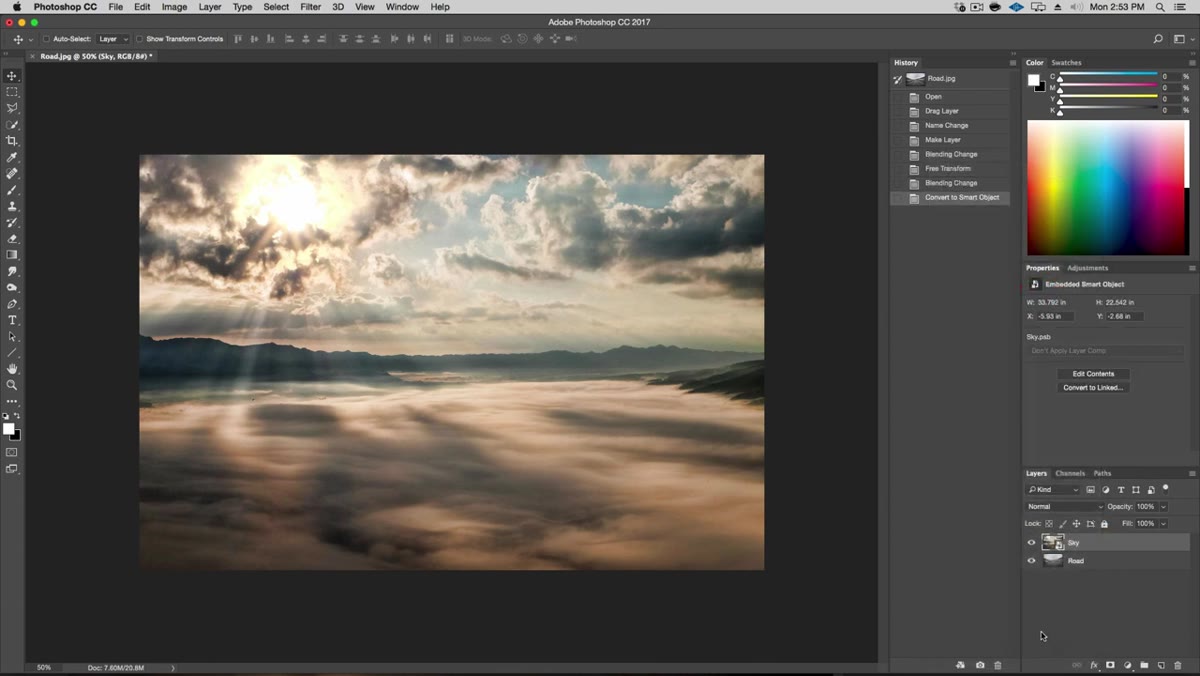 Right-click menu showing Convert to Smart Object option on sky layer
Right-click the sky layer in the Layers panel and choose Convert to Smart Object. Do this after you’ve already scaled the layer down, not before. If you convert first and then scale, the smart object is storing a massive file internally and your document gets bloated for no reason. Scale first, then convert. The smart object protects you from destructive edits going forward. Any adjustments you add later become editable filters you can tweak or remove rather than permanent changes baked into the pixels. I learned this the hard way after losing a client’s layered file to a string of bad decisions I couldn’t undo. Smart objects exist for a reason. Use them.
Right-click menu showing Convert to Smart Object option on sky layer
Right-click the sky layer in the Layers panel and choose Convert to Smart Object. Do this after you’ve already scaled the layer down, not before. If you convert first and then scale, the smart object is storing a massive file internally and your document gets bloated for no reason. Scale first, then convert. The smart object protects you from destructive edits going forward. Any adjustments you add later become editable filters you can tweak or remove rather than permanent changes baked into the pixels. I learned this the hard way after losing a client’s layered file to a string of bad decisions I couldn’t undo. Smart objects exist for a reason. Use them.
Step 5: Use Quick Selection to Isolate the Mountains
 Quick Selection tool active, selection being drawn across mountain range
Click on the road layer and grab the Quick Selection tool. Paint across the mountain range to build your initial selection. The tool is smarter than it looks, especially with high-contrast edges like mountains against sky. Where it grabs too much, hold Alt and paint back over those areas to subtract them from the selection. Where it misses, just paint over again normally to add. You’re not going for perfection here. You’re going for a solid base to refine in the next step.
Quick Selection tool active, selection being drawn across mountain range
Click on the road layer and grab the Quick Selection tool. Paint across the mountain range to build your initial selection. The tool is smarter than it looks, especially with high-contrast edges like mountains against sky. Where it grabs too much, hold Alt and paint back over those areas to subtract them from the selection. Where it misses, just paint over again normally to add. You’re not going for perfection here. You’re going for a solid base to refine in the next step.
Step 6: Refine the Edge with Select and Mask
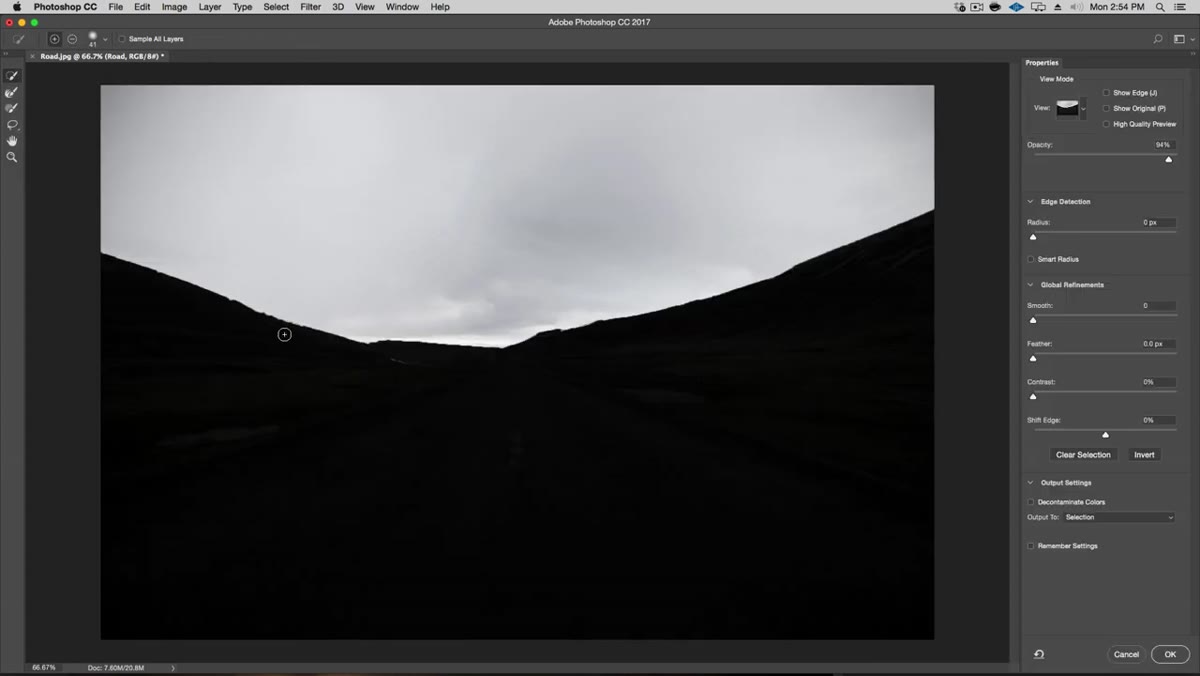 Select and Mask workspace open showing edge detection slider
With your selection active, click Select and Mask up in the options bar. This opens a dedicated workspace for cleaning up messy edges. Kelvin uses a small amount of Edge Detection to smooth out the mountain silhouette without making it look digitally softened. Bring the Smooth slider up slightly too. The goal is an edge that reads as natural rather than one that looks traced. Snow edges near the sky are tricky because the tonal values are so close, but the Edge Detection algorithm handles it better than a manual approach most of the time. Output the result as a Layer Mask directly on the road layer.
Select and Mask workspace open showing edge detection slider
With your selection active, click Select and Mask up in the options bar. This opens a dedicated workspace for cleaning up messy edges. Kelvin uses a small amount of Edge Detection to smooth out the mountain silhouette without making it look digitally softened. Bring the Smooth slider up slightly too. The goal is an edge that reads as natural rather than one that looks traced. Snow edges near the sky are tricky because the tonal values are so close, but the Edge Detection algorithm handles it better than a manual approach most of the time. Output the result as a Layer Mask directly on the road layer.
My Take: Blend Mode Previewing Is Genuinely Underrated
I started doing the Multiply preview trick on every composite I build now, not just when I’m positioning sky replacements. Dropping a layer into Multiply temporarily while you’re placing it gives you an honest read of how its values interact with what’s underneath. It’s faster than toggling visibility on and off and gives you more information than a straight opacity reduction. Composite work is largely about relationships between layers, and Multiply mode makes those relationships visible while you work. Once you commit to a position, flip back to Normal and evaluate with fresh eyes. Fifteen seconds of extra process, noticeably better placement decisions.
The single most important thing Kelvin demonstrates here is this: establish your light source first and build everything else to match it. Shadows, highlights, blend modes, masking, all of it flows from that one committed decision. A composite that ignores this looks assembled. One that respects it looks photographed.
Watch the full tutorial on YouTube to see Kelvin walk through the full shadow manipulation, including the opacity and angle adjustments that make the final image land.
Comments (6)
Bookmarked. Coming back to this one for sure.
Shared this with my photography group. Everyone loved it.
Applied this to my portfolio shots and the improvement is noticeable.
This saved me so much time on my last edit. Wish I'd found this sooner.
Just used this on a wedding shoot edit. Client was thrilled.
Applied this to my portfolio shots and the improvement is noticeable.
Leave a Comment