
There’s a specific kind of design panic that hits when you’re building a thumbnail, a print layout, or a client deliverable and the photo just doesn’t fit the canvas the way you need it to. The subject is dead center, you need room on one side for text, and if you just scale the whole image you’ll either crop something important or squash the person in the frame into a funhouse mirror version of themselves. I’ve been there more times than I’d like to admit, usually at a coffee shop at 11pm with a deadline in the morning.
In this Scott Kelby tutorial, he solves that exact problem using a feature that’s been sitting in Photoshop for years without getting nearly enough credit: Content Aware Scale. Not Content Aware Fill, not the Remove tool, not any of the flashier AI stuff. Just a quiet, reliable tool that lets you stretch a background without mangling whatever’s standing in front of it. Watch the full tutorial on YouTube if you want to see Kelby walk through it in real time. If you want the step-by-step breakdown you can follow without switching tabs, keep reading.
The scenario he uses is practical and immediately recognizable: a fashion photo where the subject is centered, but the thumbnail layout needs her shifted to one side so text can breathe on the other. Dragging the image over creates a gap. Stretching the whole image distorts her. Content Aware Scale handles both problems at once, and here’s exactly how to do it.
Step 1: Set Up Your Canvas Gap
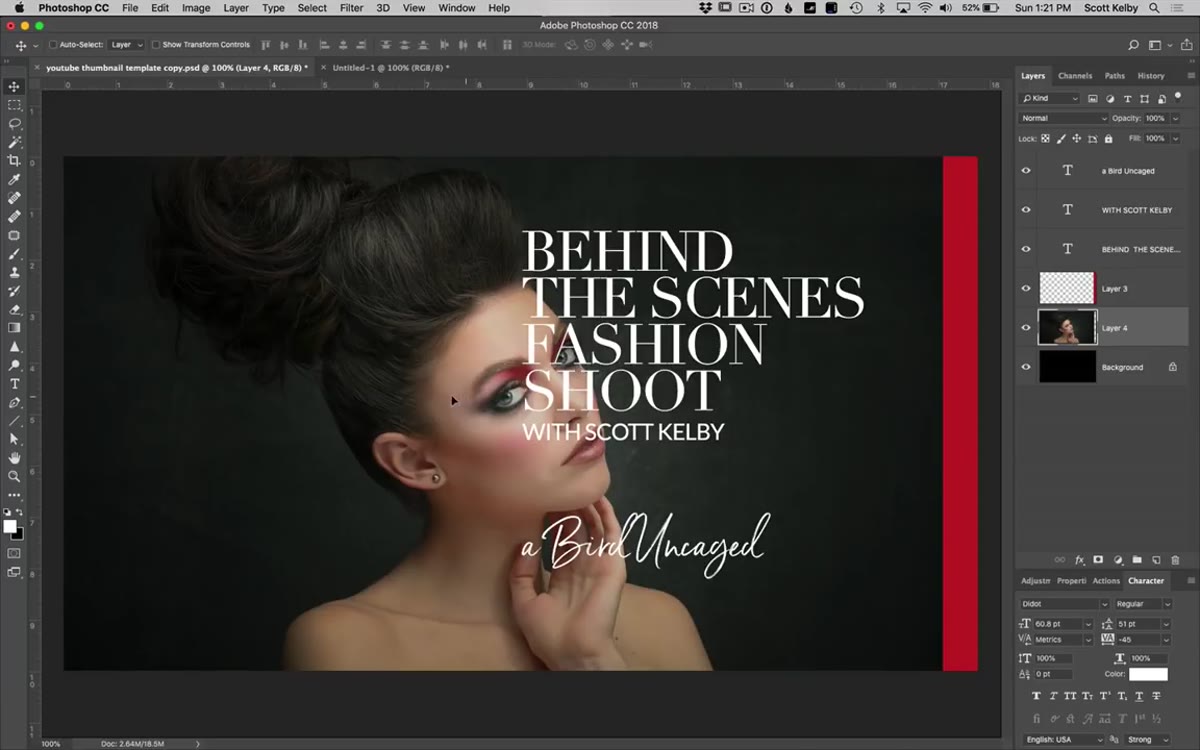 Black gap visible after image repositioned on canvas
Before Content Aware Scale can do its thing, you need the problem to exist. Move your subject-heavy photo so the person sits to one side of the canvas, leaving a gap (black, white, transparent, whatever your canvas background is) on the other side. This is the space you’re trying to fill without distorting your subject. Make sure your image layer is selected in the Layers panel and you have a clear sense of where the photo ends and the canvas gap begins.
Black gap visible after image repositioned on canvas
Before Content Aware Scale can do its thing, you need the problem to exist. Move your subject-heavy photo so the person sits to one side of the canvas, leaving a gap (black, white, transparent, whatever your canvas background is) on the other side. This is the space you’re trying to fill without distorting your subject. Make sure your image layer is selected in the Layers panel and you have a clear sense of where the photo ends and the canvas gap begins.
Step 2: Open Content Aware Scale
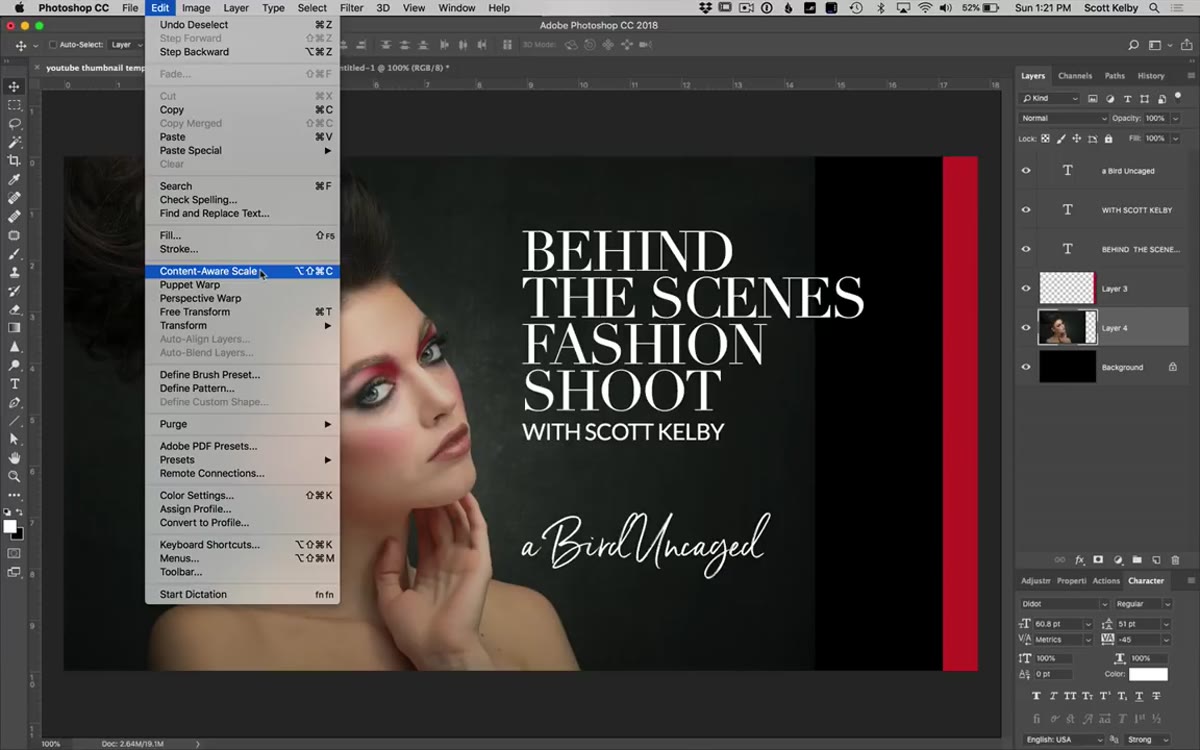 Edit menu open with Content Aware Scale highlighted
Go to Edit, then choose Content Aware Scale. It’s not in Filter, it’s not in Image. It lives in Edit, which is part of why people forget it exists. The transform handles that appear look almost identical to Free Transform, so it’s easy to assume you’ve made a wrong turn. You haven’t. The difference is everything that happens when you actually start dragging.
Edit menu open with Content Aware Scale highlighted
Go to Edit, then choose Content Aware Scale. It’s not in Filter, it’s not in Image. It lives in Edit, which is part of why people forget it exists. The transform handles that appear look almost identical to Free Transform, so it’s easy to assume you’ve made a wrong turn. You haven’t. The difference is everything that happens when you actually start dragging.
Step 3: Drag to Fill the Gap (and Watch What Happens)
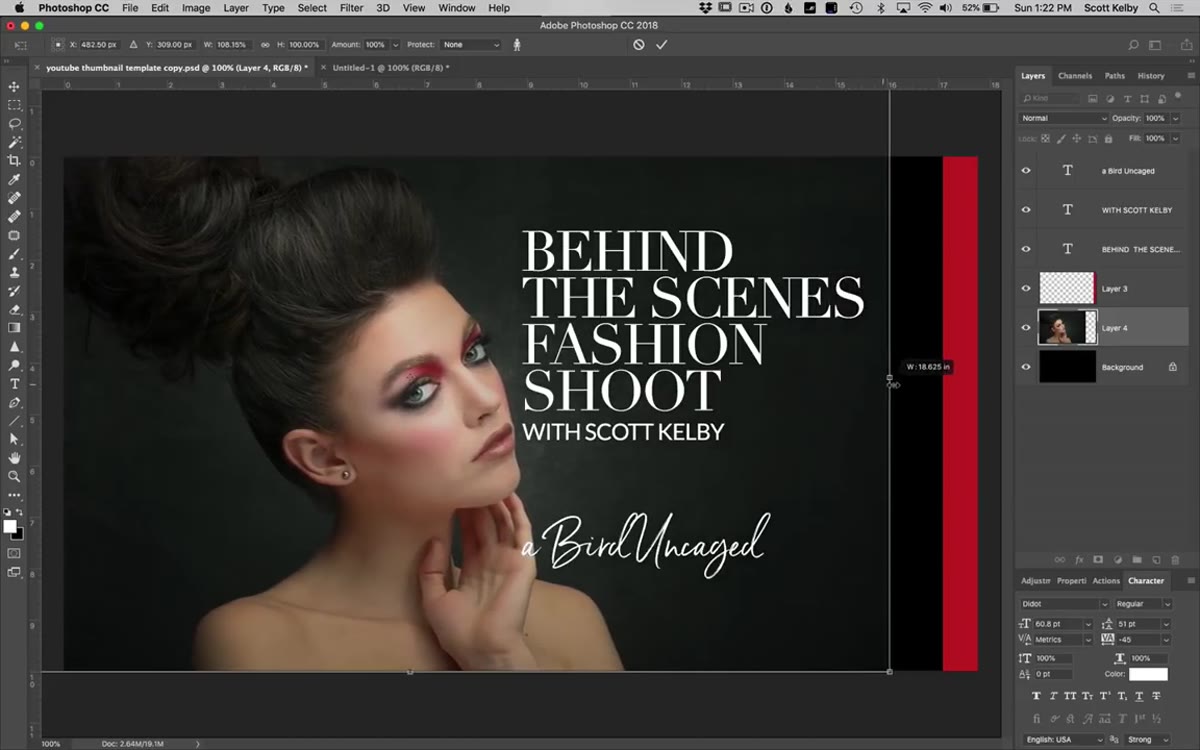 Canvas being stretched, subject beginning to distort slightly
Grab the edge handle on the side with the gap and drag to stretch the image toward the canvas edge. At a moderate stretch, you’ll notice the background expands while the subject stays relatively intact. Photoshop is making smart decisions about what’s background and what isn’t. Push it too far though and the subject starts to warp. Her shoulders get wider, her proportions go soft. That’s the ceiling of what the tool can do on its own, and it’s the problem the next two steps solve.
Canvas being stretched, subject beginning to distort slightly
Grab the edge handle on the side with the gap and drag to stretch the image toward the canvas edge. At a moderate stretch, you’ll notice the background expands while the subject stays relatively intact. Photoshop is making smart decisions about what’s background and what isn’t. Push it too far though and the subject starts to warp. Her shoulders get wider, her proportions go soft. That’s the ceiling of what the tool can do on its own, and it’s the problem the next two steps solve.
Step 4: Turn On Skin Tone Protection
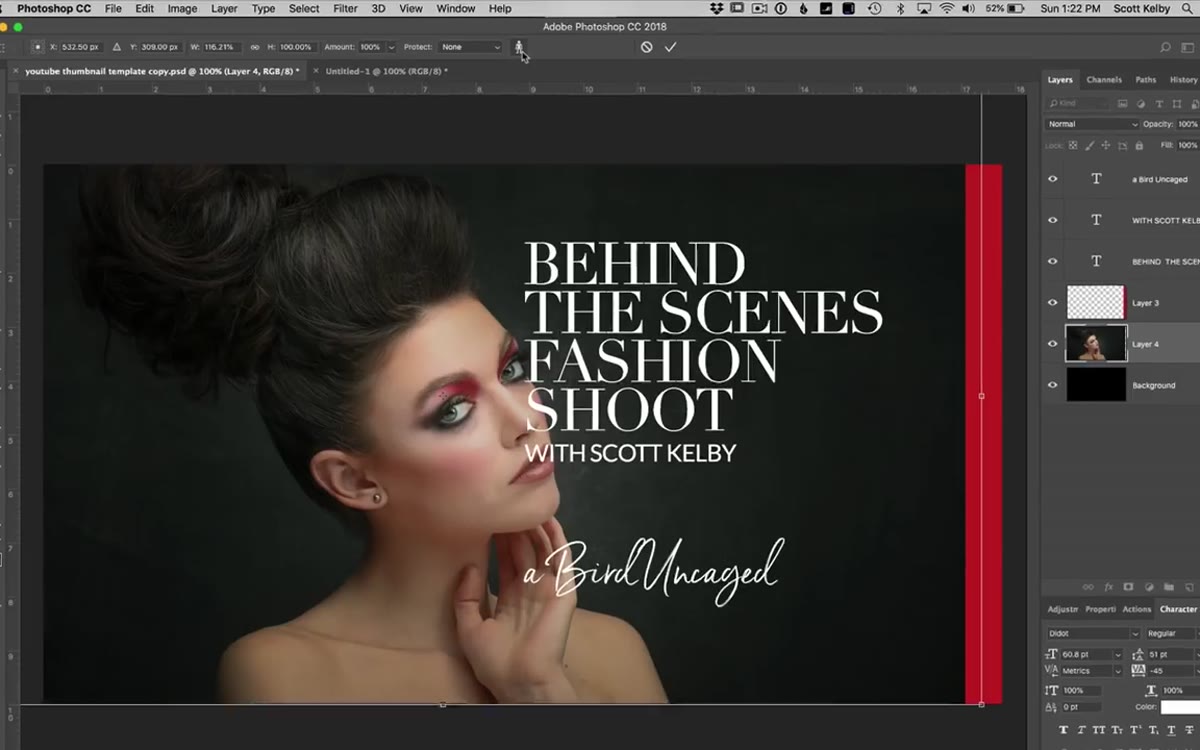 Toolbar showing the human figure/skin tone protect icon highlighted
Up in the Options Bar at the top of the screen, there’s a small icon that looks like a little human figure. Click it. This tells Photoshop to look for skin tones in the image and treat them as protected content, meaning the algorithm will work even harder to avoid stretching those areas. It’s not a perfect fix on its own for aggressive stretches, but it noticeably extends how far you can push the effect before things start looking wrong. Enable it before you drag, not after.
Toolbar showing the human figure/skin tone protect icon highlighted
Up in the Options Bar at the top of the screen, there’s a small icon that looks like a little human figure. Click it. This tells Photoshop to look for skin tones in the image and treat them as protected content, meaning the algorithm will work even harder to avoid stretching those areas. It’s not a perfect fix on its own for aggressive stretches, but it noticeably extends how far you can push the effect before things start looking wrong. Enable it before you drag, not after.
Step 5: Make a Selection Around Your Subject
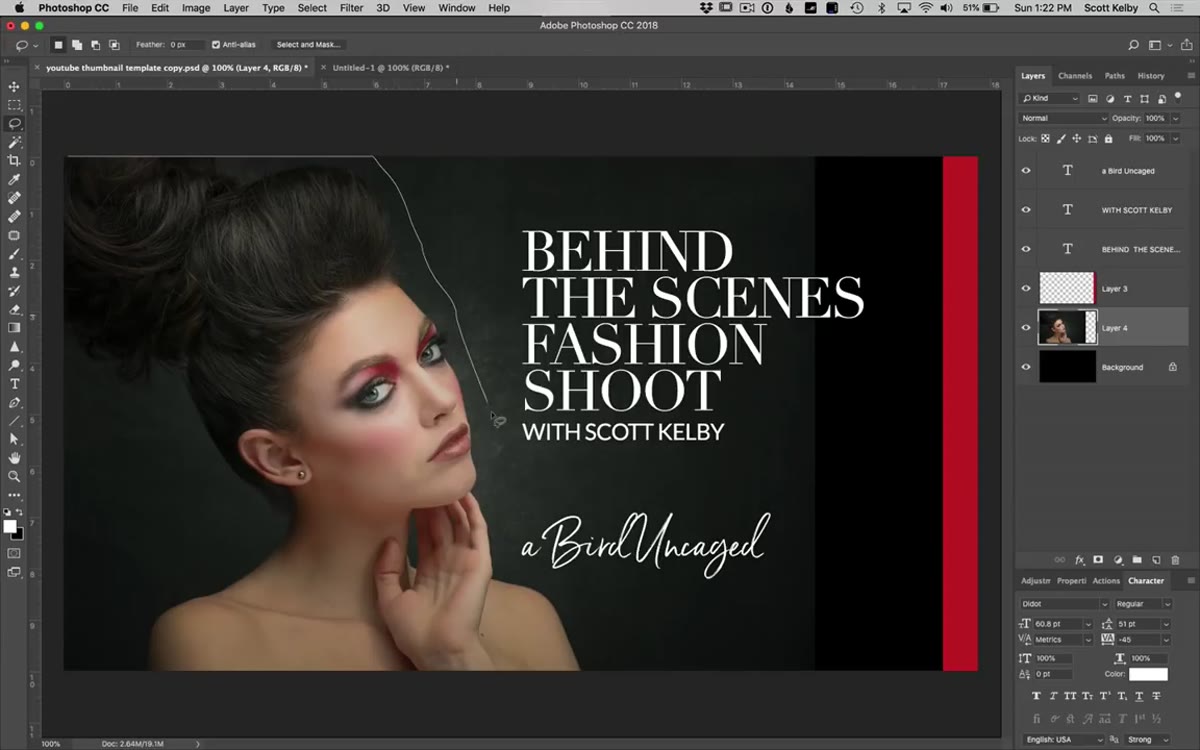 Subject selected with marquee or lasso tool on canvas
If skin tone protection still isn’t enough and your subject starts distorting before you’ve filled the gap, you need to manually tell Photoshop what to protect. Hit Escape to cancel the current Content Aware Scale operation. Then use any selection tool, a lasso, the Object Selection tool, or a quick marquee, to draw a selection around the subject. It doesn’t need to be pixel-perfect. You just need a selection that reasonably covers the person and keeps background out of it.
Subject selected with marquee or lasso tool on canvas
If skin tone protection still isn’t enough and your subject starts distorting before you’ve filled the gap, you need to manually tell Photoshop what to protect. Hit Escape to cancel the current Content Aware Scale operation. Then use any selection tool, a lasso, the Object Selection tool, or a quick marquee, to draw a selection around the subject. It doesn’t need to be pixel-perfect. You just need a selection that reasonably covers the person and keeps background out of it.
Step 6: Save the Selection as an Alpha Channel
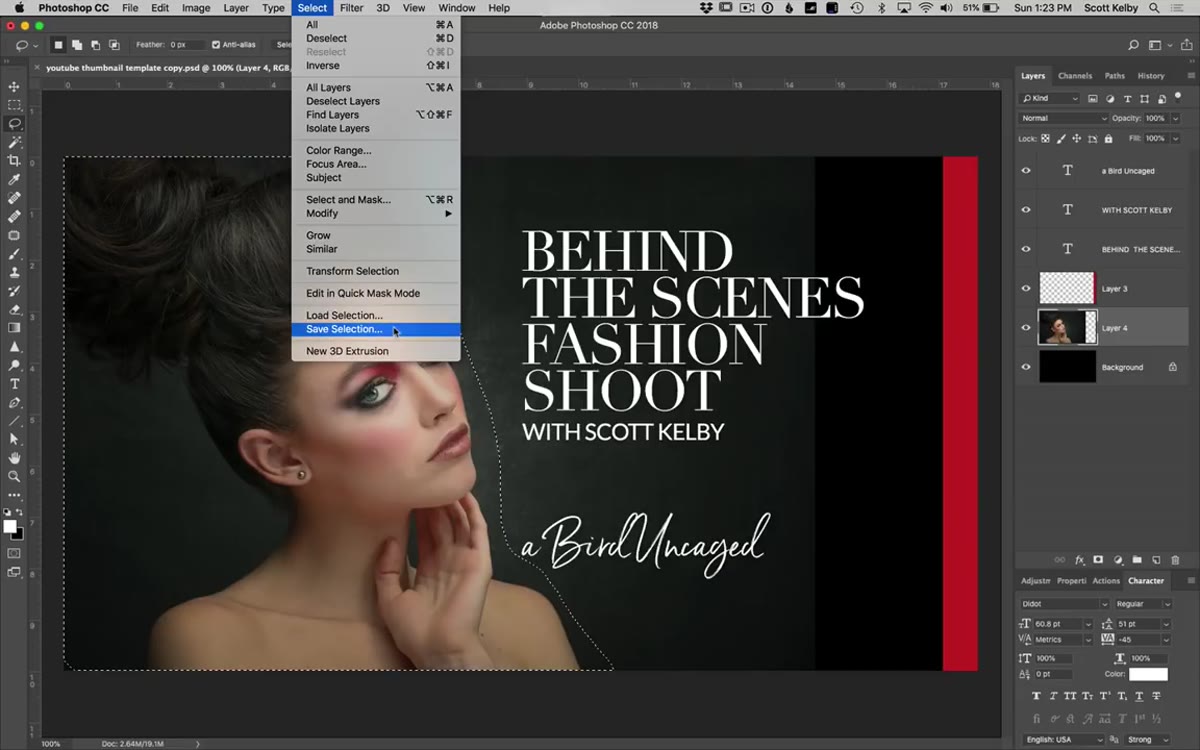 Save Selection dialog box open with alpha channel being created
With your selection active, go to Select, then Save Selection. A dialog box appears. Give it a name or just leave it as the default “Alpha 1” and click OK. This converts your selection into a stored alpha channel, which Content Aware Scale can read directly. You’ll see it appear in the Channels panel if you check. Now press Ctrl+D (Cmd+D on Mac) to deselect.
Save Selection dialog box open with alpha channel being created
With your selection active, go to Select, then Save Selection. A dialog box appears. Give it a name or just leave it as the default “Alpha 1” and click OK. This converts your selection into a stored alpha channel, which Content Aware Scale can read directly. You’ll see it appear in the Channels panel if you check. Now press Ctrl+D (Cmd+D on Mac) to deselect.
Step 7: Run Content Aware Scale with the Alpha Protection Active
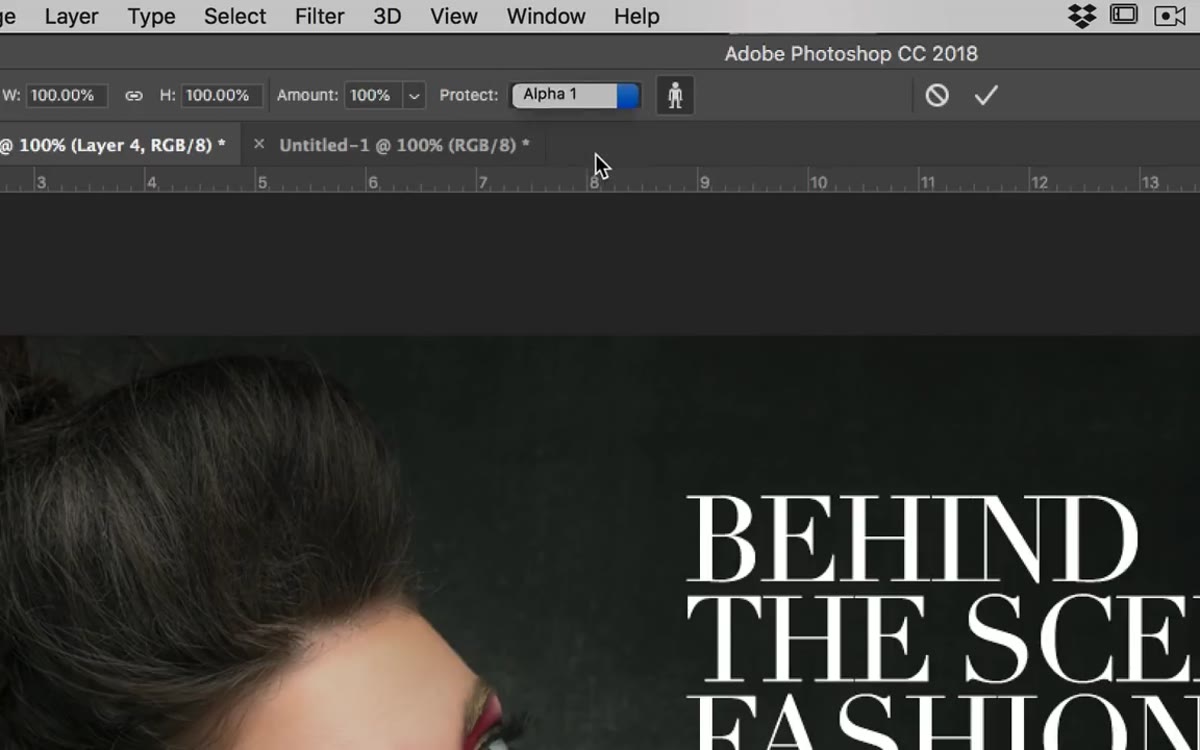 Content Aware Scale Protect dropdown showing Alpha 1 selected
Go back to Edit, Content Aware Scale. This time, before you drag anything, look at the Options Bar at the top. There’s a dropdown labeled “Protect.” Click it and choose the alpha channel you just saved, “Alpha 1” or whatever you named it. Now drag the edge handle to fill the gap. The subject doesn’t move. The background stretches. The alpha channel is acting as a hard instruction to Photoshop: everything inside this boundary is off-limits. You can push the stretch significantly further than before and the subject holds together.
Content Aware Scale Protect dropdown showing Alpha 1 selected
Go back to Edit, Content Aware Scale. This time, before you drag anything, look at the Options Bar at the top. There’s a dropdown labeled “Protect.” Click it and choose the alpha channel you just saved, “Alpha 1” or whatever you named it. Now drag the edge handle to fill the gap. The subject doesn’t move. The background stretches. The alpha channel is acting as a hard instruction to Photoshop: everything inside this boundary is off-limits. You can push the stretch significantly further than before and the subject holds together.
Where I’d Take This Further
The thumbnail use case Kelby demonstrates is exactly where I reach for this tool most, but the other scenario he mentions briefly is worth its own attention: fitting a photo into a fixed print size. If you’ve ever bought a frame only to realize your photo is the wrong aspect ratio, you know the usual options are bad. Crop and lose part of the image. Scale uniformly and add bars. Content Aware Scale gives you a third option, stretch the less important parts of the image to fill the frame while keeping the subject intact. I’ve used this to fit landscape photos into portrait frames for client print orders without any visible distortion. The key is to always work on a duplicate layer or a Smart Object so you have a clean original to go back to. Content Aware Scale is not a reversible operation once you flatten and save, and I learned the importance of non-destructive habits the expensive way on a different project entirely.
The biggest takeaway here is that Content Aware Scale does something genuinely difficult, filling space and preserving subjects, without requiring you to learn a complex masking workflow or spend time with generative tools that might produce inconsistent results. The alpha channel trick is what separates a tool that mostly works from one that actually works. Kelby’s tutorial is short and practical, which is exactly why it’s worth your four minutes. Watch the full tutorial on YouTube and then go check your Edit menu. This one’s been waiting for you.
Comments
Leave a Comment