There’s a specific kind of humiliation that comes from spending three days on a composite — cutting, masking, refining, swearing at your pen tool — only to have someone glance over your shoulder and say “why didn’t you just use Blend If?” I’ve been there. I didn’t even know what Blend If was at the time, which made it worse. It lives inside Layer Styles, a panel most people open by accident and immediately close, which means one of Photoshop’s most powerful compositing tools has been quietly sitting there, ignored, while the rest of us wrestled with layer masks like it’s 2009.
In this Aaron Nace (PHLEARN) tutorial from his 30 Days of Photoshop series, he walks through exactly how Blend If works – starting from first principles with a simple gradient demo before moving into a real-world sky replacement. It’s the kind of tutorial that reframes a feature you thought was decorative into something you’ll use on actual client work. Watch the full tutorial on YouTube – but here’s the step-by-step breakdown if you want to follow along right now.
Step 1: Set Up a Demo Layer to Understand the Mechanics
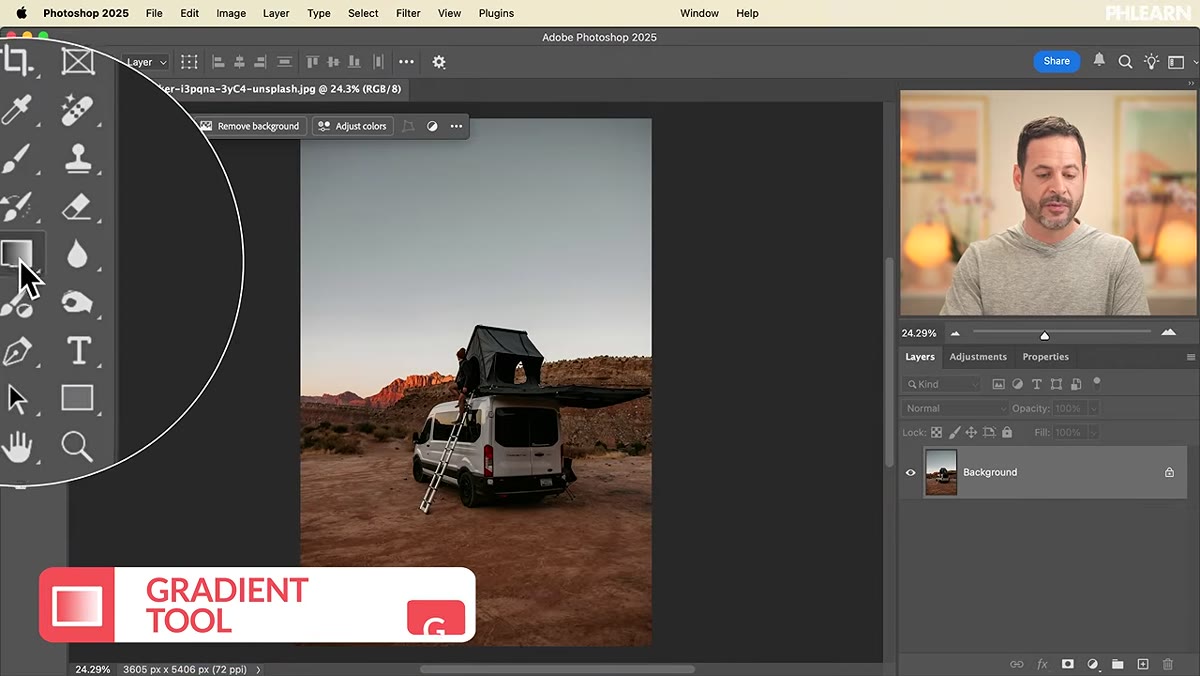 Gradient tool selected, black to white linear gradient being drawn
Before touching a real photo, Aaron builds a simple test case: a black-to-white gradient on a new layer sitting above a base image. Hit G to grab the Gradient tool, pick a linear black-to-white gradient from the Basics presets, and drag from the top of your canvas to the bottom. This isn’t your actual composite – it’s a diagnostic tool. Having a gradient as your test layer makes the Blend If sliders immediately readable because you can see exactly which tonal values are being hidden or revealed as you drag.
Gradient tool selected, black to white linear gradient being drawn
Before touching a real photo, Aaron builds a simple test case: a black-to-white gradient on a new layer sitting above a base image. Hit G to grab the Gradient tool, pick a linear black-to-white gradient from the Basics presets, and drag from the top of your canvas to the bottom. This isn’t your actual composite – it’s a diagnostic tool. Having a gradient as your test layer makes the Blend If sliders immediately readable because you can see exactly which tonal values are being hidden or revealed as you drag.
Step 2: Open the Blend If Panel
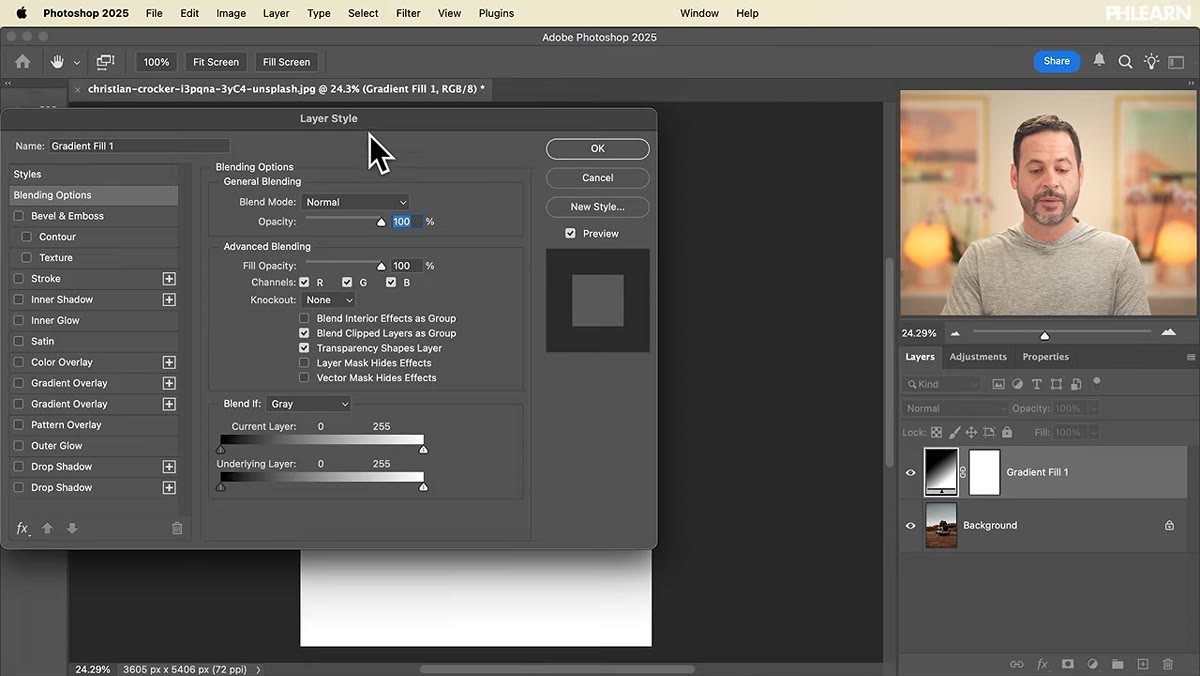 Layer Style dialog open, Blend If sliders visible at the bottom
You can get to Blend If two ways. The faster one: double-click the empty gray area to the right of your layer’s name in the Layers panel – not the thumbnail, not the name itself, the gray space. That opens the Layer Style dialog. The other route is the FX button at the bottom of the Layers panel, then Blending Options. Either way, scroll down in that dialog and you’ll see the Blend If section with two gradient bars and a set of sliders. This is where the magic lives.
Layer Style dialog open, Blend If sliders visible at the bottom
You can get to Blend If two ways. The faster one: double-click the empty gray area to the right of your layer’s name in the Layers panel – not the thumbnail, not the name itself, the gray space. That opens the Layer Style dialog. The other route is the FX button at the bottom of the Layers panel, then Blending Options. Either way, scroll down in that dialog and you’ll see the Blend If section with two gradient bars and a set of sliders. This is where the magic lives.
Step 3: Understand the “This Layer” Slider
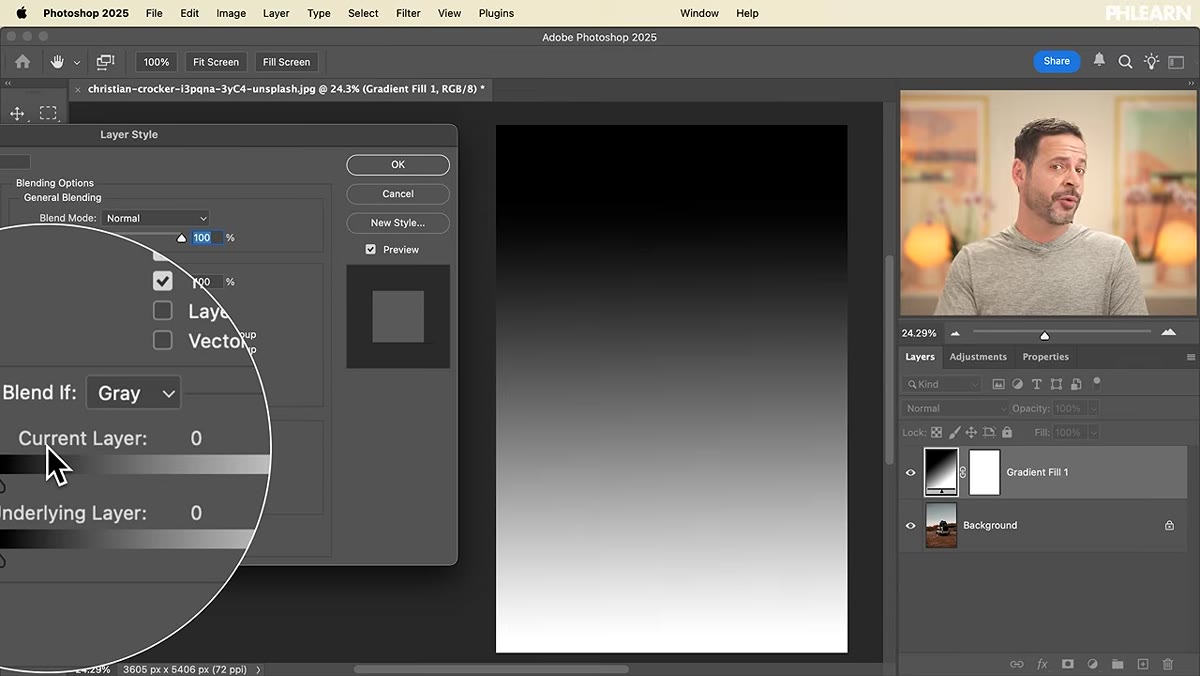 Left slider on “This Layer” bar being dragged right, dark areas disappearing
The top slider is labeled “This Layer” and it controls visibility based on the tonal values within the layer you’re currently editing. Drag the left handle to the right and Photoshop starts hiding the darker pixels on your layer – the further right you drag, the more of the shadows disappear. Drag the right handle to the left and the highlights start vanishing instead. With the gradient layer, this is really obvious: push the left slider right and the black end of the gradient evaporates. It’s blunt and a little harsh at this stage, but stay with it.
Left slider on “This Layer” bar being dragged right, dark areas disappearing
The top slider is labeled “This Layer” and it controls visibility based on the tonal values within the layer you’re currently editing. Drag the left handle to the right and Photoshop starts hiding the darker pixels on your layer – the further right you drag, the more of the shadows disappear. Drag the right handle to the left and the highlights start vanishing instead. With the gradient layer, this is really obvious: push the left slider right and the black end of the gradient evaporates. It’s blunt and a little harsh at this stage, but stay with it.
Step 4: Explore the “Underlying Layer” Slider – This Is the Real Power
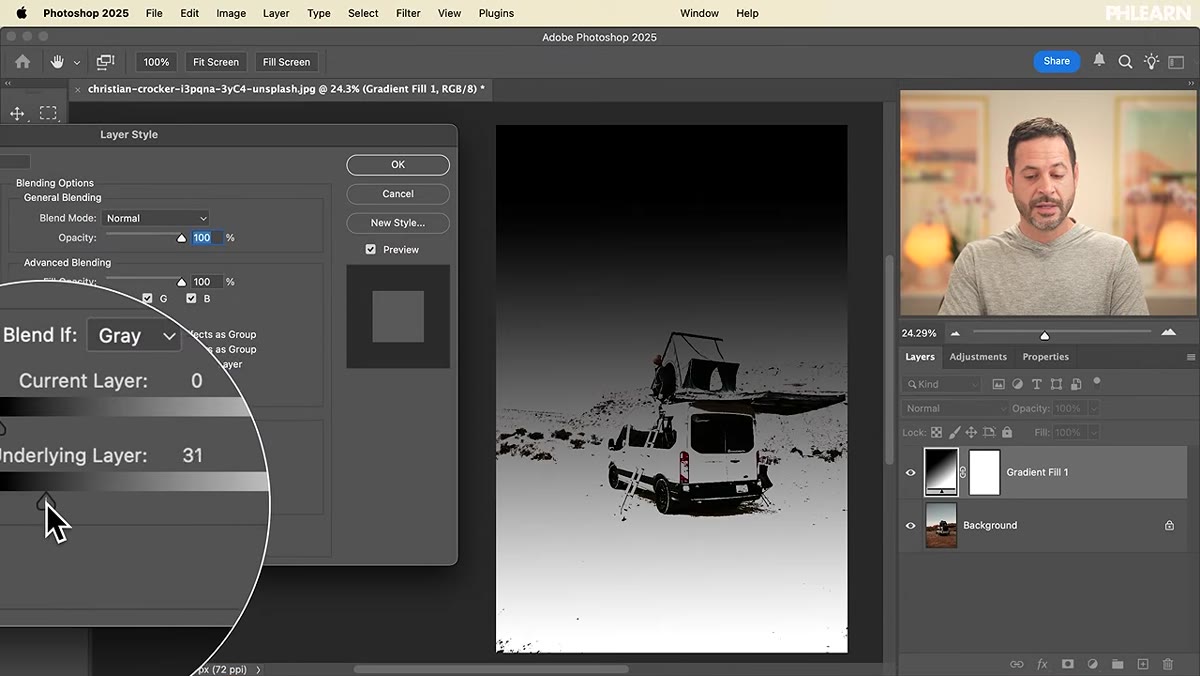 Underlying Layer slider dragged right, gradient disappearing from shadow areas of base image
The bottom slider – “Underlying Layer” – is the one that changes how you think about compositing. Instead of controlling your current layer’s own tones, it controls where your layer appears based on the brightness values of whatever is underneath it. Drag the left handle right and your layer starts disappearing from the dark areas of the base image. Push it further and your layer only shows up in the highlights. Reverse direction and your layer becomes a shadows-only element. For sky replacement, this is the slider you’ll live on – the sky layer can be told to only appear in the bright areas of the background, which naturally follows the existing light logic of your scene.
Underlying Layer slider dragged right, gradient disappearing from shadow areas of base image
The bottom slider – “Underlying Layer” – is the one that changes how you think about compositing. Instead of controlling your current layer’s own tones, it controls where your layer appears based on the brightness values of whatever is underneath it. Drag the left handle right and your layer starts disappearing from the dark areas of the base image. Push it further and your layer only shows up in the highlights. Reverse direction and your layer becomes a shadows-only element. For sky replacement, this is the slider you’ll live on – the sky layer can be told to only appear in the bright areas of the background, which naturally follows the existing light logic of your scene.
Step 5: Split the Slider Handles for Feathering
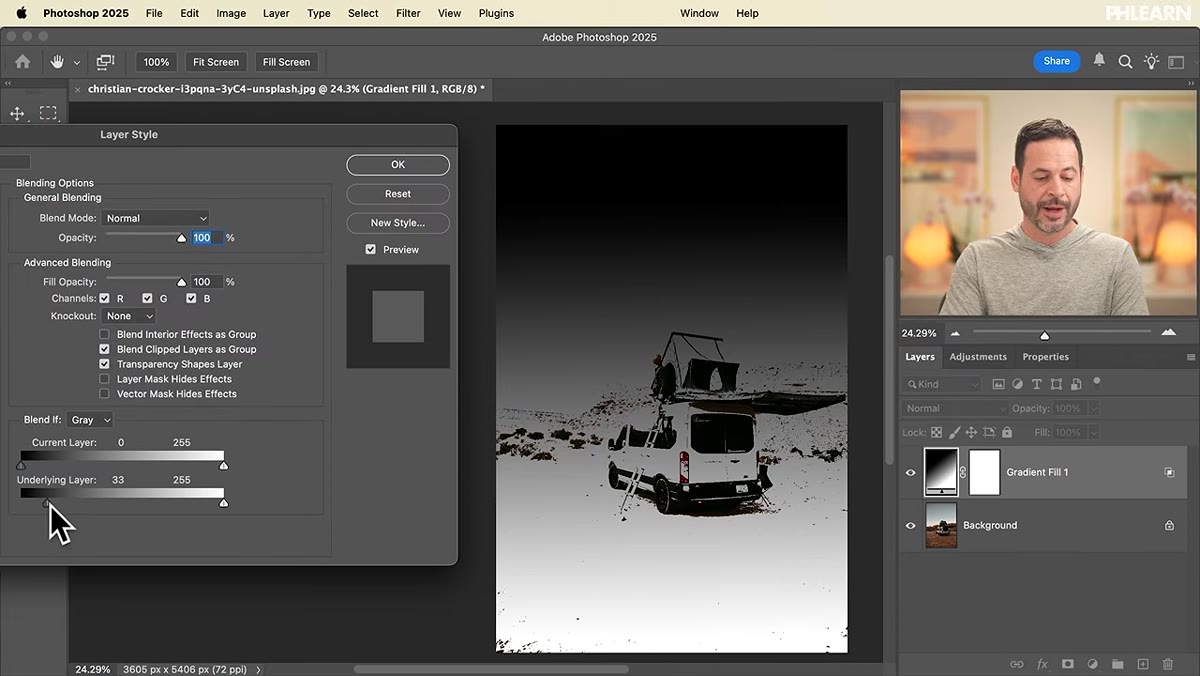
 Alt-click splitting a slider handle into two separate points
Here’s the thing that trips everyone up the first time: each end of those sliders looks like a single control point, but it’s actually two. Hold Alt (Windows) or Option (Mac) and click-drag on any slider handle and it splits into two separate points. The space between those two points creates a feathered transition – a gradual blend rather than a hard cutoff. Without this, your composite edges look like someone cut them out with scissors. With it, the layer bleeds in and out naturally across a tonal range you define. This is the step that makes Blend If usable on real work rather than just demo work.
Alt-click splitting a slider handle into two separate points
Here’s the thing that trips everyone up the first time: each end of those sliders looks like a single control point, but it’s actually two. Hold Alt (Windows) or Option (Mac) and click-drag on any slider handle and it splits into two separate points. The space between those two points creates a feathered transition – a gradual blend rather than a hard cutoff. Without this, your composite edges look like someone cut them out with scissors. With it, the layer bleeds in and out naturally across a tonal range you define. This is the step that makes Blend If usable on real work rather than just demo work.
Step 6: Apply It to a Real Sky Composite
 Sky image layer being blended into landscape using split Underlying Layer sliders
With the gradient demo making sense, the same logic applies directly to a sky replacement. Bring your new sky in as a layer above your base landscape photo. Open Layer Style on the sky layer, go to Blend If, and work the Underlying Layer slider. Drag the left handle right until the sky layer stops appearing in the dark areas (your foreground, trees, buildings). Then hold Alt/Option and split that handle – drag the left half back toward the dark end to introduce a soft transition. The sky naturally integrates with the bright areas of your image without needing a single mask.
Sky image layer being blended into landscape using split Underlying Layer sliders
With the gradient demo making sense, the same logic applies directly to a sky replacement. Bring your new sky in as a layer above your base landscape photo. Open Layer Style on the sky layer, go to Blend If, and work the Underlying Layer slider. Drag the left handle right until the sky layer stops appearing in the dark areas (your foreground, trees, buildings). Then hold Alt/Option and split that handle – drag the left half back toward the dark end to introduce a soft transition. The sky naturally integrates with the bright areas of your image without needing a single mask.
Where I’d Take This Further: Channel-Specific Blending
One thing Aaron doesn’t dig into deeply in this particular tutorial – but that’s worth knowing – is the channel selector dropdown at the top of the Blend If section. By default, it’s set to Gray, which uses overall luminosity. But you can switch it to Red, Green, or Blue and blend based on specific color channel values. If you’re dropping a blue sky into a scene where the original sky had a strong blue channel anyway, switching to the Blue channel slider can give you an even cleaner natural separation. It’s fiddly, but for difficult composites it can save you from manual masking almost entirely. Worth a ten-minute experiment on your next sky swap.
Blend If isn’t a workaround – it’s a legitimate compositing method that works with the light information already baked into your photos. The single most important habit to build is splitting those slider handles with Alt/Option every single time. A hard Blend If edge is rarely what you want; the feathered version is what actually looks like it belongs. That one gesture – hold Alt, drag to split – is the difference between a result that looks like a tutorial exercise and one that looks like a real photograph.
Watch the full tutorial on YouTube to see Aaron walk through the sky replacement from start to finish – it’s part of his 30 Days of Photoshop series and this episode alone is worth bookmarking.
Comments
Leave a Comment