I’ve spent more hours than I’d like to admit clicking through blend modes like a slot machine, hoping something useful would land. Multiply. No. Screen. Nope. Overlay. Maybe? It’s the kind of guesswork that makes you feel like you’re wasting time, which you are. And Content-Aware Fill has always felt like a magic trick that works great in demos and falls apart the moment you actually need it. Adobe Max 2019 addressed both of those pain points in ways that are genuinely useful rather than just impressive on a keynote slide.
In this Matt Kloskowski tutorial recorded live from Adobe Max in Los Angeles, Matt walks through two of the biggest updates to ship with Photoshop 2019. Watch the full tutorial on YouTube if you want to follow along with Matt directly, but I’m going to break down each feature step by step so you can put it to work without pausing and rewinding every thirty seconds.
These aren’t cosmetic changes. One removes a genuine daily frustration, and the other turns a blunt instrument into something surgical. Here’s how to use both.
Step 1: Duplicate Your Layer Before Testing Blend Modes
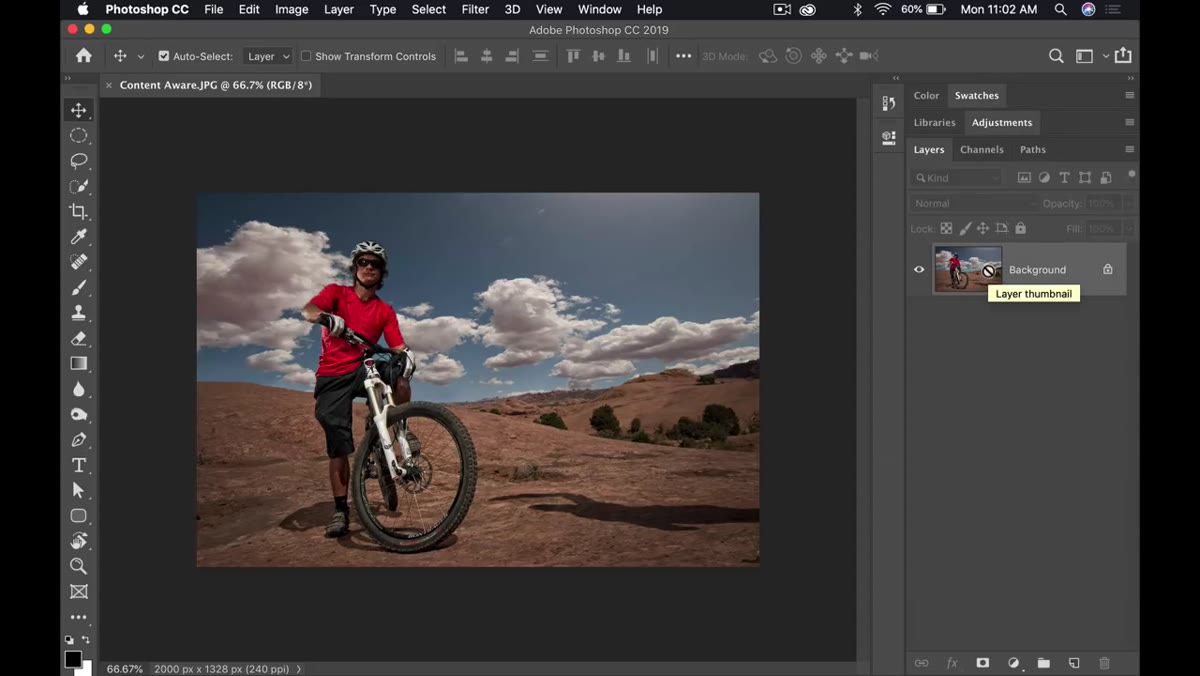 Layer panel open with base image layer visible
Before you touch the blend mode dropdown, duplicate the layer you want to experiment on. Hit Cmd+J (Mac) or Ctrl+J (Windows). This keeps your original intact and gives you a working copy to apply blend modes to. It’s a basic habit, but it matters here because you’re about to do a lot of live previewing and you don’t want to commit anything by accident.
Layer panel open with base image layer visible
Before you touch the blend mode dropdown, duplicate the layer you want to experiment on. Hit Cmd+J (Mac) or Ctrl+J (Windows). This keeps your original intact and gives you a working copy to apply blend modes to. It’s a basic habit, but it matters here because you’re about to do a lot of live previewing and you don’t want to commit anything by accident.
This step hasn’t changed, but it’s the setup that makes the next step actually useful. Get into the routine of duplicating first, experimenting second.
Step 2: Use Live Blend Mode Preview to Stop Guessing
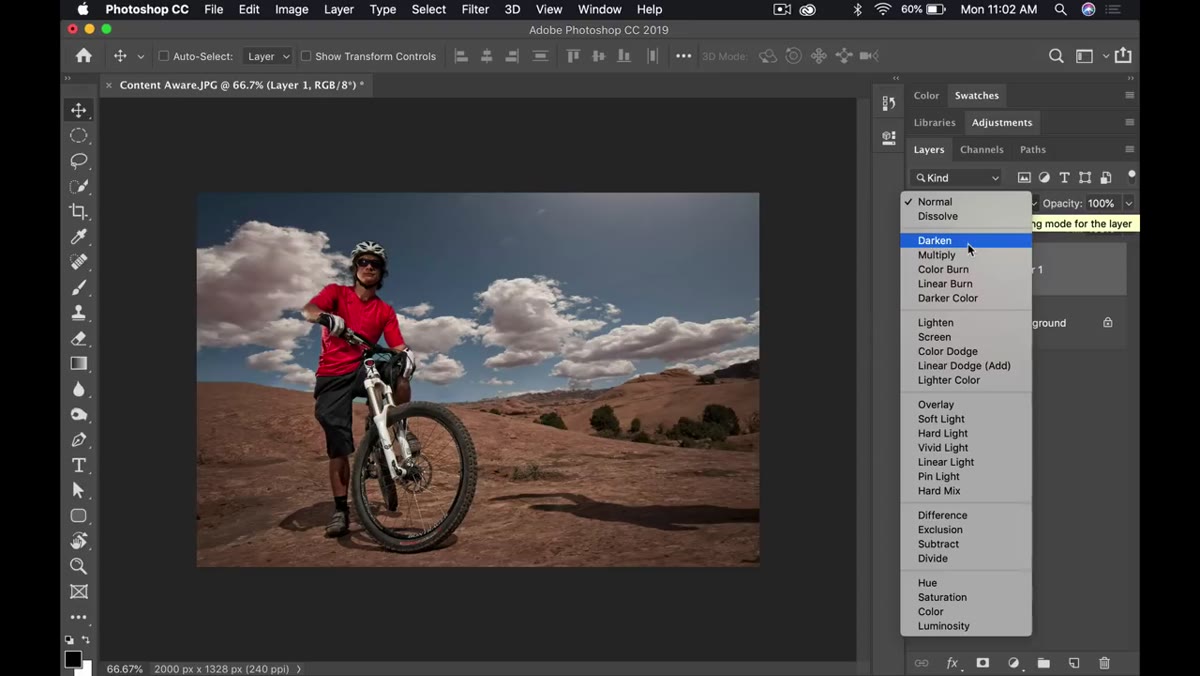 Blend mode dropdown open with live preview updating on canvas
With your duplicate layer selected, open the blend mode dropdown at the top of the Layers panel. In Photoshop 2019, hovering over any blend mode now shows you a live preview on the canvas in real time. You don’t have to click and hope. You just hover, look, move on.
Blend mode dropdown open with live preview updating on canvas
With your duplicate layer selected, open the blend mode dropdown at the top of the Layers panel. In Photoshop 2019, hovering over any blend mode now shows you a live preview on the canvas in real time. You don’t have to click and hope. You just hover, look, move on.
This sounds small. It isn’t. If you’re newer to Photoshop, blend modes have always been one of those things you either memorize through repetition or just avoid entirely. Live preview collapses that learning curve. Even if you’ve been using Photoshop for years, it’s faster. You stop clicking through the list like you’re flipping channels and start actually seeing what works. Overlay, Soft Light, Luminosity, these all look different depending on the image underneath, and now you can judge them visually instead of theoretically.
Step 3: Select the Area You Want to Remove
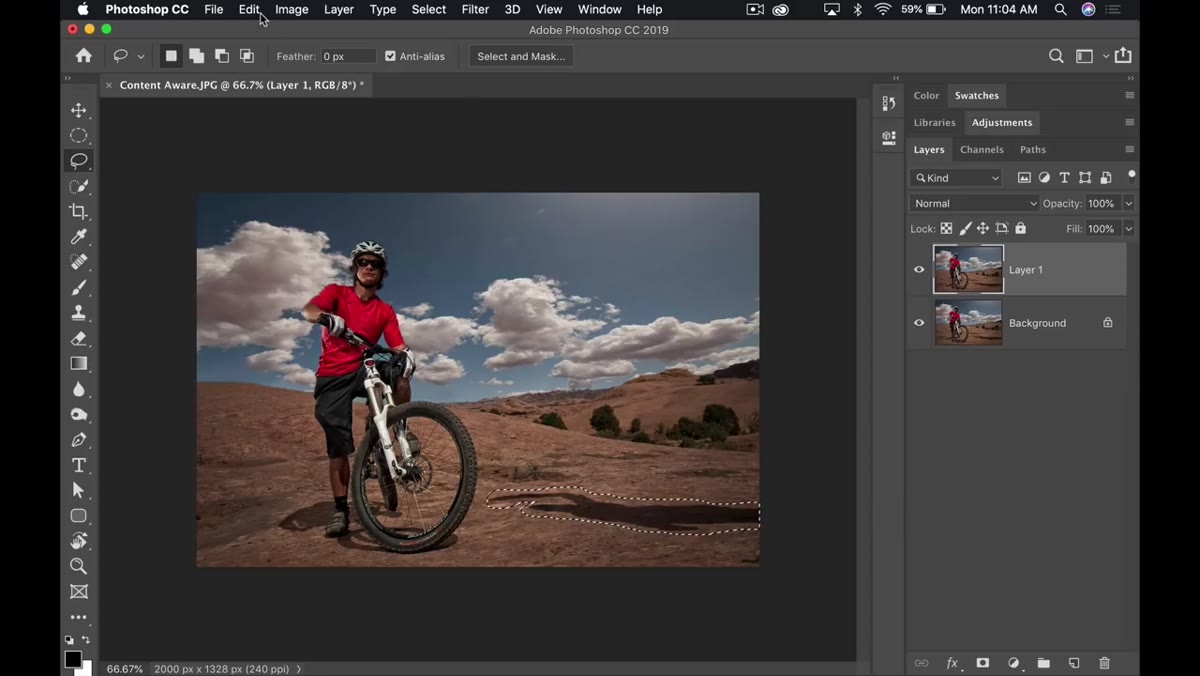 Lasso tool active with selection drawn around shadow on ground
For the Content-Aware Fill demo, Matt uses a photo with a distracting shadow on the ground, the kind left behind by an assistant holding a light stand just outside the frame. Grab the Lasso Tool (L) and draw a loose selection around whatever you want to remove. You don’t need to be precise here. A rough outline that captures the problem area with a little breathing room is enough.
Lasso tool active with selection drawn around shadow on ground
For the Content-Aware Fill demo, Matt uses a photo with a distracting shadow on the ground, the kind left behind by an assistant holding a light stand just outside the frame. Grab the Lasso Tool (L) and draw a loose selection around whatever you want to remove. You don’t need to be precise here. A rough outline that captures the problem area with a little breathing room is enough.
The selection doesn’t need to hug the edges of the object. Give it maybe 10 to 20 pixels of buffer on all sides. Content-Aware Fill works better when it has some surrounding context to read, and being overly tight with your selection tends to produce hard seams.
Step 4: Open the New Content-Aware Fill Workspace
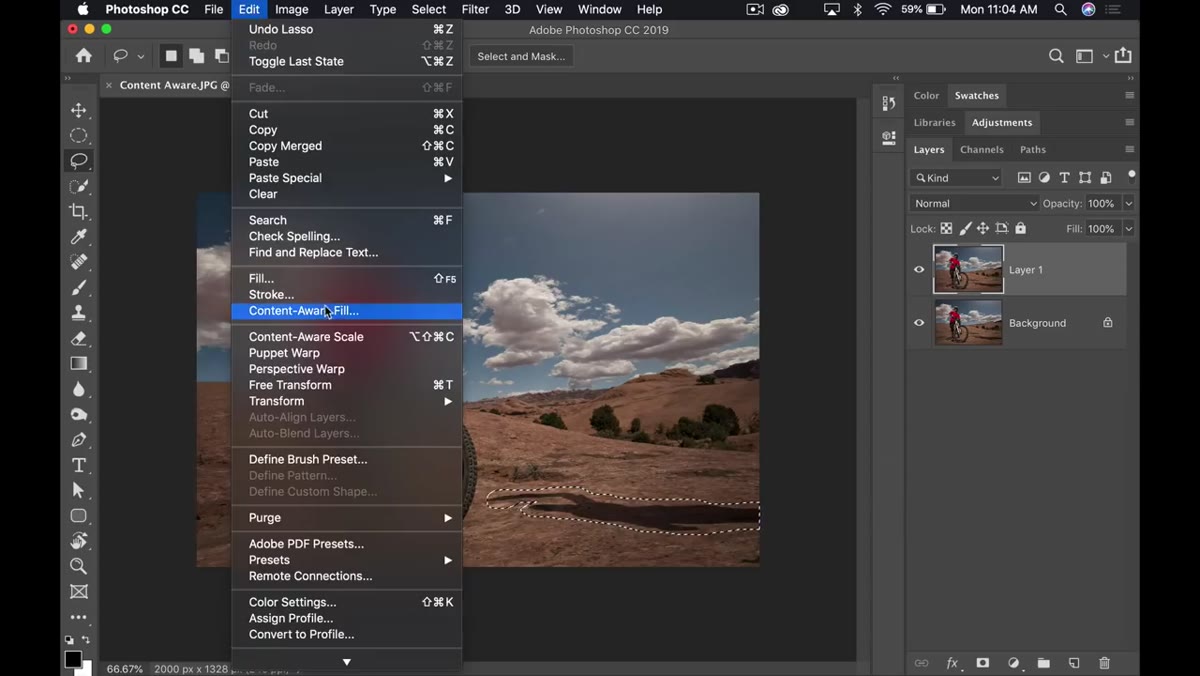 Edit menu open with Content-Aware Fill option highlighted
Go to Edit in the top menu bar and look for Content-Aware Fill. In previous versions of Photoshop, this option lived inside the Fill dialog box, which was fine but felt like finding a hardware store inside a grocery store. Now it has its own dedicated workspace that opens as a full panel with a live preview front and center.
Edit menu open with Content-Aware Fill option highlighted
Go to Edit in the top menu bar and look for Content-Aware Fill. In previous versions of Photoshop, this option lived inside the Fill dialog box, which was fine but felt like finding a hardware store inside a grocery store. Now it has its own dedicated workspace that opens as a full panel with a live preview front and center.
This is the real upgrade. The workspace gives you a preview of the fill result before you commit to anything. You can see exactly what Photoshop intends to do, and more importantly, you can correct it before it does it.
Step 5: Read the Preview and Check What It’s Sampling
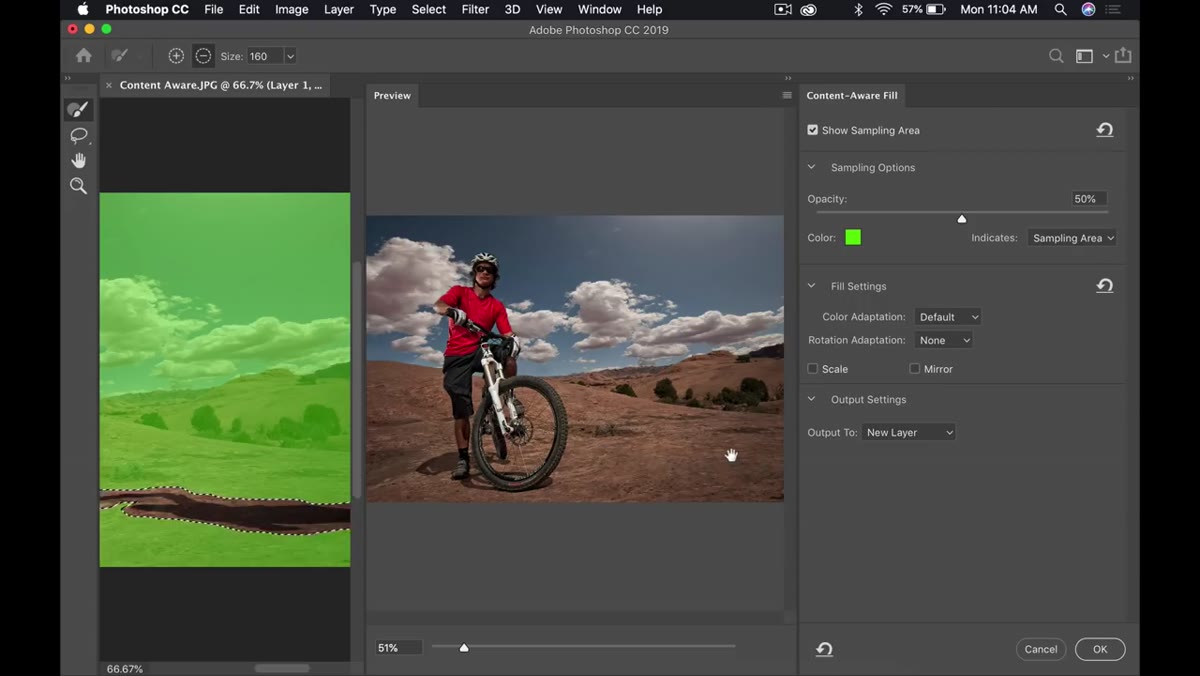 Content-Aware Fill workspace with preview panel showing fill result
Once the workspace opens, position the panels so you can see both the preview and the original image side by side. The preview shows you what the filled area will look like. Photoshop highlights the sampling zone in green on the original image, which is the area it’s pulling pixel information from to construct the fill.
Content-Aware Fill workspace with preview panel showing fill result
Once the workspace opens, position the panels so you can see both the preview and the original image side by side. The preview shows you what the filled area will look like. Photoshop highlights the sampling zone in green on the original image, which is the area it’s pulling pixel information from to construct the fill.
If the result looks good, you’re done. Click OK and move on. But if the preview shows something obviously wrong, like texture from the wrong part of the image being pulled in, that’s where the next step saves you.
Step 6: Paint the Sampling Area to Fix Bad Results
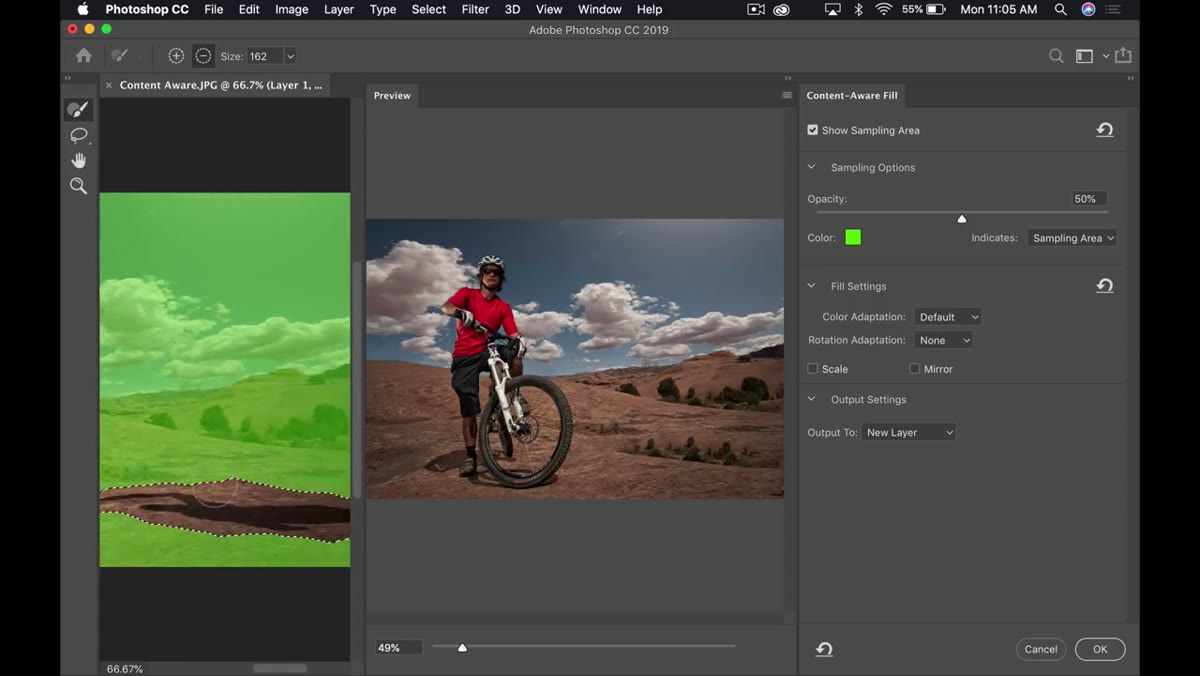 Sampling brush active, user painting green overlay to guide fill source
On the left side of the Content-Aware Fill workspace, there’s a sampling brush. Use the left and right bracket keys to resize it, the same way you’d resize any brush in Photoshop. Paint over the areas of the image you want Photoshop to pull from when constructing the fill.
Sampling brush active, user painting green overlay to guide fill source
On the left side of the Content-Aware Fill workspace, there’s a sampling brush. Use the left and right bracket keys to resize it, the same way you’d resize any brush in Photoshop. Paint over the areas of the image you want Photoshop to pull from when constructing the fill.
This is the feature that actually changes the game. Before this, if Content-Aware Fill grabbed the wrong texture, your options were to undo, adjust the selection, try again, and hope. Now you can guide it. Paint over the area that has the right texture, sky, ground, grass, whatever matches, and watch the preview update. It’s not always perfect, but it’s dramatically more controllable than anything we had before.
What I’d Add From My Own Experience
Matt keeps the demo clean and intentional, which is the right call for a conference setting. But in real client work, the Content-Aware Fill workspace is most useful when you combine it with a slightly expanded selection and then refine the sampling zone rather than trying to nail it with the selection alone.
I’ve also found that if the initial preview result is about 70% right, it’s often faster to accept it and then clone stamp or heal the remaining 30% manually than to keep fighting the sampling brush trying to get a perfect result inside the workspace. The tool is smart, but your eye is smarter. Use it to do the heavy lifting and finish the detail work yourself.
The single biggest takeaway here is that Photoshop 2019 moved two critical workflows from guesswork to preview-driven decisions. Live blend mode hover and the Content-Aware Fill workspace both operate on the same principle: show you the result before you’re committed to it. That’s genuinely good design, and it’s worth updating for.
Watch the full tutorial on YouTube to see Matt walk through both features on his own images, including a moment where Content-Aware Fill actually performs better than he expected live on camera, which is more impressive than any rehearsed demo.
Comments
Leave a Comment