There’s a certain kind of client request that used to make me quietly groan into my coffee. “Can you make it look… softer? Like dreamy? You know, that look?” I did not always know that look. And my first instinct was usually to reach for some overcomplicated multi-layer Orton effect tutorial I’d bookmarked three years ago and never fully understood. Twenty minutes later I’d have something that looked like a fever dream, not a photograph.
Then I watched this Scott Kelby tutorial and felt the specific embarrassment of a technique being simpler than you ever assumed. The whole thing clocks in at under five minutes. It uses tools you already have open. And the result actually looks good, which, honestly, isn’t guaranteed with quick techniques. Here’s the full breakdown so you can follow along without having to pause and rewind every thirty seconds.
Step 1: Duplicate the Background Layer
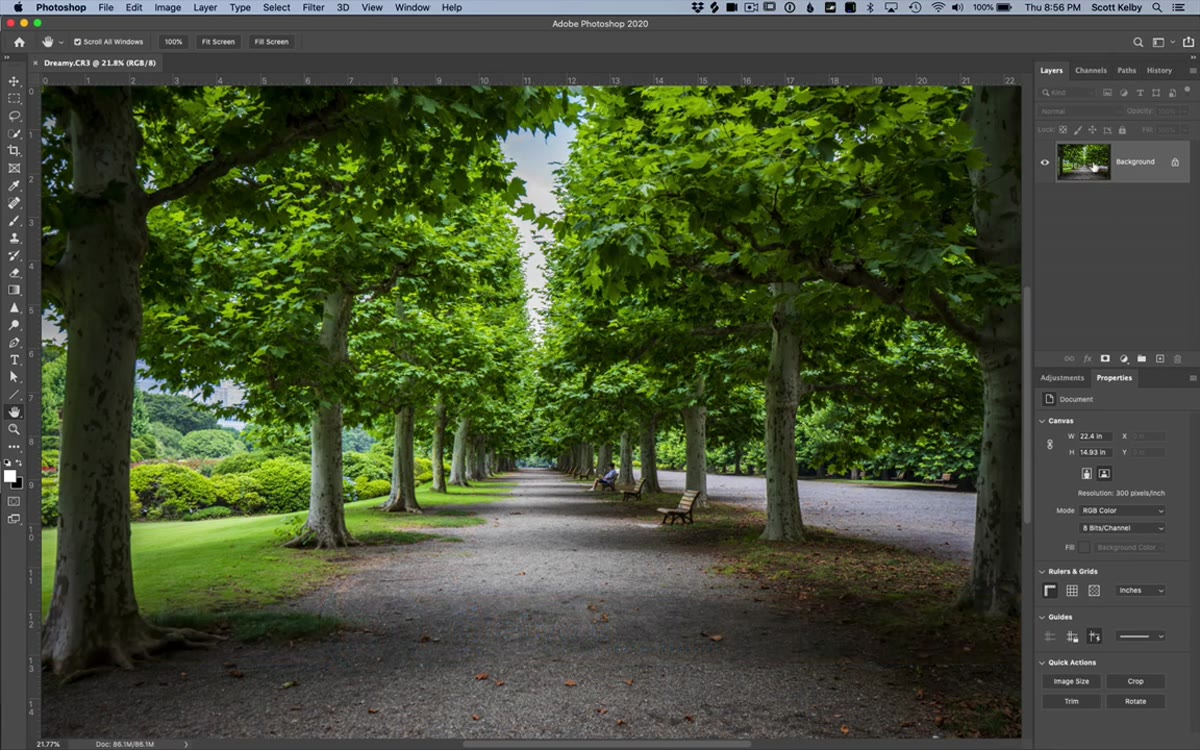 Background layer being duplicated in Layers panel
Before touching anything, duplicate your background layer. Keyboard shortcut people (and I am one of them): Cmd+J on Mac, Ctrl+J on Windows. This gives you a safety net, but more importantly, it sets up the before/after comparison you’ll want later and creates the layer you’re actually going to manipulate. Never work destructively on your original. That’s not a tip, that’s just self-respect.
Background layer being duplicated in Layers panel
Before touching anything, duplicate your background layer. Keyboard shortcut people (and I am one of them): Cmd+J on Mac, Ctrl+J on Windows. This gives you a safety net, but more importantly, it sets up the before/after comparison you’ll want later and creates the layer you’re actually going to manipulate. Never work destructively on your original. That’s not a tip, that’s just self-respect.
Step 2: Open the Camera Raw Filter
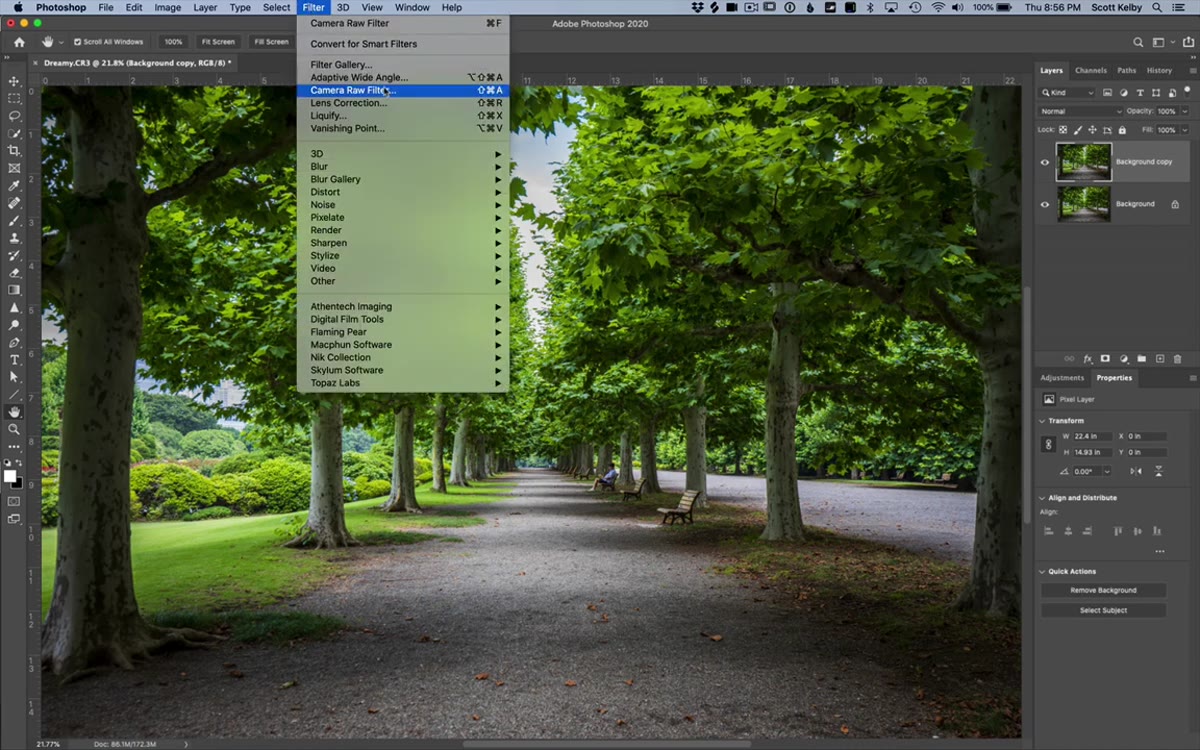 Filter menu open with Camera Raw Filter highlighted
With your duplicate layer selected, go to Filter, then choose Camera Raw Filter. If you’ve used Lightroom’s Develop module before, this interface will feel instantly familiar. If you haven’t, don’t stress - you’re only touching two sliders here, so the intimidating panel of knobs won’t bite you today. The Camera Raw Filter is doing the heavy lifting for the soft, painterly quality of the final effect, and it’s more precise than just slapping a blur on things.
Filter menu open with Camera Raw Filter highlighted
With your duplicate layer selected, go to Filter, then choose Camera Raw Filter. If you’ve used Lightroom’s Develop module before, this interface will feel instantly familiar. If you haven’t, don’t stress - you’re only touching two sliders here, so the intimidating panel of knobs won’t bite you today. The Camera Raw Filter is doing the heavy lifting for the soft, painterly quality of the final effect, and it’s more precise than just slapping a blur on things.
Step 3: Pull the Texture Slider All the Way Left
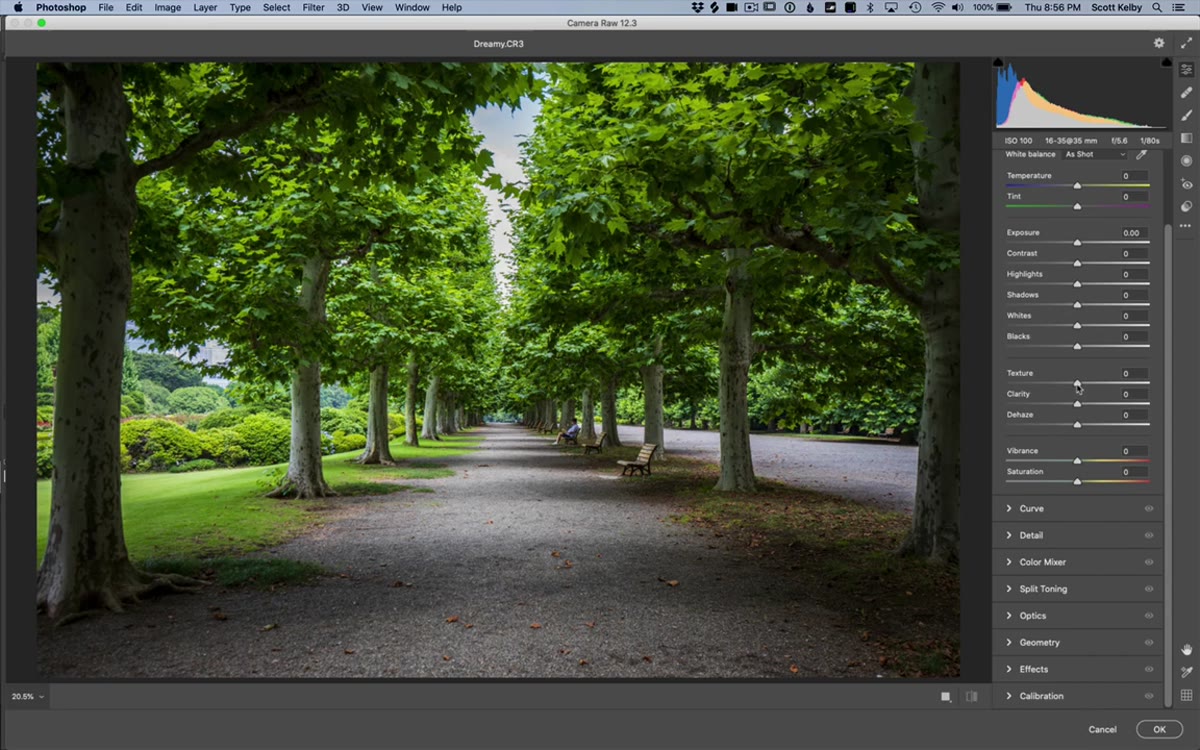 Texture slider being dragged to negative 100 in Camera Raw
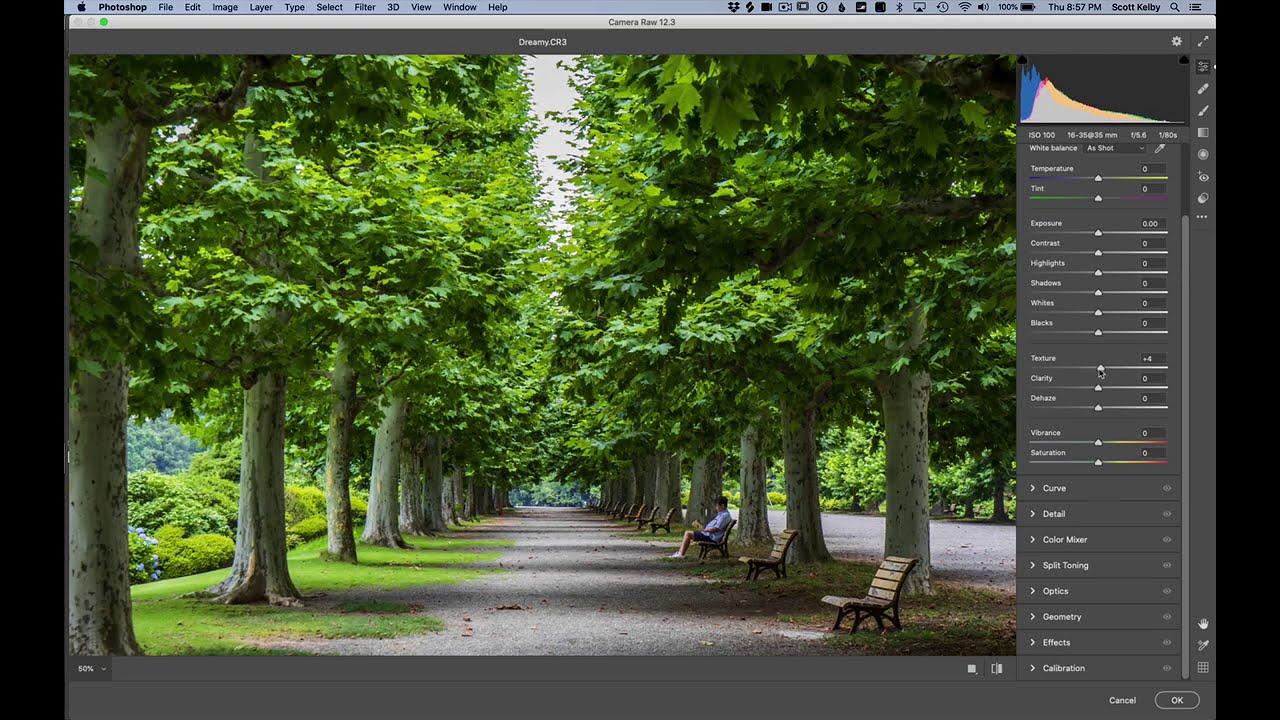
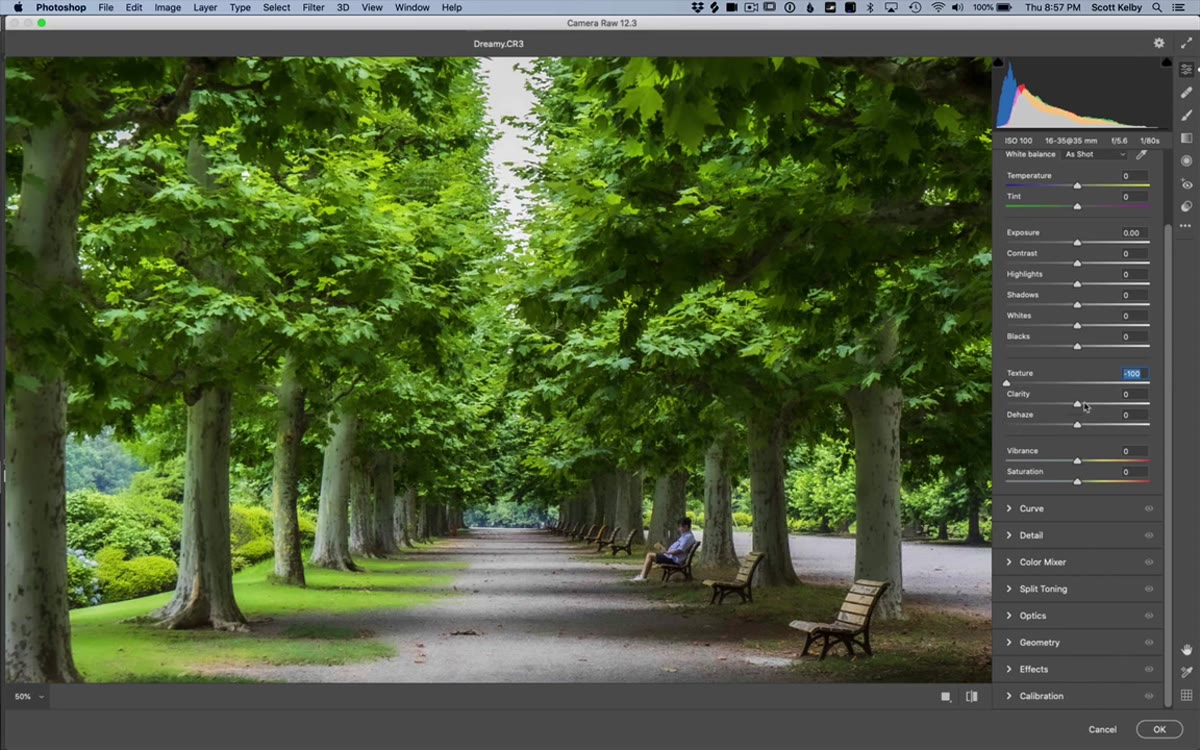
Find the Texture slider in the Basic panel. By default it sits at zero. Dragging it right sharpens and emphasizes surface detail - good for landscapes where you want every rock to feel tactile, not what we’re doing here. Drag it all the way to the left, to -100. Watch what happens to fine detail in the image. Leaves, fabric, skin texture - everything starts to take on a slightly painterly, softened quality. It’s subtle at this stage but it’s building the foundation of the effect.
Texture slider being dragged to negative 100 in Camera Raw
Find the Texture slider in the Basic panel. By default it sits at zero. Dragging it right sharpens and emphasizes surface detail - good for landscapes where you want every rock to feel tactile, not what we’re doing here. Drag it all the way to the left, to -100. Watch what happens to fine detail in the image. Leaves, fabric, skin texture - everything starts to take on a slightly painterly, softened quality. It’s subtle at this stage but it’s building the foundation of the effect.
Step 4: Drag Clarity to the Left
 Clarity slider pulled to a negative value in Camera Raw
Just below Texture you’ll find the Clarity slider. Same logic applies: right increases mid-tone contrast and makes things look punchy and sharp, left does the opposite. Pull it left - Kelby doesn’t pin it to -100 here, and neither should you. This slider controls the overall hazy, diffused quality of the image. Somewhere between -40 and -70 is a reasonable range depending on your image. The goal is a soft haze, not a blurry mess. Click OK when you’re happy with how it reads.
Clarity slider pulled to a negative value in Camera Raw
Just below Texture you’ll find the Clarity slider. Same logic applies: right increases mid-tone contrast and makes things look punchy and sharp, left does the opposite. Pull it left - Kelby doesn’t pin it to -100 here, and neither should you. This slider controls the overall hazy, diffused quality of the image. Somewhere between -40 and -70 is a reasonable range depending on your image. The goal is a soft haze, not a blurry mess. Click OK when you’re happy with how it reads.
Step 5: Apply a Gaussian Blur
 Gaussian Blur dialog box open with radius around 50 pixels
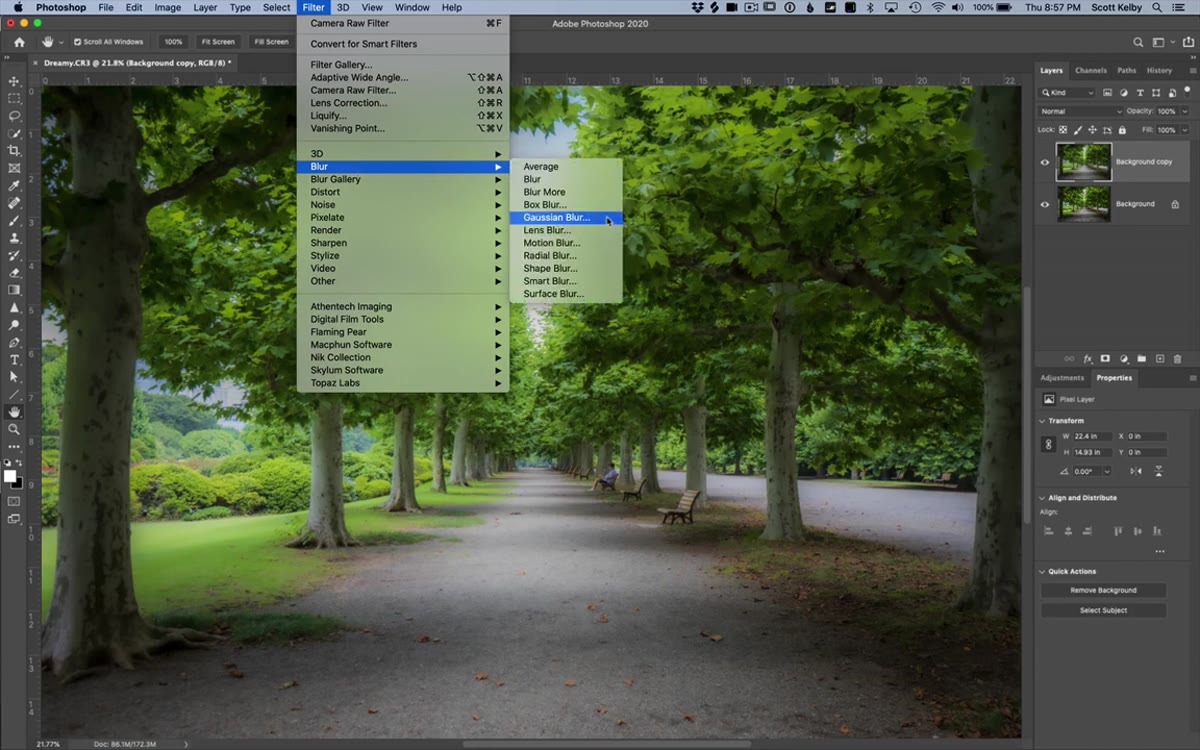
Now go to Filter, Blur, Gaussian Blur. Set the radius to around 50 pixels. Yes, that sounds like a lot. Yes, your image will look completely destroyed. That’s fine. You’re intentionally blowing out the layer because the next step is what controls how much of this blur actually shows up in the final result. Don’t skip ahead, and don’t second-guess the number - somewhere in the 40 to 60 pixel range works well for most images. Click OK.
Gaussian Blur dialog box open with radius around 50 pixels
Now go to Filter, Blur, Gaussian Blur. Set the radius to around 50 pixels. Yes, that sounds like a lot. Yes, your image will look completely destroyed. That’s fine. You’re intentionally blowing out the layer because the next step is what controls how much of this blur actually shows up in the final result. Don’t skip ahead, and don’t second-guess the number - somewhere in the 40 to 60 pixel range works well for most images. Click OK.
Step 6: Change the Blend Mode and Reduce Opacity
 Blend mode dropdown in Layers panel set to Soft Light
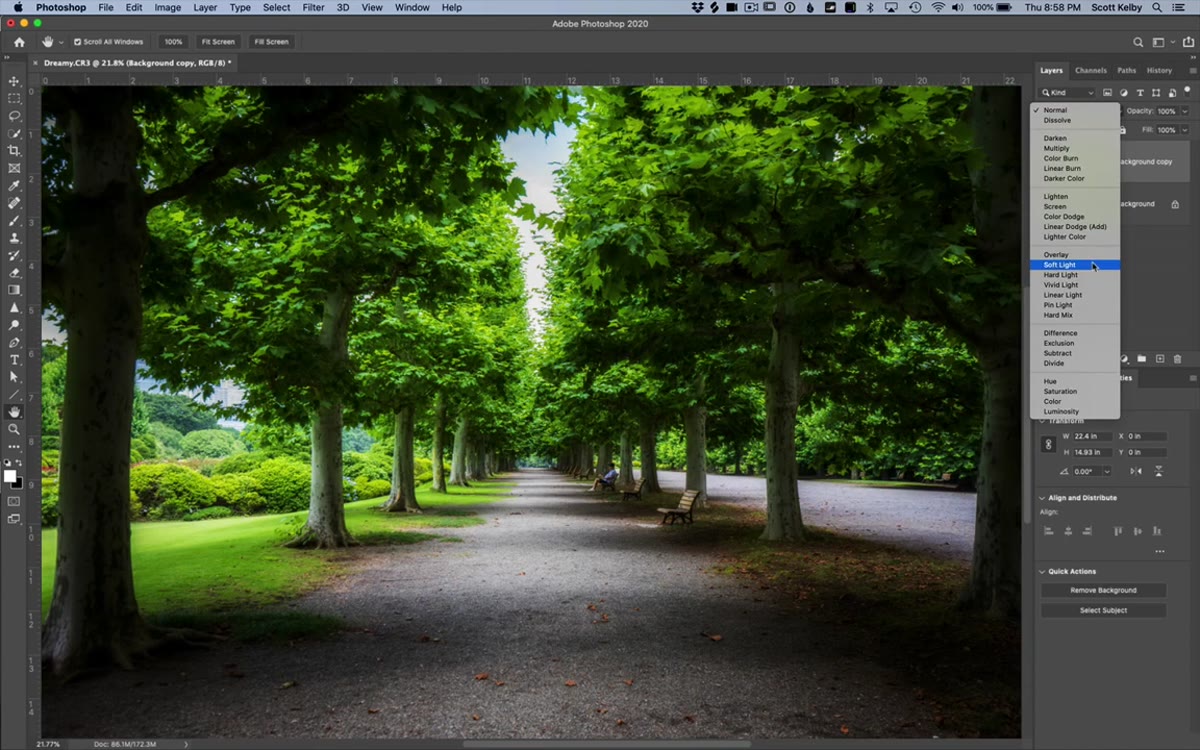
This is the step that makes everything click. In the Layers panel, click the blend mode dropdown (it says “Normal” by default) and switch it to Soft Light. The blur suddenly integrates with the layer below it instead of just sitting on top, and you get that signature soft-but-still-detailed dreamy look. If you want more contrast and a slightly stronger blur effect, try Overlay mode instead - it’s a touch more aggressive. Kelby uses Overlay in the tutorial, and I tend to agree it gives more punch.
Blend mode dropdown in Layers panel set to Soft Light
This is the step that makes everything click. In the Layers panel, click the blend mode dropdown (it says “Normal” by default) and switch it to Soft Light. The blur suddenly integrates with the layer below it instead of just sitting on top, and you get that signature soft-but-still-detailed dreamy look. If you want more contrast and a slightly stronger blur effect, try Overlay mode instead - it’s a touch more aggressive. Kelby uses Overlay in the tutorial, and I tend to agree it gives more punch.
From there, reduce the layer opacity until the effect feels balanced. Start around 50% and adjust from there. Lower opacity means more of your crisp original shows through; higher means you’re leaning into the dream. There’s no wrong answer, just your eye and your client’s brief.
One Thing I’d Add: Mask It Selectively
The technique as described applies the effect to the entire image, which is exactly right for certain shots - moody portraits, floral photography, anything where you want uniform softness. But in a lot of commercial work, you want selective application. The subject stays sharp while the background gets the dreamy treatment, or vice versa.
After you’ve set your blend mode and opacity, add a layer mask to the blurred duplicate by clicking the mask icon at the bottom of the Layers panel. Paint black on the mask with a soft brush to hide the effect from areas that need to stay crisp - usually eyes in a portrait, or a key product in a lifestyle shot. This takes the technique from “nice filter” to “deliberate creative choice,” which is the difference between a look and a look that serves the image.
I spent three days once on a composite that a friend rebuilt in twenty minutes because he knew which techniques to apply selectively rather than globally. Selective masking is almost always the upgrade.
The real takeaway here is that the dreamy soft-focus look doesn’t require a complicated multi-step workflow or a plugin. It requires Camera Raw’s Texture and Clarity sliders, one Gaussian Blur, and a blend mode change. The whole thing takes five minutes. The fact that it produces genuinely usable results is almost annoying given how simple it is.
Watch the full tutorial on YouTube to see Scott Kelby walk through it on an actual image - seeing the before and after on screen makes the effect a lot easier to calibrate when you’re applying it to your own work.
Comments (2)
I tried this on a client project yesterday and the results were way better than expected.
I've been looking for exactly this kind of tutorial. Perfect timing.
Leave a Comment