
There’s a particular kind of freelance shame that comes from billing a client for a job you could have done faster with a tool you already own. I’ve been there more times than I’d like to admit. Lately I’ve noticed myself reaching for Photoshop’s Generative Fill on things that are genuinely too simple for it — small cracks in walls, stray wires, a smudge of graffiti on an otherwise clean background. The AI does fine, but it costs credits, it takes a second to process, and sometimes it hallucinates a brick pattern that looks like it came from a fever dream. The Clone Stamp has been sitting right there the whole time, and I was sleeping on it.
In this Aaron Nace (PHLEARN) tutorial, Watch the full tutorial on YouTube, Aaron walks through a Clone Stamp workflow that’s faster and more controlled than most people’s current approach — including mine. The technique isn’t just “here’s the tool, go paint.” It’s a layered, non-destructive method with a couple of settings most people have never touched. Once I tried it on an actual client image, I stopped opening Generative Fill for anything under a certain complexity threshold. Here’s the full breakdown.
Step 1: Create a New Layer Before You Touch Anything
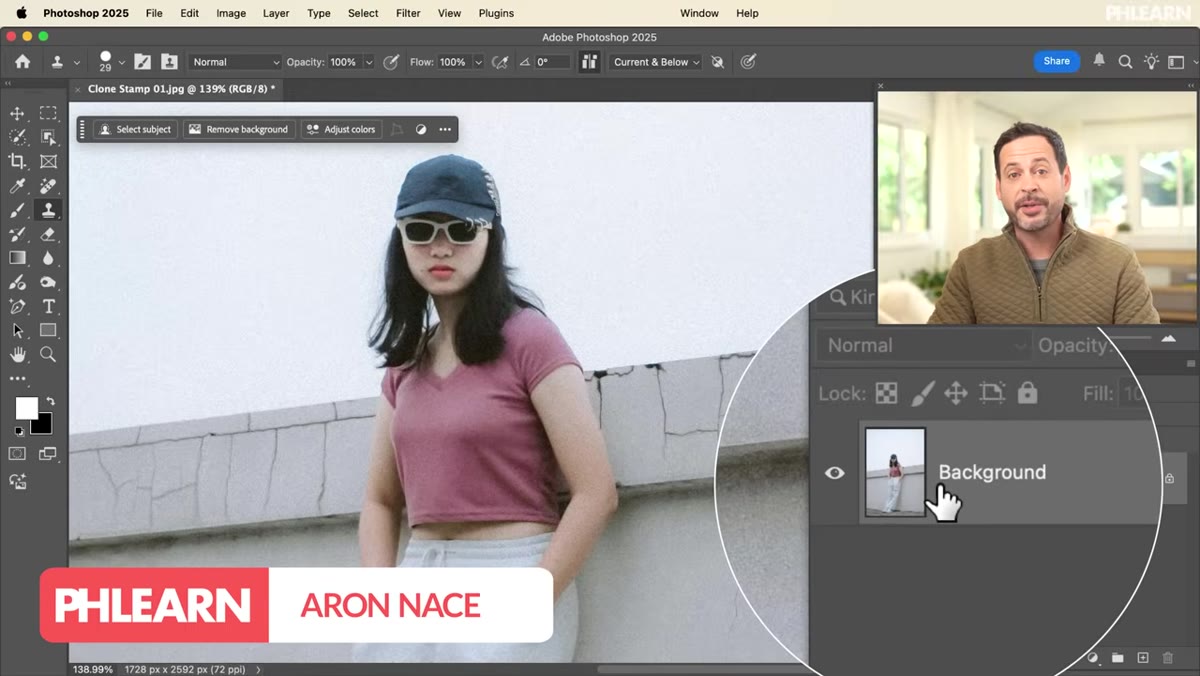 New layer icon being clicked in the Layers panel
The single biggest mistake people make with the Clone Stamp is painting directly on the background layer. The moment you do that, you’ve committed. There’s no moving things around, no toggling visibility, no clean undo path beyond hitting Ctrl+Z seventeen times and hoping for the best. Before you even pick up the tool, click the new layer icon in the Layers panel. Name it something useful — Aaron calls his “clone stamp,” which is boring but honestly smart. You’ll thank yourself later when you have six layers open and can’t remember which one has the fix.
New layer icon being clicked in the Layers panel
The single biggest mistake people make with the Clone Stamp is painting directly on the background layer. The moment you do that, you’ve committed. There’s no moving things around, no toggling visibility, no clean undo path beyond hitting Ctrl+Z seventeen times and hoping for the best. Before you even pick up the tool, click the new layer icon in the Layers panel. Name it something useful — Aaron calls his “clone stamp,” which is boring but honestly smart. You’ll thank yourself later when you have six layers open and can’t remember which one has the fix.
This isn’t just housekeeping. Working on a dedicated layer is what makes every other step in this workflow possible. The repositioning trick later in this tutorial only works if your clone stamp strokes live on their own layer.
Step 2: Set the Sample Mode to “Current and Below”
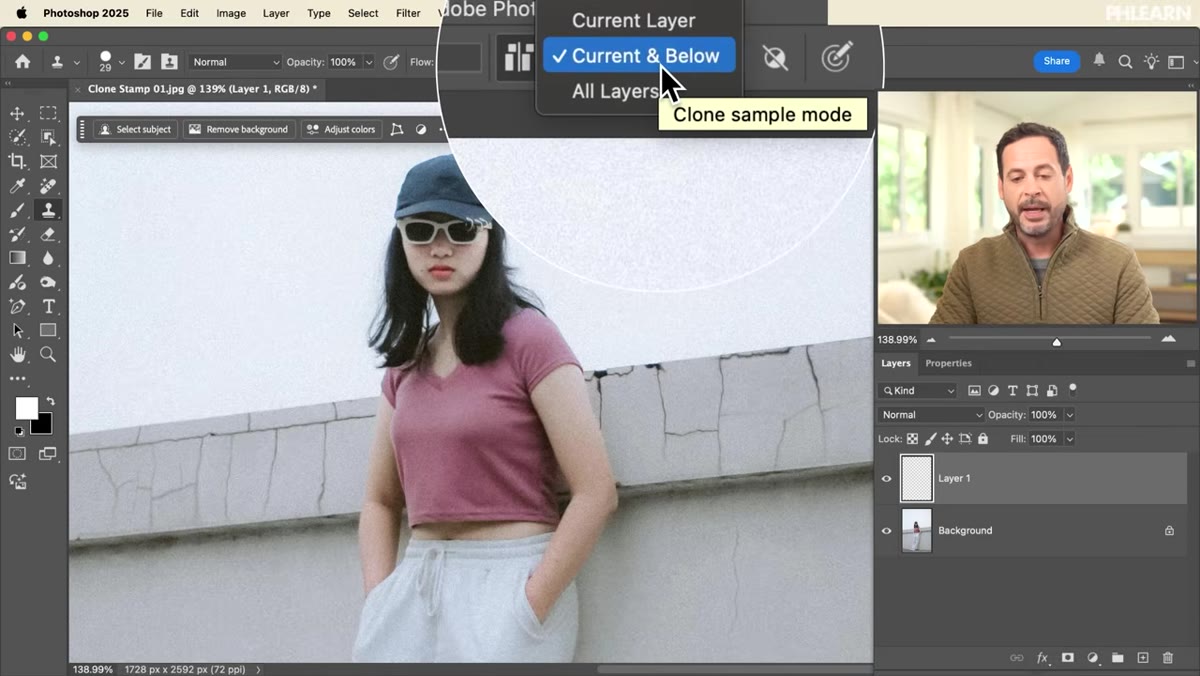 Sample dropdown in the options bar showing “Current & Below”
Here’s the setting that trips people up. By default, the Clone Stamp samples from the current layer only. You just made a new blank layer. There’s nothing on it to sample. So you’ll paint and nothing will happen, or you’ll get a transparent smear, and then you’ll give up and go back to the background layer like everyone else does. Don’t do that.
Sample dropdown in the options bar showing “Current & Below”
Here’s the setting that trips people up. By default, the Clone Stamp samples from the current layer only. You just made a new blank layer. There’s nothing on it to sample. So you’ll paint and nothing will happen, or you’ll get a transparent smear, and then you’ll give up and go back to the background layer like everyone else does. Don’t do that.
Go to the options bar at the top and find the Sample dropdown. Change it from “Current Layer” to “Current and Below.” This tells Photoshop to look through your new empty layer and pull texture from whatever’s underneath it — which is your actual image. “All Layers” is also an option, but it’ll pick up data from adjustment layers and other stuff above the current layer, which can cause weird color shifts. “Current and Below” is almost always the right call.
Step 3: Turn On Show Overlay via the Clone Source Panel
 Clone Source panel open with Show Overlay checkbox enabled
This one is genuinely a quality-of-life upgrade I didn’t know existed. Go to Window, then Clone Source, and check the box that says “Show Overlay.” What this does is give you a live preview of what the stamp will look like before you commit to a single stroke. As you hover over your canvas, you see a ghosted version of your source material following your cursor around. It makes alignment dramatically easier, especially when you’re matching edges, textures, or repeating patterns.
Clone Source panel open with Show Overlay checkbox enabled
This one is genuinely a quality-of-life upgrade I didn’t know existed. Go to Window, then Clone Source, and check the box that says “Show Overlay.” What this does is give you a live preview of what the stamp will look like before you commit to a single stroke. As you hover over your canvas, you see a ghosted version of your source material following your cursor around. It makes alignment dramatically easier, especially when you’re matching edges, textures, or repeating patterns.
Before I knew this existed, I was doing the very scientific method of stamp, look, undo, stamp again, look harder, undo again. The overlay eliminates most of that guesswork.
Step 4: Sample Your Source Point With Alt/Option Click
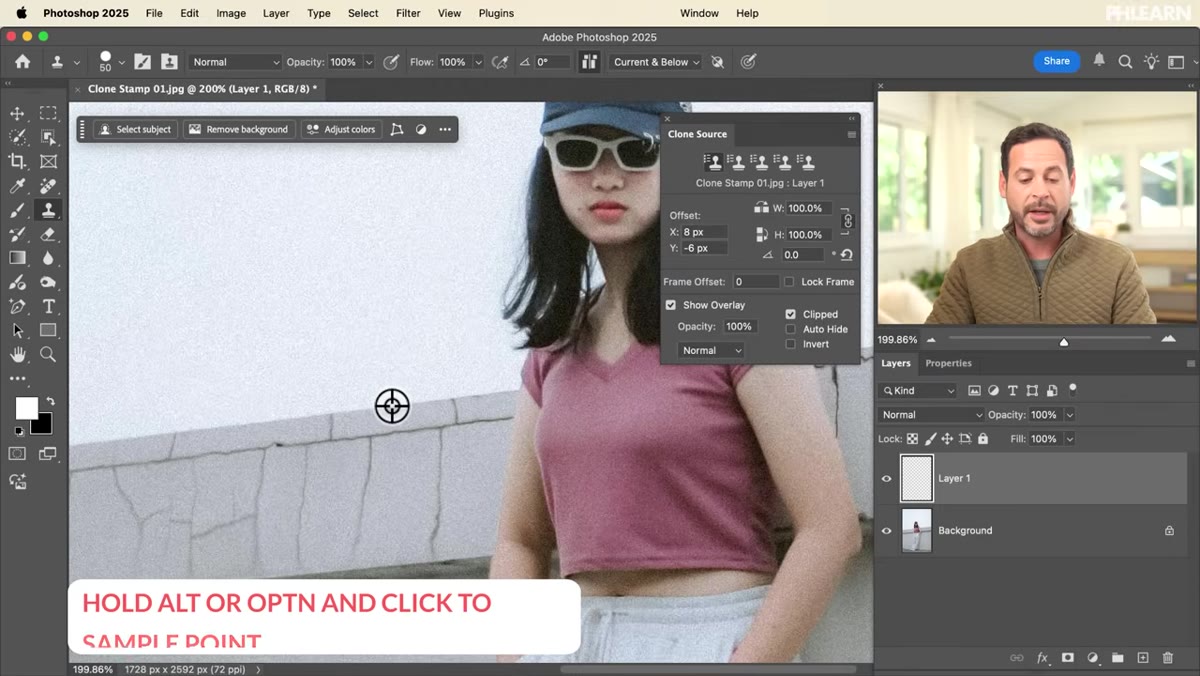 Cursor with Alt key held down sampling a point on the wall texture
This is the core of how the tool actually works. Hold Alt on Windows or Option on Mac and click somewhere on your image to set your source point — the area you want to copy texture from. Then move your cursor to the damaged or unwanted area and paint. Photoshop duplicates the source texture and lays it over your target area.
Cursor with Alt key held down sampling a point on the wall texture
This is the core of how the tool actually works. Hold Alt on Windows or Option on Mac and click somewhere on your image to set your source point — the area you want to copy texture from. Then move your cursor to the damaged or unwanted area and paint. Photoshop duplicates the source texture and lays it over your target area.
The key word Aaron uses here is “continue.” Don’t sample once and paint the whole thing. Resample often. Move your source point around to nearby areas of the image so the texture stays varied and natural. A single source point repeated across a large patch looks stamped. Multiple source points sampled from slightly different spots look like the real thing. It’s the difference between a repair that holds up at 100% zoom and one that falls apart the moment a client looks closely.
Step 5: Place Tricky Fixes on Separate Layers, Then Merge
 Move tool repositioning a clone stamp layer to align it correctly
Here’s the part of the workflow I actually didn’t expect. If you clone stamp something and it lands slightly off — wrong position, wrong alignment — you don’t have to undo and start over. If that particular stroke is on its own layer, you just hit V for the Move tool and drag it into the right spot. Aaron demonstrates this with a deliberately exaggerated example, but it’s the kind of thing that saves you in real retouching work when you’re dealing with complex edges or tight alignment.
Move tool repositioning a clone stamp layer to align it correctly
Here’s the part of the workflow I actually didn’t expect. If you clone stamp something and it lands slightly off — wrong position, wrong alignment — you don’t have to undo and start over. If that particular stroke is on its own layer, you just hit V for the Move tool and drag it into the right spot. Aaron demonstrates this with a deliberately exaggerated example, but it’s the kind of thing that saves you in real retouching work when you’re dealing with complex edges or tight alignment.
Once everything is positioned correctly, Shift-click to select your clone stamp layers and hit Ctrl+E (Command+E on Mac) to merge them down. Or go to Layer, then Merge Layers. Either way, you end up with one clean layer of clone stamp work sitting safely above your original, and the original is still completely untouched underneath.
One Thing I’d Add From My Own Work
The overlay preview Aaron shows is great, but I’d push it one step further: zoom in before you sample. I mean really zoom in, like 200% or more. When you’re working on something like wall texture or fabric, the grain and direction of that texture matters at a fine level. Sampling from a point that looks nearby at 50% zoom can still introduce a visible seam at full resolution because the texture angle shifts slightly. Get close, check your source point at full zoom, then back out to paint. It takes an extra ten seconds and saves you from a fix that looks perfect on your screen and embarrassing when the client opens it in Preview.
The biggest takeaway here is a simple priority shift: use the right tool for the complexity of the job. Generative Fill is powerful and worth using, but it’s not free, and it’s definitely overkill for a crack in a wall or a smudge on a clean surface. The Clone Stamp, done with a new layer, the right sample setting, and the overlay preview on, handles those jobs faster and with more precision than any AI feature currently on the market.
Watch the full tutorial on YouTube to see Aaron work through the actual image in real time — seeing the overlay in motion and watching how often he resamples makes the rhythm of the technique click in a way that’s hard to fully capture in text.
Comments (2)
This is going in my reference folder. Incredibly useful.
My workflow just got 10x faster. Not even kidding.
Leave a Comment