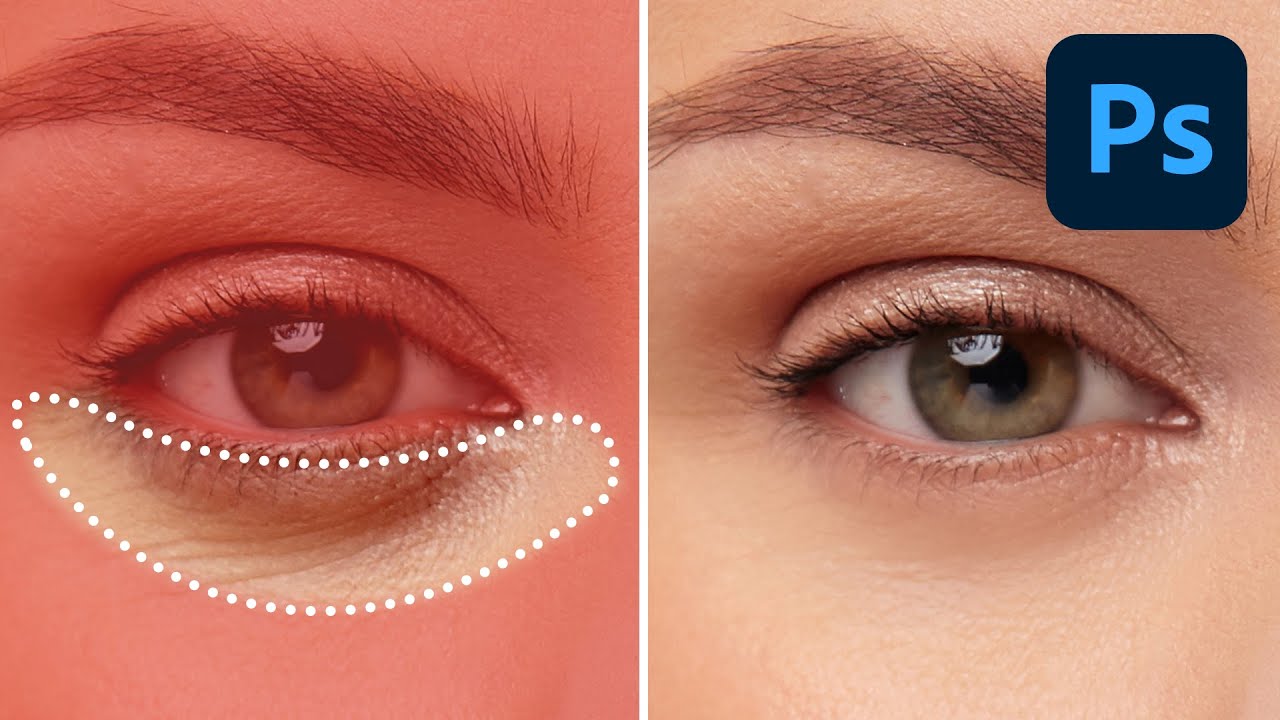
I’ve handed clients back photos where the under-eye area looked so aggressively smoothed it felt like I’d replaced their face with a soap commercial extra. Dark circles, bags, soft wrinkles – these aren’t flaws to be surgically erased. They’re part of someone’s face. The goal is to lighten and brighten, not rebuild the whole structure from scratch. Once I figured that out, my retouching got about ten times more believable.
That’s why this tutorial from Aaron Nace over at PHLEARN hit differently when I came across it. Watch the full tutorial on YouTube – it’s quick, practical, and he makes a really sharp point early on that I wish someone had told me years ago. The technique itself is elegant: skip the dramatic restructuring, feather your selections properly, and paint in a targeted lightening effect that looks like the person just got a full night’s sleep. Three examples, genuinely fast to follow.
The core workflow runs about four solid steps, and I’m going to walk you through what’s actually happening at each stage so you can use this without rewatching the video six times.
Step 1: Resist the AI Temptation
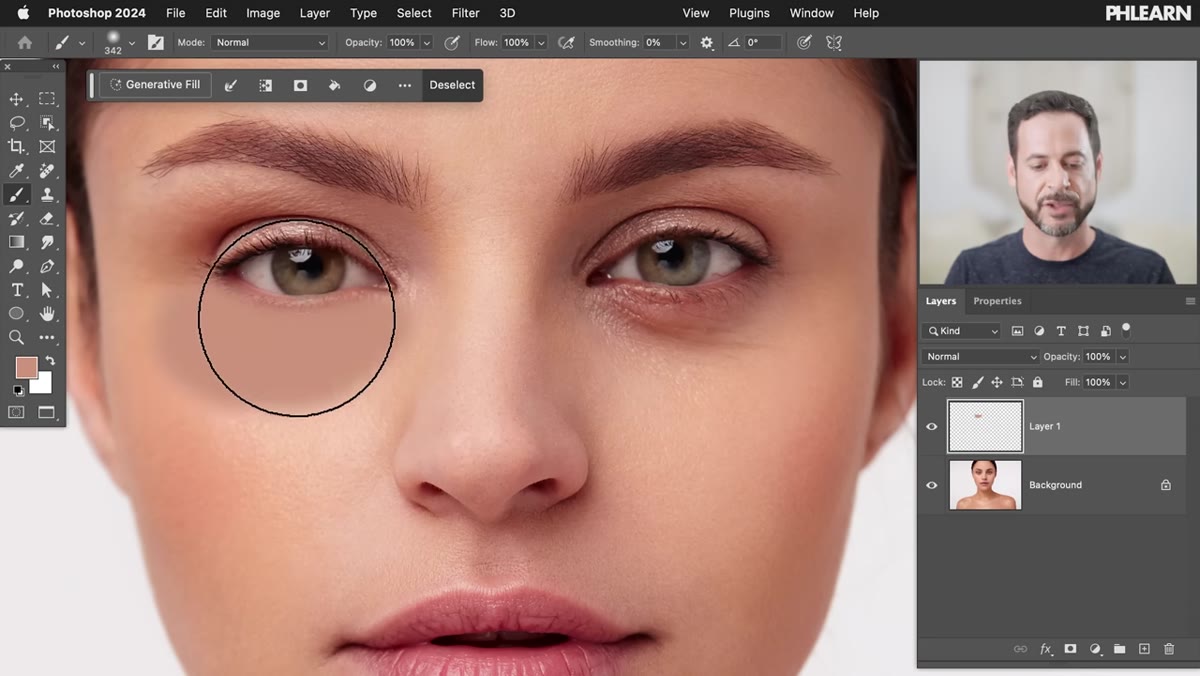
 Generative Fill result showing altered eye shape
Before getting into the actual technique, Aaron makes a point worth pausing on: Generative Fill is not your friend here. It seems obvious – select the bags, tell AI to fix it, done. But what actually happens is the AI generates new geometry. The roundness under your subject’s eye? That’s the eyeball itself pushing against the lower lid. It’s structural. When AI fills it in, you don’t get the same person with less puffiness. You get a slightly different face. Toggle the layer on and off and it’s immediately obvious something is wrong, even if you can’t name exactly what.
Generative Fill result showing altered eye shape
Before getting into the actual technique, Aaron makes a point worth pausing on: Generative Fill is not your friend here. It seems obvious – select the bags, tell AI to fix it, done. But what actually happens is the AI generates new geometry. The roundness under your subject’s eye? That’s the eyeball itself pushing against the lower lid. It’s structural. When AI fills it in, you don’t get the same person with less puffiness. You get a slightly different face. Toggle the layer on and off and it’s immediately obvious something is wrong, even if you can’t name exactly what.
The fix isn’t to remove the shape. It’s to lighten it. Keep that in mind as the guiding principle for everything that follows.
Step 2: Make a Loose Lasso Selection Around Both Eyes
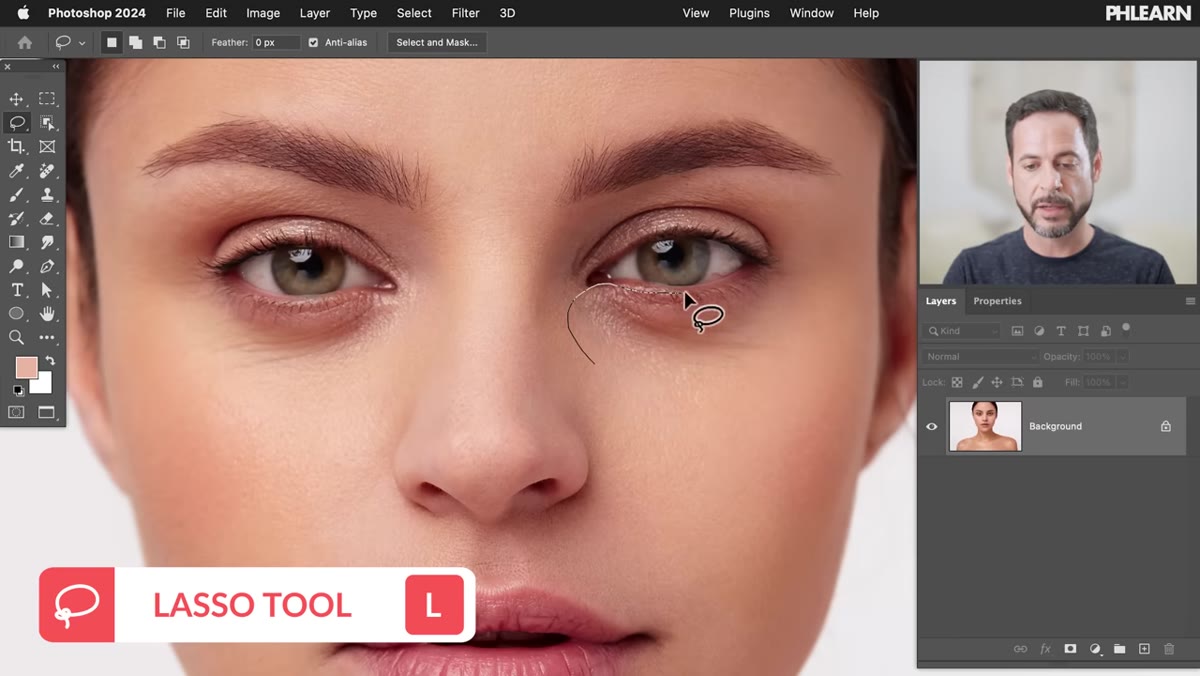 Lasso tool tracing under-eye area on subject
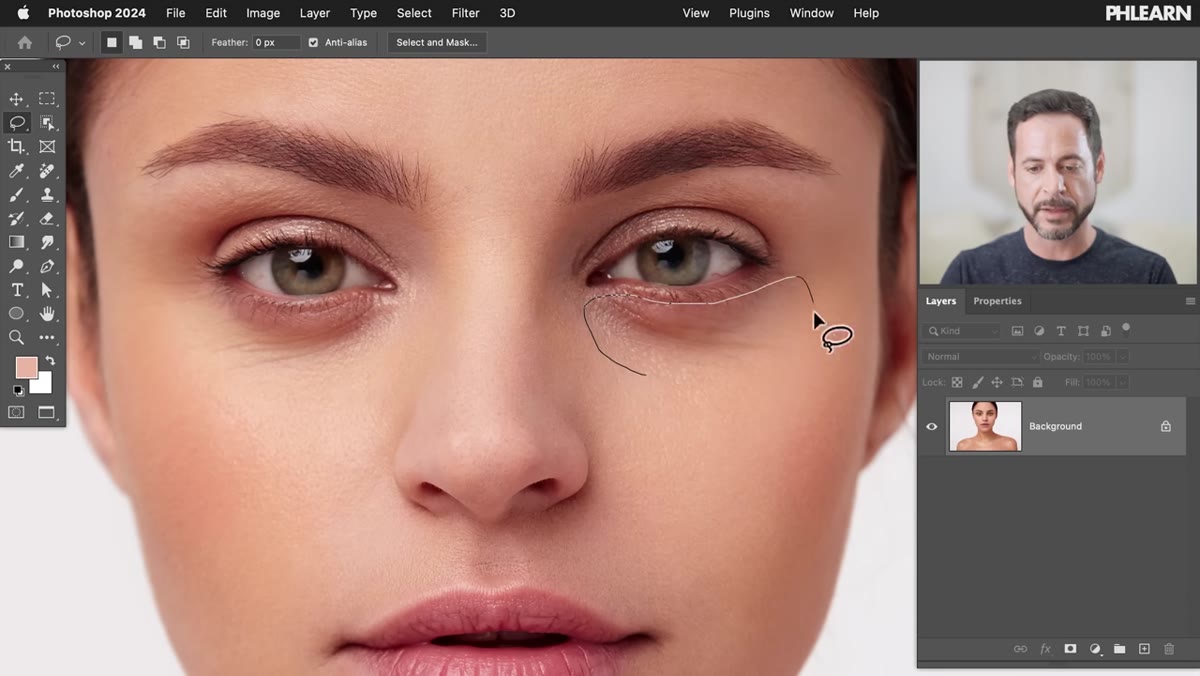
Hit L to grab the Lasso tool. Draw a relaxed, freehand selection under one eye – you don’t need to be surgical about it. Loop down a bit lower than you think you need to. Then hold Shift and draw the same kind of selection under the other eye. Shift adds to your existing selection, so you end up with both areas selected at once.
Lasso tool tracing under-eye area on subject
Hit L to grab the Lasso tool. Draw a relaxed, freehand selection under one eye – you don’t need to be surgical about it. Loop down a bit lower than you think you need to. Then hold Shift and draw the same kind of selection under the other eye. Shift adds to your existing selection, so you end up with both areas selected at once.
Don’t stress about precision at this stage. The whole next step is specifically designed to make rough edges irrelevant. The selection is just a starting point.
Step 3: Enter Quick Mask Mode to Feather Your Selection Visually
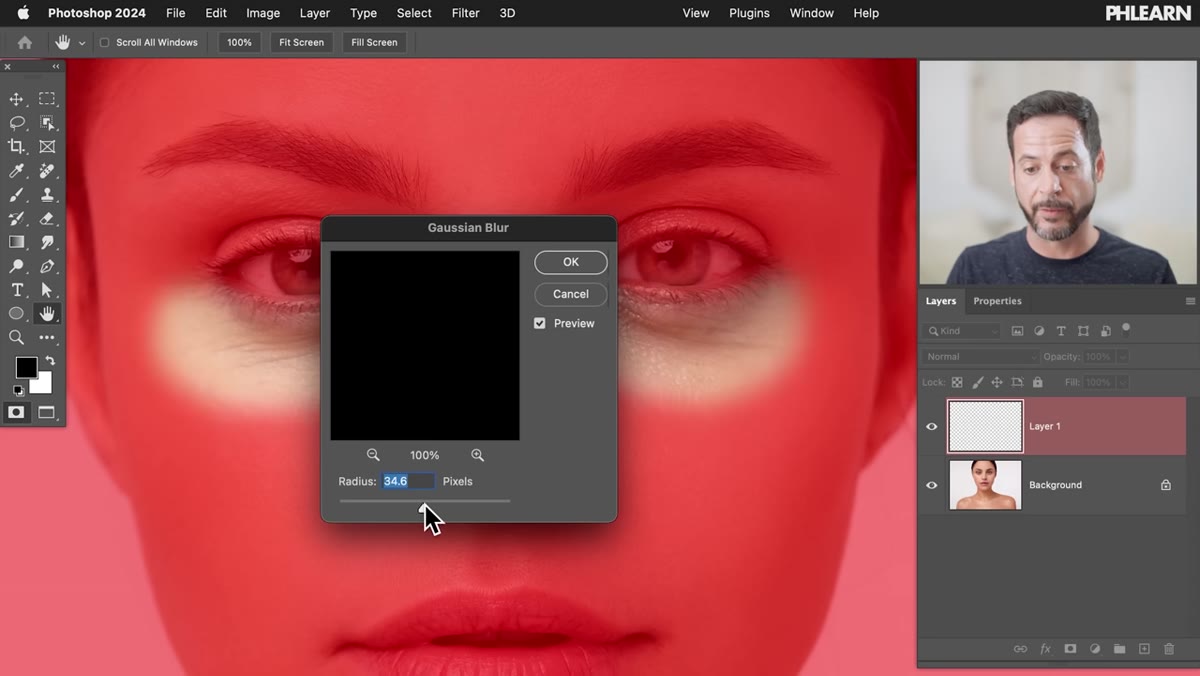
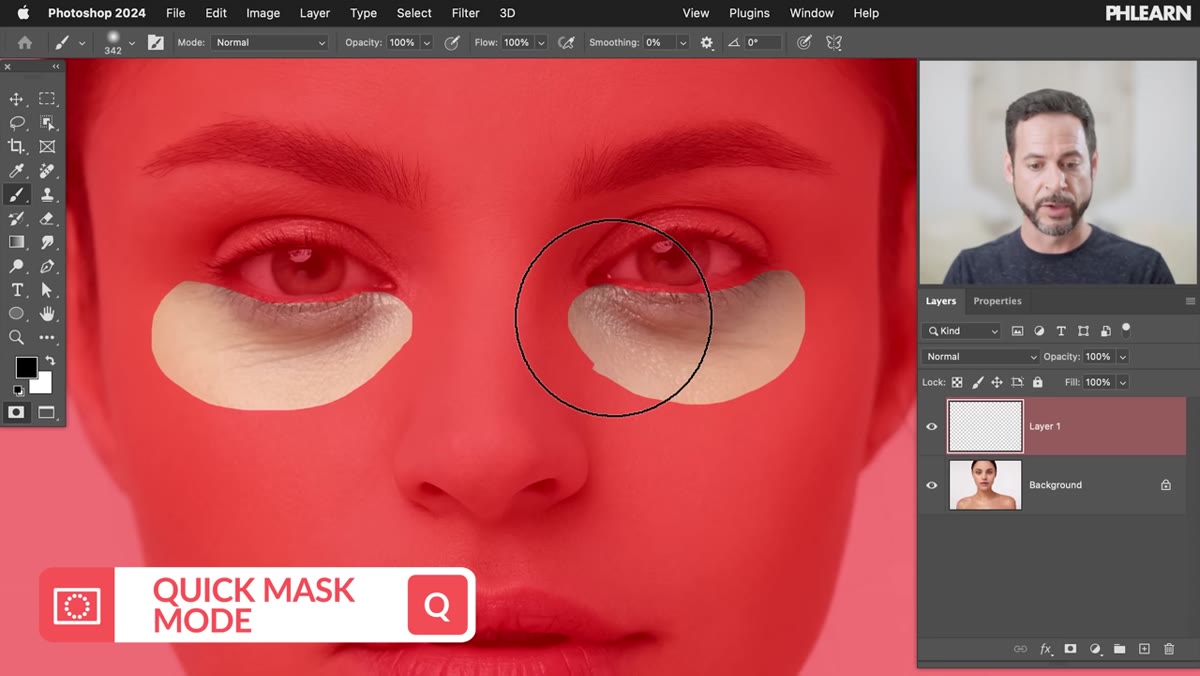 Quick Mask mode active showing red overlay on selection
This is the part of the tutorial that genuinely changed how I work with selections. Most people feather through Select > Modify > Feather, type in a pixel value, and just… hope for the best. You get zero preview. You have no idea if 10 pixels is too much or not enough until you’ve already started painting.
Quick Mask mode active showing red overlay on selection
This is the part of the tutorial that genuinely changed how I work with selections. Most people feather through Select > Modify > Feather, type in a pixel value, and just… hope for the best. You get zero preview. You have no idea if 10 pixels is too much or not enough until you’ve already started painting.
Aaron’s method is better. Hit Q on your keyboard to enter Quick Mask mode. Your selection turns into a red overlay, and now you can actually see what you’re working with. From here, go to Filter > Blur > Gaussian Blur and drag the radius slider while watching the edges of that red mask soften in real time. When the edges look gradual and natural rather than hard-cut, you’ve got the right amount. Hit OK, then hit Q again to convert back to a live selection. Now your selection has a proper feathered edge and you watched it happen.
This approach works for any selection feathering, not just this technique. It’s one of those things you’ll use constantly once you know it exists.
Step 4: Add a Curves Adjustment Layer
 Curves adjustment layer panel with adjustment applied
With your feathered selection still active, add a Curves adjustment layer via the Adjustments panel or through Layer > New Adjustment Layer > Curves. Photoshop automatically uses your selection as a layer mask, which means your Curves adjustment will only affect the area you selected. The feathered edge ensures the lightening blends seamlessly into the surrounding skin.
Curves adjustment layer panel with adjustment applied
With your feathered selection still active, add a Curves adjustment layer via the Adjustments panel or through Layer > New Adjustment Layer > Curves. Photoshop automatically uses your selection as a layer mask, which means your Curves adjustment will only affect the area you selected. The feathered edge ensures the lightening blends seamlessly into the surrounding skin.
In the Curves dialog, drag the midpoint of the curve upward to brighten the under-eye area. You’re lifting the shadows without blowing out the highlights. Go subtle – this is a situation where less is almost always more. A little brightness goes a long way, and if you overdo it the area will look pale or washed out against the rest of the face.
Step 5: Refine the Mask if Needed
 Layer mask on Curves layer being painted with soft brush
Once the adjustment is in, zoom in and check the edges. If the lightening bleeds into areas you don’t want – like the eyelid itself or the top of the cheekbone – grab a soft black brush and paint directly on the layer mask to hide those areas. Switch to white to restore the effect where you want it back.
Layer mask on Curves layer being painted with soft brush
Once the adjustment is in, zoom in and check the edges. If the lightening bleeds into areas you don’t want – like the eyelid itself or the top of the cheekbone – grab a soft black brush and paint directly on the layer mask to hide those areas. Switch to white to restore the effect where you want it back.
This is also where you’d fine-tune the Curves adjustment itself if the initial lift is too strong. Double-click the Curves thumbnail to reopen it and pull the midpoint back down slightly. Because everything lives on an adjustment layer, nothing is destructive. You can revisit any of it later.
My Own Caveat: Match the Lightening to the Light Source
Here’s something the tutorial doesn’t explicitly cover but I’ve burned myself on enough times to mention it. When you’re brightening under-eye areas, the direction of the light in the photo matters. If your subject is lit from the upper right, the natural shadow under their eye falls toward the lower left. If you uniformly lighten the entire under-eye region, it can start to look flat – like the face suddenly lost its three-dimensional structure right there.
My fix is to paint on the layer mask with a low-opacity black brush and gently reduce the effect in the areas that should still hold a little shadow. You’re not removing the lightening entirely, just sculpting it so the result still reads as a real face under real light. Takes maybe thirty extra seconds and makes the retouch look noticeably more considered.
The single most important takeaway here is that the goal of under-eye retouching isn’t removal – it’s reduction. Keeping the shape while changing the tone is what separates a retouch that looks professional from one that looks like a face transplant. Aaron Nace lays it out clearly, efficiently, and with actual working examples.
Watch the full tutorial on YouTube – he covers three different examples and there are details in the later examples worth seeing even after you’ve got the core technique down.
Comments
Leave a Comment