
I’ve spent an embarrassing amount of time patching skies, cloning out trash cans, and carefully healing away power lines — the kind of tedious retouching work that makes you question your life choices around hour two. So when a new Photoshop tool actually makes me faster and gets better results than my existing workflow, I pay attention. In this Matt Kloskowski tutorial, he walks through the Remove Tool that shipped in Photoshop 24.5 (May 2023), and honestly, calling it a minor update feels like underselling it. Watch the full tutorial on YouTube
The Remove Tool sits in the same toolbar group as the Spot Healing Brush and the regular Healing Brush, which means a lot of people probably glided right past it. I did. I saw the icon, assumed it was a slight variation on tools I already knew, and moved on. That was a mistake. This thing uses generative awareness of the surrounding image to fill selections, and the results are genuinely different from what the Healing Brush produces, especially in areas where you don’t have clean source material to clone from.
What makes Matt’s breakdown valuable is that he doesn’t just demo the happy path. He’s upfront about when the tool stumbles, what realistic expectations look like, and which settings actually matter. That’s the kind of tutorial I’ll sit through a cup of coffee for at my usual corner table. Here’s how the technique actually works.
Step 1: Find the Remove Tool in Your Toolbar
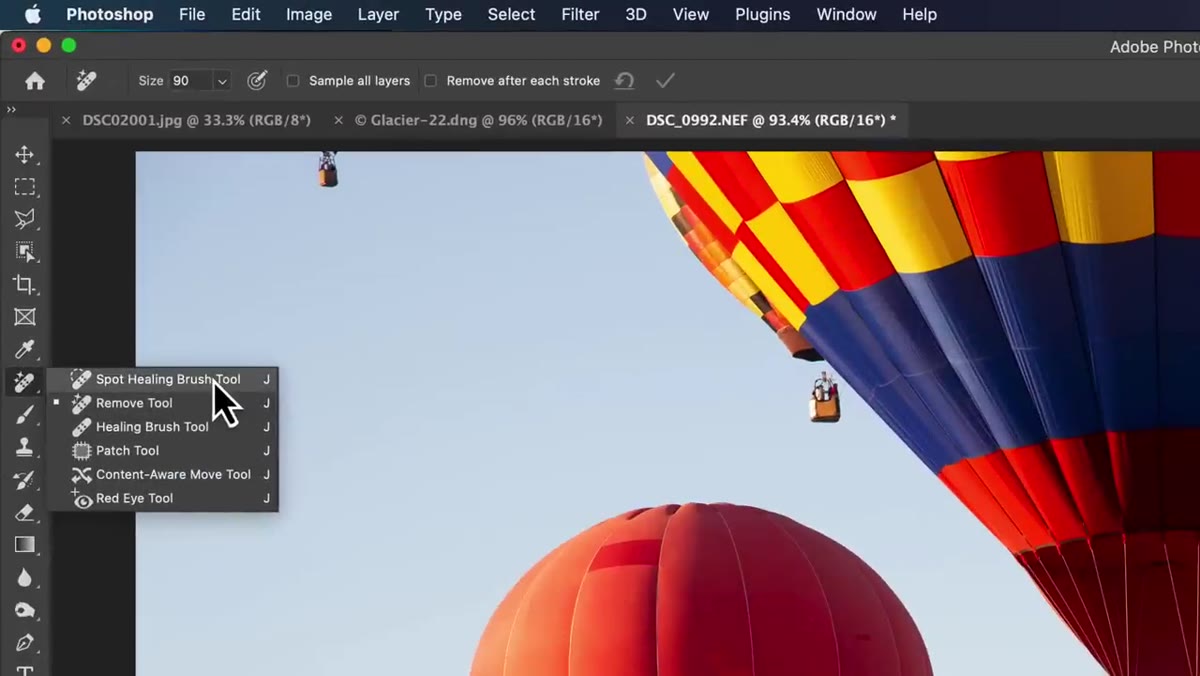 Remove Tool grouped with Spot Healing and Healing Brush
The Remove Tool lives grouped with the Spot Healing Brush and Healing Brush in the left toolbar. If you’re on Photoshop 24.5 or later and it’s nowhere to be found, head to Edit, then Toolbar, and restore your toolbar defaults. Custom toolbar configurations can hide newer tools. If that still doesn’t surface it, Adobe support is your next stop, but for most people it’ll be right there once you know where to look.
Remove Tool grouped with Spot Healing and Healing Brush
The Remove Tool lives grouped with the Spot Healing Brush and Healing Brush in the left toolbar. If you’re on Photoshop 24.5 or later and it’s nowhere to be found, head to Edit, then Toolbar, and restore your toolbar defaults. Custom toolbar configurations can hide newer tools. If that still doesn’t surface it, Adobe support is your next stop, but for most people it’ll be right there once you know where to look.
Step 2: Turn Off “Remove After Each Stroke”
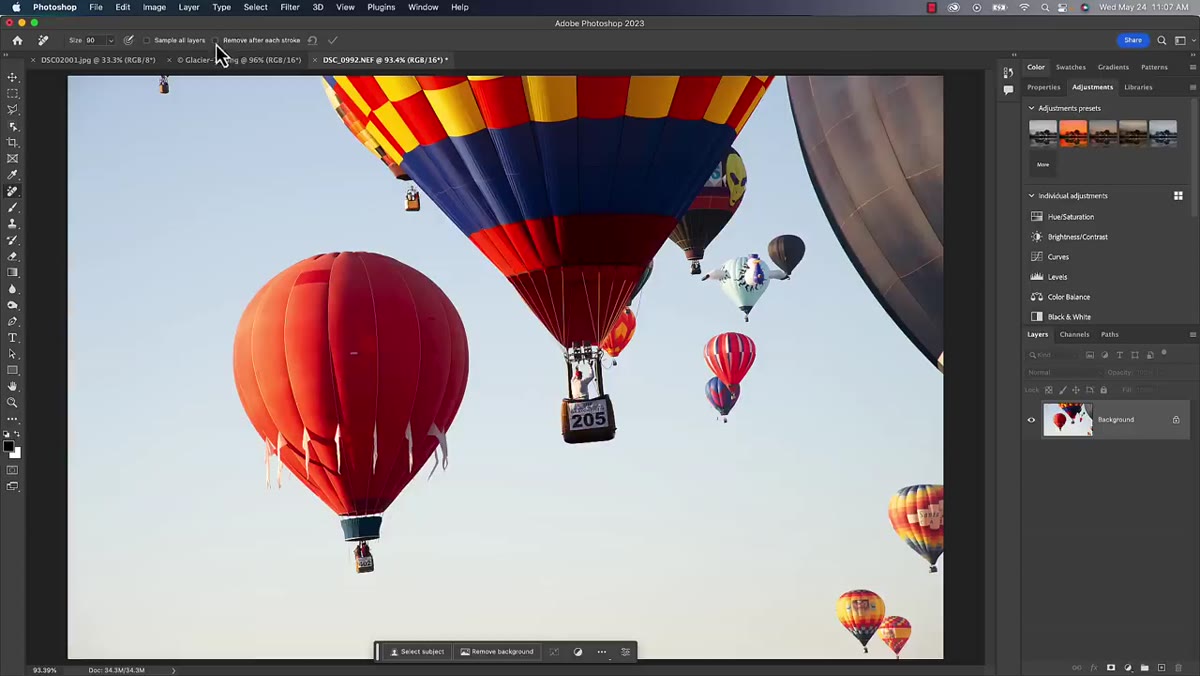 Options bar showing Remove After Each Stroke checkbox
This is the setting that separates a frustrating experience from a smooth one, and it’s the first thing Matt flags in the tutorial. In the options bar at the top, you’ll see a checkbox labeled “Remove After Each Stroke.” Turn it off. When it’s enabled, Photoshop processes and fills your painted area the moment you lift your mouse or stylus. That sounds convenient until you’re working on a complex edge, lift your pen slightly by accident, and Photoshop commits to a half-finished stroke. With the setting off, you paint freely, lift as many times as you need, and trigger the removal only when you’re satisfied with your coverage.
Options bar showing Remove After Each Stroke checkbox
This is the setting that separates a frustrating experience from a smooth one, and it’s the first thing Matt flags in the tutorial. In the options bar at the top, you’ll see a checkbox labeled “Remove After Each Stroke.” Turn it off. When it’s enabled, Photoshop processes and fills your painted area the moment you lift your mouse or stylus. That sounds convenient until you’re working on a complex edge, lift your pen slightly by accident, and Photoshop commits to a half-finished stroke. With the setting off, you paint freely, lift as many times as you need, and trigger the removal only when you’re satisfied with your coverage.
Step 3: Adjust Your Brush Size for Precision
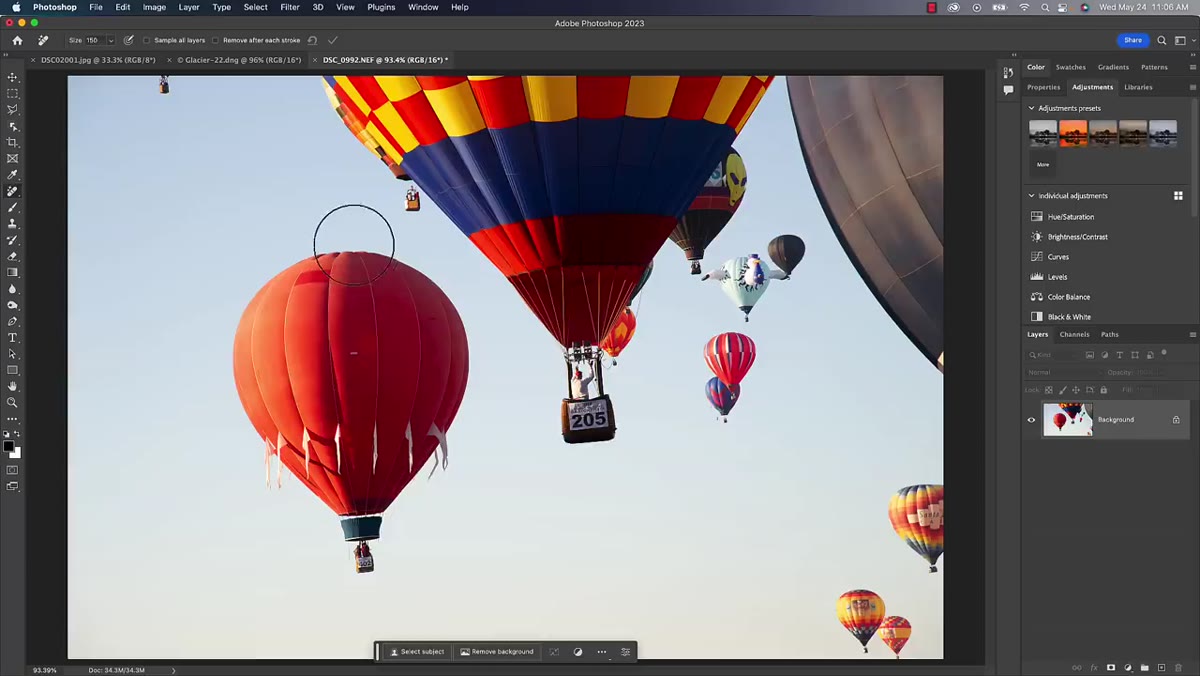 Brush size options in the options bar
Brush size works exactly like the rest of Photoshop’s brush-based tools. Left bracket key shrinks it, right bracket key grows it. Nothing revolutionary there, but it matters more with the Remove Tool because you want your painted area to hug the object you’re removing fairly closely. Too small and you leave remnants at the edges. Too large and you’re giving the algorithm less useful context to work with because you’ve painted over more of the surrounding image. A size that’s just slightly bigger than your target object tends to give the cleanest results.
Brush size options in the options bar
Brush size works exactly like the rest of Photoshop’s brush-based tools. Left bracket key shrinks it, right bracket key grows it. Nothing revolutionary there, but it matters more with the Remove Tool because you want your painted area to hug the object you’re removing fairly closely. Too small and you leave remnants at the edges. Too large and you’re giving the algorithm less useful context to work with because you’ve painted over more of the surrounding image. A size that’s just slightly bigger than your target object tends to give the cleanest results.
Step 4: Paint Over What You Want Removed
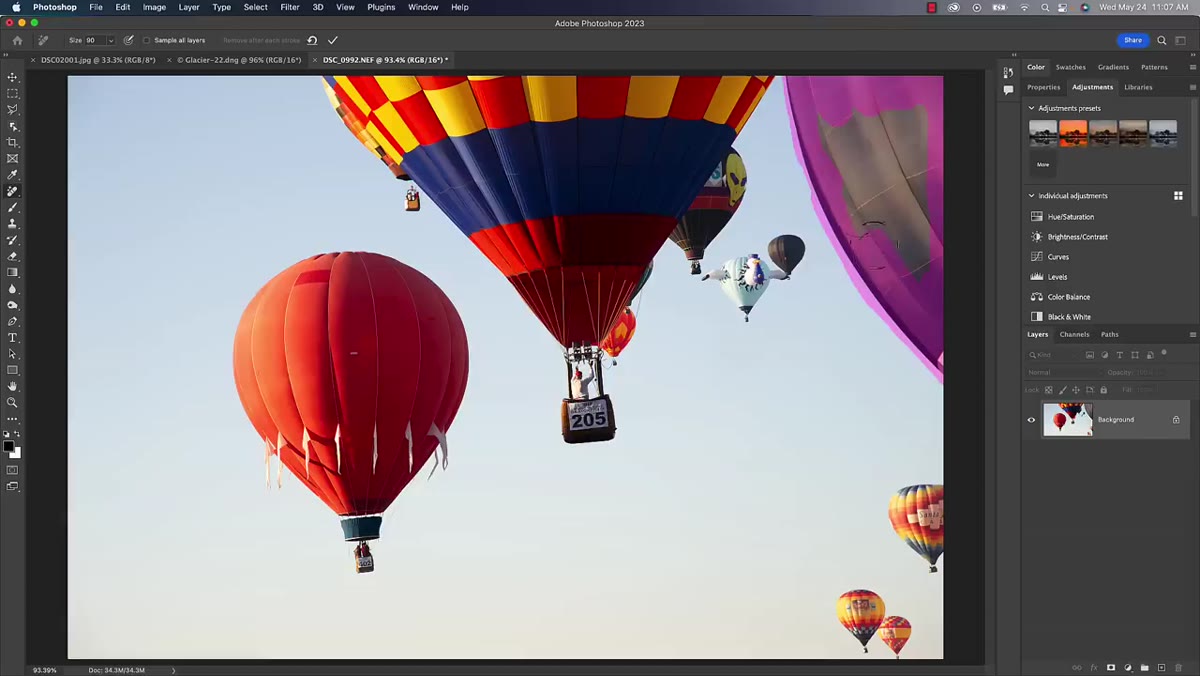 Painting over an unwanted element with the Remove Tool
With “Remove After Each Stroke” off, you can paint over your target in multiple passes without Photoshop doing anything until you say so. This is the part that feels the most different from the Healing Brush workflow. You’re not clicking and dragging one careful stroke. You’re painting loose coverage, lifting, adjusting, adding a bit more. Think of it less like surgical retouching and more like scribbling over something with a marker. Photoshop is looking at what you’ve covered and what surrounds it, and it’ll use all of that to generate the fill.
Painting over an unwanted element with the Remove Tool
With “Remove After Each Stroke” off, you can paint over your target in multiple passes without Photoshop doing anything until you say so. This is the part that feels the most different from the Healing Brush workflow. You’re not clicking and dragging one careful stroke. You’re painting loose coverage, lifting, adjusting, adding a bit more. Think of it less like surgical retouching and more like scribbling over something with a marker. Photoshop is looking at what you’ve covered and what surrounds it, and it’ll use all of that to generate the fill.
Step 5: Commit with the Checkmark and Evaluate the Result
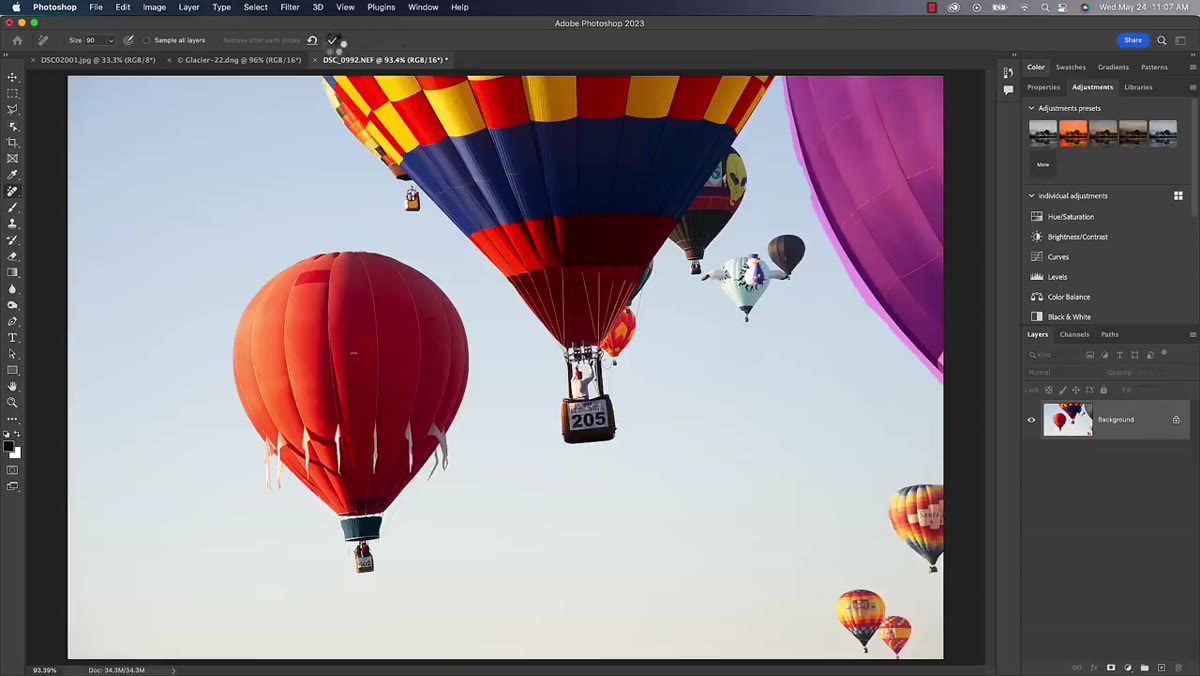 Clicking the checkmark to trigger the Remove Tool fill
Once your painted coverage looks right, hit the checkmark in the options bar (or press Enter) to let Photoshop do its thing. The fill generates, and this is where managing your expectations pays off. Matt is refreshingly direct about this: sometimes it’s perfect, sometimes it gets you 70 percent there. The algorithm produces slightly different results each time you run it on the same area, so if the first result isn’t great, undo and try again. A second or third attempt often lands cleaner than the first, and small leftover artifacts are easily handled with a follow-up pass of the Clone Stamp or Spot Healing Brush.
Clicking the checkmark to trigger the Remove Tool fill
Once your painted coverage looks right, hit the checkmark in the options bar (or press Enter) to let Photoshop do its thing. The fill generates, and this is where managing your expectations pays off. Matt is refreshingly direct about this: sometimes it’s perfect, sometimes it gets you 70 percent there. The algorithm produces slightly different results each time you run it on the same area, so if the first result isn’t great, undo and try again. A second or third attempt often lands cleaner than the first, and small leftover artifacts are easily handled with a follow-up pass of the Clone Stamp or Spot Healing Brush.
Step 6: Try Using It Additively, Not Just to Remove
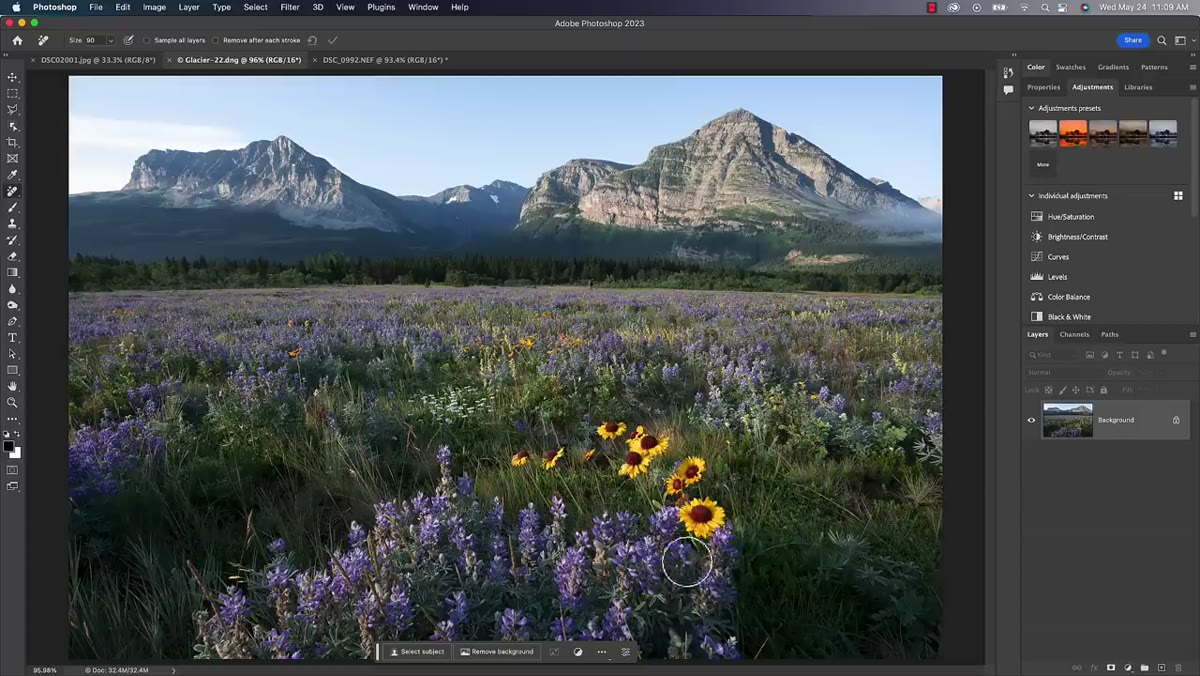 Painting over an empty area to generate new content
This is the part of Matt’s tutorial that actually reframed how I think about this tool. He paints over a sparse area next to a cluster of flowers, not to remove anything, but to prompt Photoshop to extend and fill in that space with contextually generated content. The result is a fuller, more balanced composition. The Remove Tool isn’t just a deletion tool. It’s a content-aware fill with a brush interface, and that opens up possibilities for extending backgrounds, balancing compositions, or filling in gaps that would have taken twenty minutes of careful cloning before.
Painting over an empty area to generate new content
This is the part of Matt’s tutorial that actually reframed how I think about this tool. He paints over a sparse area next to a cluster of flowers, not to remove anything, but to prompt Photoshop to extend and fill in that space with contextually generated content. The result is a fuller, more balanced composition. The Remove Tool isn’t just a deletion tool. It’s a content-aware fill with a brush interface, and that opens up possibilities for extending backgrounds, balancing compositions, or filling in gaps that would have taken twenty minutes of careful cloning before.
One Caveat Worth Knowing Before You Rely On It
The Remove Tool works on pixel layers, which means if your document is heavy on adjustment layers and smart objects, you’ll want to check that “Sample All Layers” checkbox in the options bar. Without it, the tool only reads the active layer and the fill can come out looking patchy or wrong. I’ve also found it performs noticeably better on organic textures like grass, foliage, and sky than it does on hard geometric surfaces like buildings or patterned fabric. For those situations, the old Clone Stamp with a carefully chosen source point still wins. Use the Remove Tool to get most of the way there and then finish with something more precise. The two workflows aren’t competing, they’re complementary.
The single most important thing to take from this tutorial is the workflow shift: disable “Remove After Each Stroke,” paint your coverage in multiple relaxed passes, then commit once. That one change turns the Remove Tool from something that feels unpredictable into something you can actually control. It’s become a default part of my retouching process, and I expect it’ll do the same for yours.
Watch the full tutorial on YouTube to see Matt demonstrate this on real images, including the balloon example that shows exactly why the old cloning approach would have struggled.
Comments
Leave a Comment