I’ll be honest — I never really used Brightness/Contrast. It always felt like the adjustment layer Adobe included just so the list didn’t look short. The algorithm was weak, the results were flat, and anyone doing serious work had already migrated to Curves or was living inside Camera Raw. So when Photoshop 27.10 quietly swapped it out for a brand new tool called the Light adjustment layer, my reaction was less “how dare they” and more “finally.”
In this Aaron Nace (PHLEARN) tutorial, he breaks down exactly what the Light layer is, how its six sliders work, the correct order to use them, and how to mask adjustments independently onto your subject and background. He also gets into building a soft glow effect using a double-masked group, which is the kind of thing that sounds complicated but takes about two minutes once you see it done. Watch the full tutorial on YouTube if you want to follow along with the actual image he’s working on.
The practical upside here is real. If you’ve been doing luminosity work inside Camera Raw and then jumping back into Photoshop to do your masking and compositing, the Light layer closes that loop. It’s the same tone controls, right in your layer stack, with full mask support. That’s a workflow change worth paying attention to.
Step 1: Find the Light Layer (and What Happened to Brightness/Contrast)
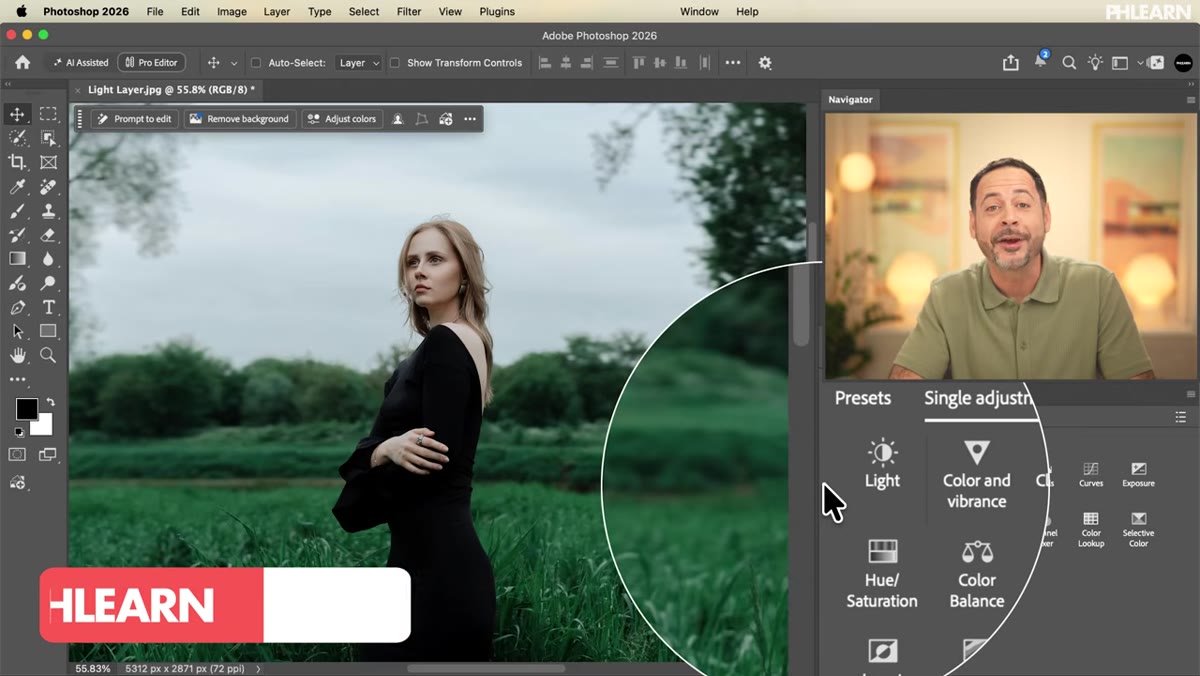 Adjustment layers panel with Brightness/Contrast missing, Light visible
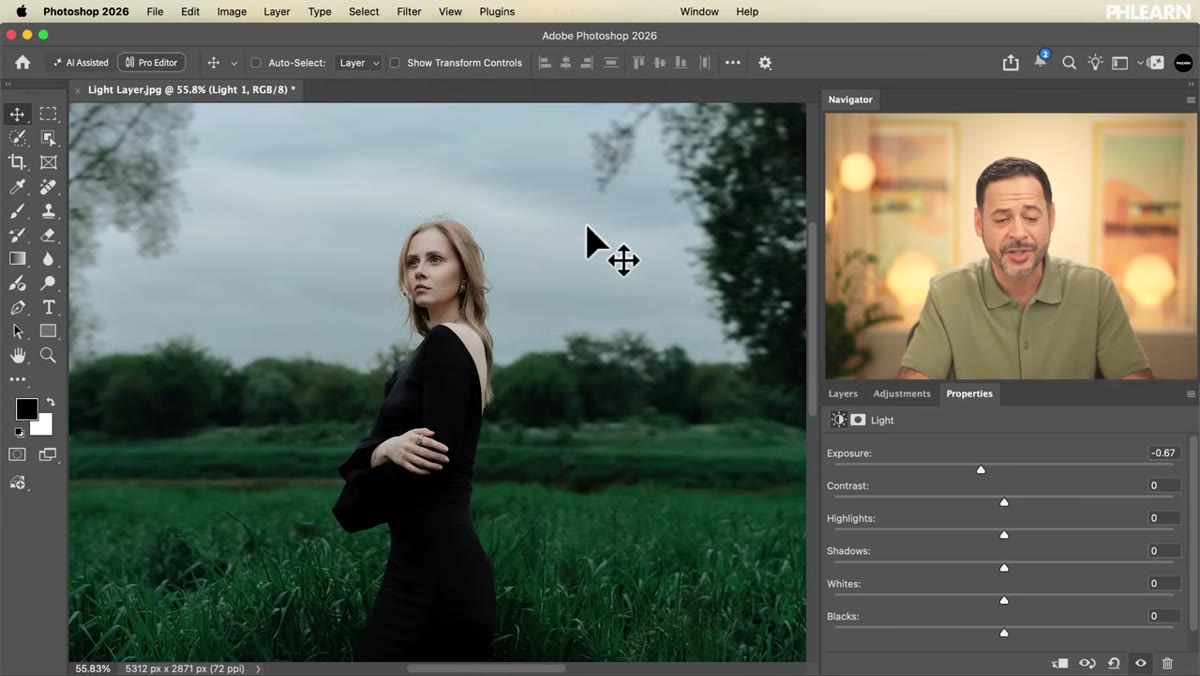
Open your Adjustments panel and look for Brightness/Contrast. It’s gone. In its place is a new entry simply labeled “Light.” Click it to add it as a new adjustment layer. The Properties panel will show six sliders: Exposure, Contrast, Highlights, Shadows, Whites, and Blacks. If you’ve spent any time in Camera Raw or Lightroom, you’re already home.
Adjustment layers panel with Brightness/Contrast missing, Light visible
Open your Adjustments panel and look for Brightness/Contrast. It’s gone. In its place is a new entry simply labeled “Light.” Click it to add it as a new adjustment layer. The Properties panel will show six sliders: Exposure, Contrast, Highlights, Shadows, Whites, and Blacks. If you’ve spent any time in Camera Raw or Lightroom, you’re already home.
If you genuinely need the old Brightness/Contrast back, you’re not stuck. Double-click the Light adjustment layer thumbnail to open its properties, then click the small menu icon on the right side of the Properties panel. Change “Light Version” from Latest to Legacy, and Brightness/Contrast returns exactly as it was. For everyone else, leave it on Latest and keep going.
Step 2: Use the Sliders in the Right Order
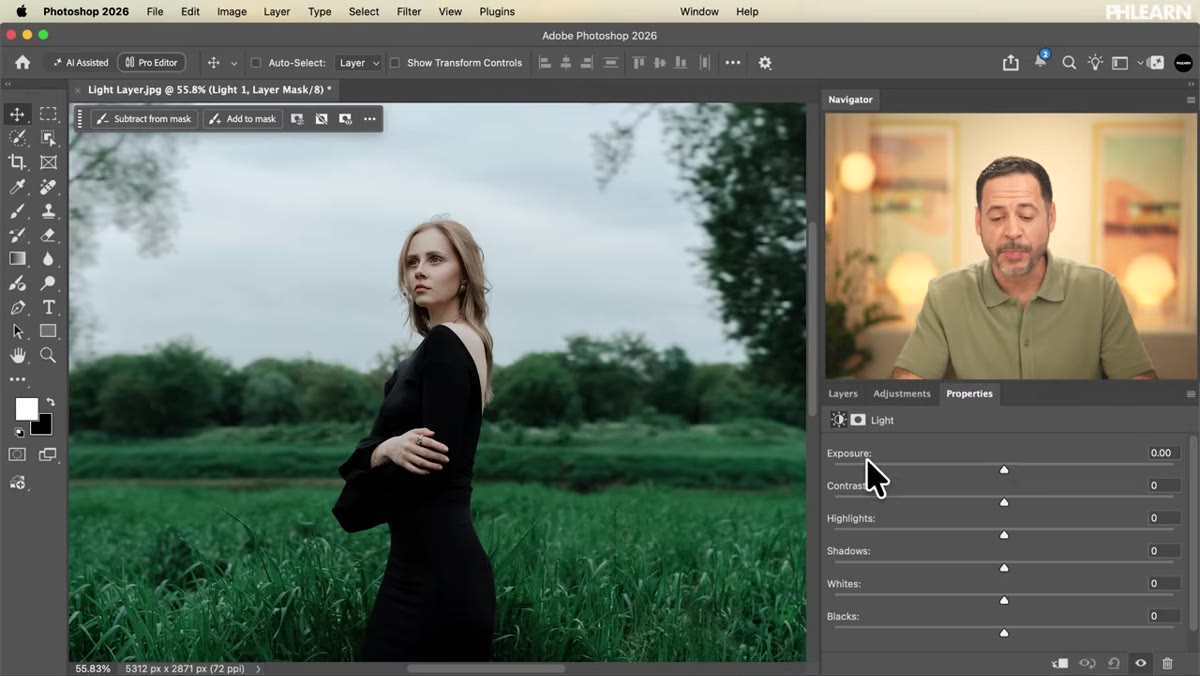 Light adjustment layer Properties panel showing all six sliders
This is the part most people skip, and it matters. Aaron walks through the correct sequence for the sliders, and it follows the same logic as Camera Raw: start with Exposure to set your overall brightness target, then dial in Whites and Blacks to set the endpoints of your tonal range, then use Highlights and Shadows to recover detail at the extremes, and finally apply Contrast last once everything else is locked in.
Light adjustment layer Properties panel showing all six sliders
This is the part most people skip, and it matters. Aaron walks through the correct sequence for the sliders, and it follows the same logic as Camera Raw: start with Exposure to set your overall brightness target, then dial in Whites and Blacks to set the endpoints of your tonal range, then use Highlights and Shadows to recover detail at the extremes, and finally apply Contrast last once everything else is locked in.
Working out of order, especially adding Contrast before you’ve set your whites and blacks, tends to clip data you haven’t accounted for yet. Think of it like seasoning a dish. You taste first, then adjust. Contrast is a finishing move, not a starting point.
Step 3: Make Your Selection Before Adding the Adjustment Layer
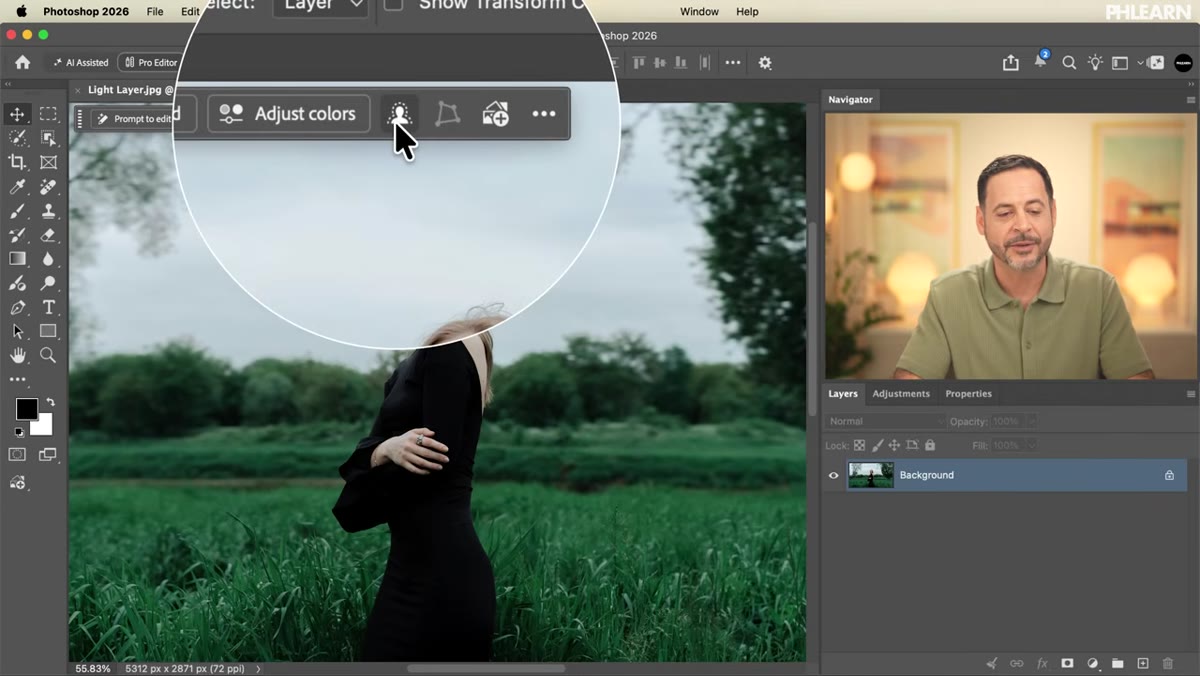 Select Subject tool active with marching ants around the subject
Here’s the workflow tip that saves the most time. Rather than adding the Light layer first and then painting a mask, start with your selection. Click your background image layer, then use the Select Subject button in the toolbar (the little person with dots around them) or go to Select, then Subject. Photoshop will generate a selection around your subject automatically.
Select Subject tool active with marching ants around the subject
Here’s the workflow tip that saves the most time. Rather than adding the Light layer first and then painting a mask, start with your selection. Click your background image layer, then use the Select Subject button in the toolbar (the little person with dots around them) or go to Select, then Subject. Photoshop will generate a selection around your subject automatically.
Now, with that selection active, go to your Adjustments panel and click Light. The new adjustment layer appears with a mask already built in, white over the subject and black everywhere else. You didn’t have to paint a single pixel. This approach works with any adjustment layer, not just Light, and it’s the kind of thing that quietly cuts five minutes off a composite workflow once it becomes habit.
Step 4: Darken the Background with Its Own Light Layer
 Light layer with inverted mask affecting only the background
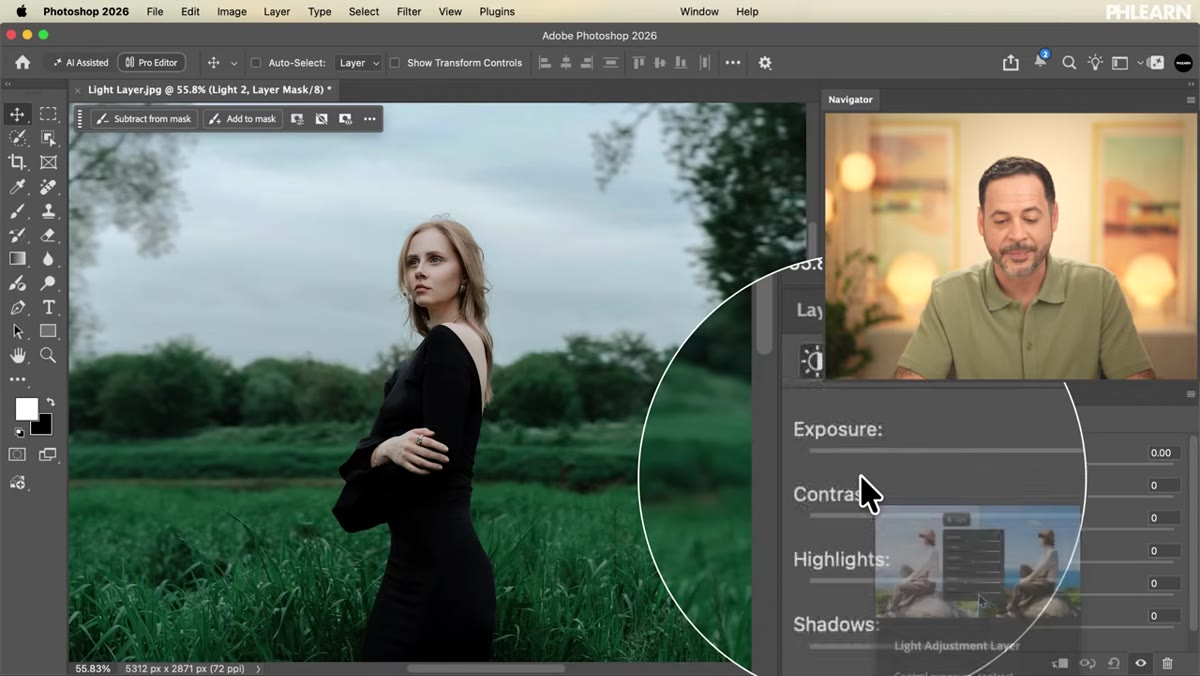
To apply a separate adjustment to the background, start the same way. With your subject selected, add a Light layer. Then click the mask thumbnail and invert it with Ctrl+I (Cmd+I on Mac). Now the white area of the mask covers the background, and the subject is protected.
Light layer with inverted mask affecting only the background
To apply a separate adjustment to the background, start the same way. With your subject selected, add a Light layer. Then click the mask thumbnail and invert it with Ctrl+I (Cmd+I on Mac). Now the white area of the mask covers the background, and the subject is protected.
Bring the Exposure slider down to taste. Aaron pulls the background darker to create depth and draw the eye toward the subject, which is a classic portrait move. Because this is a non-destructive adjustment layer, you can soften the mask edges or tweak the exposure value at any point without touching the original pixels.
Step 5: Brighten and Enhance Your Subject with a Second Light Layer
 Second Light layer with mask isolating the subject
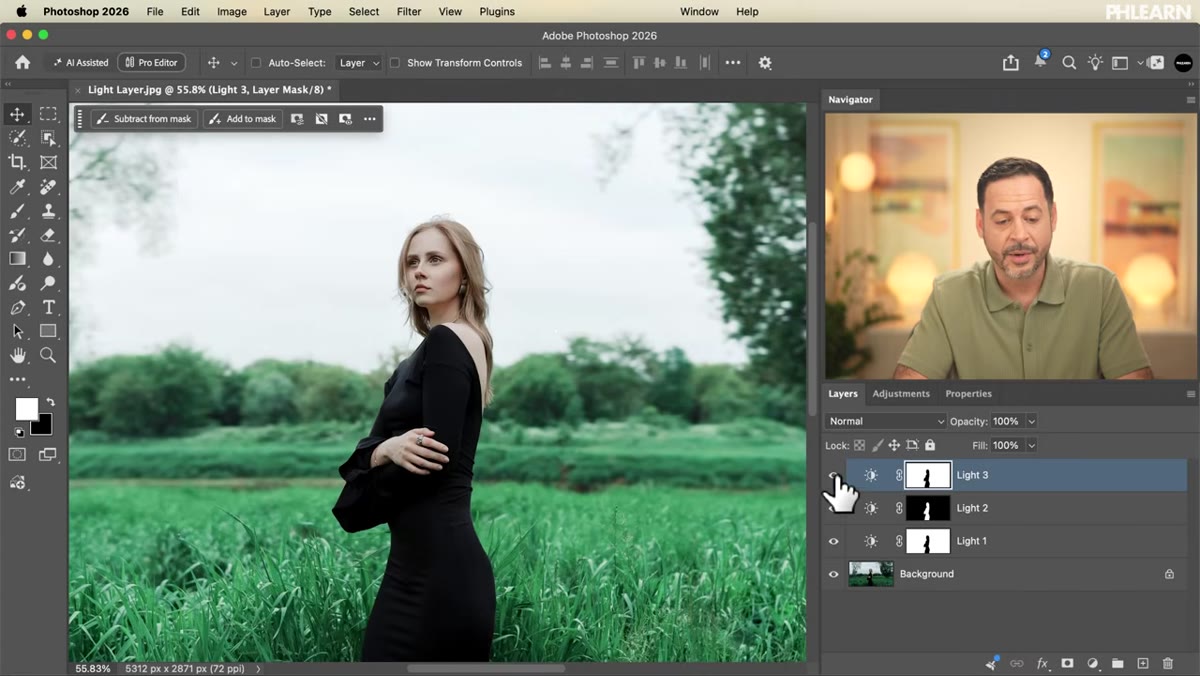
Add another Light layer, this time letting the subject-based mask sit as-is (white on the subject, black on the background). Now use the sliders to lift and refine the subject’s tones independently from the background. Bring up Exposure slightly, then use Shadows to open up any darker areas on the skin or clothing, and nudge Whites if you want more pop in the highlights.
Second Light layer with mask isolating the subject
Add another Light layer, this time letting the subject-based mask sit as-is (white on the subject, black on the background). Now use the sliders to lift and refine the subject’s tones independently from the background. Bring up Exposure slightly, then use Shadows to open up any darker areas on the skin or clothing, and nudge Whites if you want more pop in the highlights.
One thing worth noting: because the masks on these two layers are essentially inverses of each other, you get total control over subject and background lighting as separate systems. It’s a simple concept but it replicates the kind of split-toning control people usually reach for gradient maps or luminosity masks to achieve.
Step 6: Build a Background Glow Using a Masked Group
 Group layer with double mask creating soft light glow effect
This is the section that earns the tutorial. To create a soft glow of light sitting behind the subject, Aaron uses a group with two masks working together. A solid color or gradient fill layer inside the group handles the light color, but the group itself carries a mask that hides the glow from falling over the subject’s edges. The result is a rim-light style bloom in the background that reads as environmental light rather than a flat overlay.
Group layer with double mask creating soft light glow effect
This is the section that earns the tutorial. To create a soft glow of light sitting behind the subject, Aaron uses a group with two masks working together. A solid color or gradient fill layer inside the group handles the light color, but the group itself carries a mask that hides the glow from falling over the subject’s edges. The result is a rim-light style bloom in the background that reads as environmental light rather than a flat overlay.
The technique relies on the fact that groups can hold their own mask independently of the layers inside them. If you’ve never stacked masks that way, this is worth experimenting with even outside this specific use case.
One Caveat From Experience
The Light layer is excellent, but the masking still requires clean selections to look good. I’ve been burned enough times by rushed Select Subject results on hair or fine fabric to know that you’re almost always going to want to go into Select and Mask for refinement before you commit to these kinds of adjustments. The tool generates a decent starting point, but “decent” shows up fast when you’re working at full resolution on a tight deadline. Refine your edges. Always.
The single most useful thing to take from all of this: the Light layer gives you Camera Raw-grade tone controls with the masking flexibility of a native adjustment layer, and that combination makes targeted luminosity work significantly faster than the old Brightness/Contrast ever could. Whether you use it to separate a subject from a background, build atmospheric depth, or just replace a clunky old workflow, it’s worth adding to your regular toolkit.
Watch the full tutorial on YouTube for Aaron’s complete walkthrough, including the Color and Vibrance Camera Raw tools that round out this new family of adjustment layers.
Comments
Leave a Comment