
There’s a specific kind of workflow misery that comes from spending twenty minutes carefully lassoing around an object you need to remove, only to have the fill look like the background was painted by someone who had heard of the concept of “texture” but never actually seen it. I’ve been there more times than I’d like to admit, usually in a coffee shop, usually on a deadline, usually making quiet, frustrated noises into my cold brew. So when Adobe drops a new Photoshop release and the headline features are around smarter selections and faster object removal, I actually pay attention.
Watch the full tutorial on YouTube
In this Matt Kloskowski tutorial covering what’s new in Photoshop 2023, Matt walks through the key updates that landed in mid-October 2022 as part of Adobe’s annual release cycle. The selection and removal improvements are the real story here, and they’re the kind of changes that quietly save you ten minutes per project without you even realizing it until you try to go back to an older version and feel the pain.
Step 1: Find the Object Selection Tool
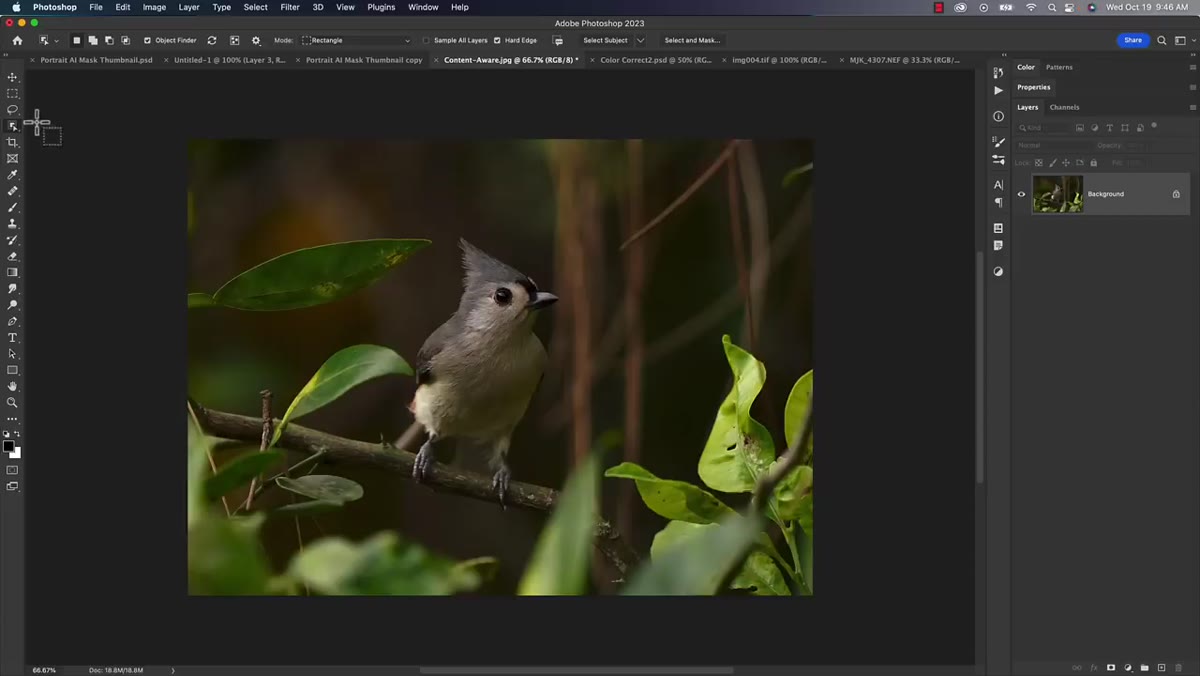 Object Selection Tool highlighted in the Photoshop toolbar
The Object Selection Tool has been in Photoshop for a few versions now, but it keeps getting better. You’ll find it in the toolbar, roughly fourth from the top. Keyboard shortcut is W, which you should absolutely be using because clicking through the toolbar is a crime against efficiency. Once you have it selected, check the options bar at the top of the screen and make sure the auto-detect objects checkbox is enabled.
Object Selection Tool highlighted in the Photoshop toolbar
The Object Selection Tool has been in Photoshop for a few versions now, but it keeps getting better. You’ll find it in the toolbar, roughly fourth from the top. Keyboard shortcut is W, which you should absolutely be using because clicking through the toolbar is a crime against efficiency. Once you have it selected, check the options bar at the top of the screen and make sure the auto-detect objects checkbox is enabled.
With that checkbox on, the tool will highlight objects as you hover over them, drawing a colored overlay so you can see what Photoshop is planning to select before you commit. In Photoshop 2023 the underlying detection has been improved, so you’re getting cleaner edges and more accurate boundaries on complex subjects like animals, people, and objects with irregular outlines.
Step 2: Make Your Selection by Clicking (Just Clicking)
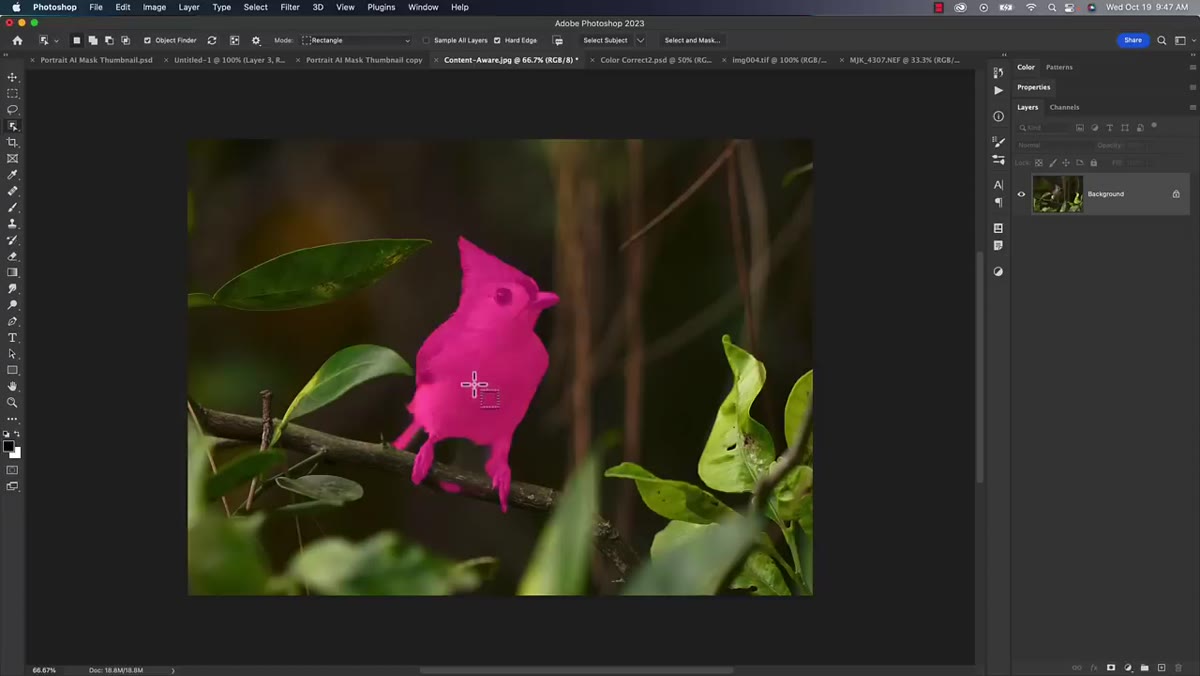 Hovering over bird subject showing automatic selection highlight
This is the part that still impresses me every time. You hover over a subject, Photoshop highlights it, and you just click. No drawing, no lassoing, no holding your breath while you try to trace a bird’s feathers with a mouse. The 2023 version of the engine produces noticeably more refined results, particularly around edges that would have previously needed manual cleanup with Refine Edge or a layer mask.
Hovering over bird subject showing automatic selection highlight
This is the part that still impresses me every time. You hover over a subject, Photoshop highlights it, and you just click. No drawing, no lassoing, no holding your breath while you try to trace a bird’s feathers with a mouse. The 2023 version of the engine produces noticeably more refined results, particularly around edges that would have previously needed manual cleanup with Refine Edge or a layer mask.
If you want to use the tool in a more traditional way, the options bar gives you a choice between rectangle and lasso modes. Rectangle mode lets you draw a box around the subject and Photoshop finds the object within it. Lasso mode lets you draw a rough freehand shape. Both work well, but the hover-and-click approach is the fastest path for clean, isolated subjects.
Step 3: Remove the Object with Delete and Fill Selection
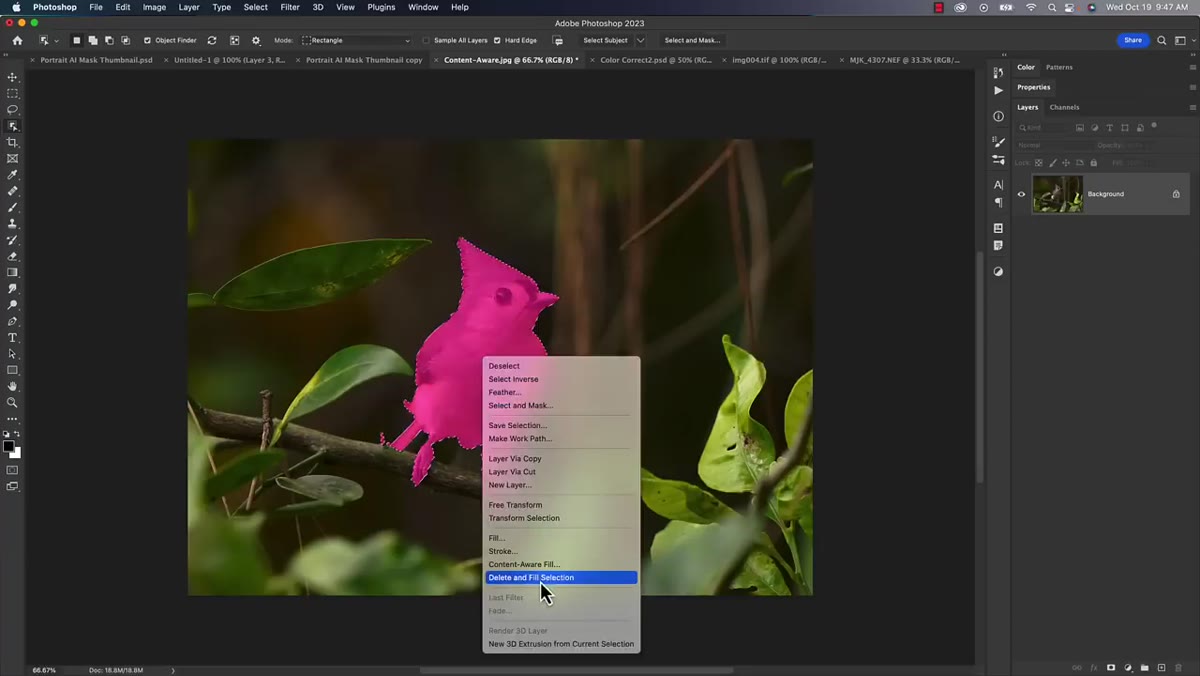 Right-click context menu showing Delete and Fill Selection option
Once you have your selection, right-click inside it. You’ll see a context menu and near the top there’s a new option called “Delete and Fill Selection.” This is a content-aware removal that works automatically, no extra dialogs, no sampling controls, it just runs and fills. Click it and Photoshop removes the selected object and replaces it with generated background content based on the surrounding area.
Right-click context menu showing Delete and Fill Selection option
Once you have your selection, right-click inside it. You’ll see a context menu and near the top there’s a new option called “Delete and Fill Selection.” This is a content-aware removal that works automatically, no extra dialogs, no sampling controls, it just runs and fills. Click it and Photoshop removes the selected object and replaces it with generated background content based on the surrounding area.
The results are genuinely good for most scenarios. Subjects sitting against relatively consistent backgrounds come out clean enough to use without any retouching. Complex or busy backgrounds will sometimes show artifacts, but as a first pass it’s faster than anything that came before it. Matt’s recommendation, and mine after trying it, is to run this first and only fall back to the manual Content-Aware Fill workspace if the automatic result needs work.
Step 4: Use Shift + Delete for Even Faster Removal
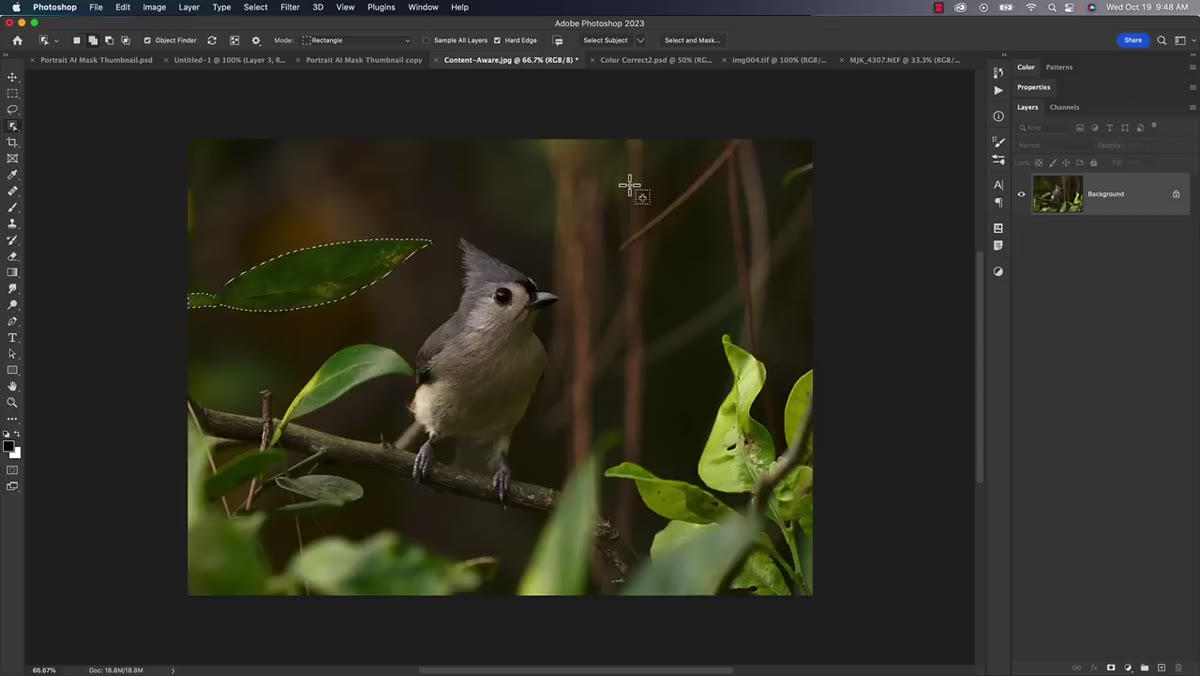 Using Shift+Delete shortcut after lassoing object for instant removal
Here’s where it gets genuinely satisfying. After you’ve made a selection with the Object Selection Tool, you can skip the right-click menu entirely. Just hit Shift + Delete and Photoshop runs the same Delete and Fill process automatically. No menu, no confirmation, just gone. For anyone who has strong opinions about unnecessary mouse clicks (hello), this is the kind of shortcut that gets added to the mental library immediately.
Using Shift+Delete shortcut after lassoing object for instant removal
Here’s where it gets genuinely satisfying. After you’ve made a selection with the Object Selection Tool, you can skip the right-click menu entirely. Just hit Shift + Delete and Photoshop runs the same Delete and Fill process automatically. No menu, no confirmation, just gone. For anyone who has strong opinions about unnecessary mouse clicks (hello), this is the kind of shortcut that gets added to the mental library immediately.
It’s worth noting that Shift + Delete is specific to certain selection tools, so if you’re working with a standard Lasso or Marquee and it doesn’t respond, that’s why. Stick with the Object Selection Tool or right-click to access Delete and Fill from the context menu in those cases.
Step 5: Know When to Use Content-Aware Fill Instead
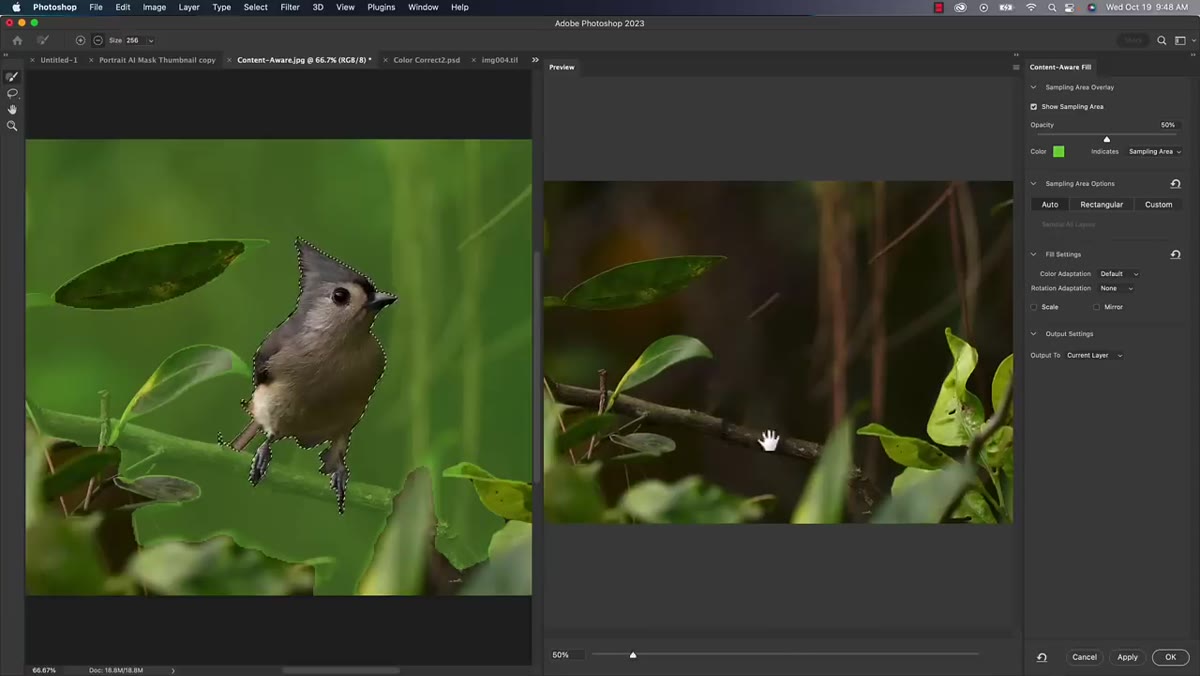 Content Aware Fill workspace open with sampling area controls visible
Delete and Fill is automatic, which is its strength and its limitation. When it doesn’t give you a clean result, the Content-Aware Fill workspace is the next move. You access it through Edit > Content-Aware Fill, or by right-clicking your selection and choosing it from the same context menu. This opens a full panel where you can paint over the areas you want Photoshop to sample from when building the fill, giving you direct control over what reference material it uses.
Content Aware Fill workspace open with sampling area controls visible
Delete and Fill is automatic, which is its strength and its limitation. When it doesn’t give you a clean result, the Content-Aware Fill workspace is the next move. You access it through Edit > Content-Aware Fill, or by right-clicking your selection and choosing it from the same context menu. This opens a full panel where you can paint over the areas you want Photoshop to sample from when building the fill, giving you direct control over what reference material it uses.
This isn’t a new feature in 2023, it’s been available for years, but understanding when to use it versus the new automatic Delete and Fill is the key decision in this workflow. Think of Delete and Fill as the fast lane and Content-Aware Fill as the manual override when the fast lane has a fender bender.
A Note from My Own Experience
The selection improvements in 2023 are real, but the Delete and Fill shortcut is what I’ve actually changed my behavior around. I used to have a whole little ritual for removing objects: select, refine, open Content-Aware Fill, paint the sample zone, generate, close, check, repeat. Now I hover, click, Shift + Delete, and I’m done 80% of the time. The other 20% I fall back to the old workflow.
Where I’ve seen it struggle is anywhere the background has strong directional lines, like a fence, a striped wall, or architectural elements with hard geometry. The automatic fill tends to blur or break the pattern. For those cases, Content-Aware Fill with a carefully painted sample zone is still the better tool. But for organic backgrounds, skies, grass, water, foliage, it’s hard to argue with one keystroke.
The single most important takeaway from this whole update is that Shift + Delete is now a legitimate part of a fast retouching workflow, not just a nice party trick. If you’re still manually running through Content-Aware Fill for every object removal, try the new approach and see how many steps you can cut.
Watch the full tutorial on YouTube to see Matt walk through the photo restoration neural filter and the rest of the 2023 updates, which are also worth your time.
Comments
Leave a Comment