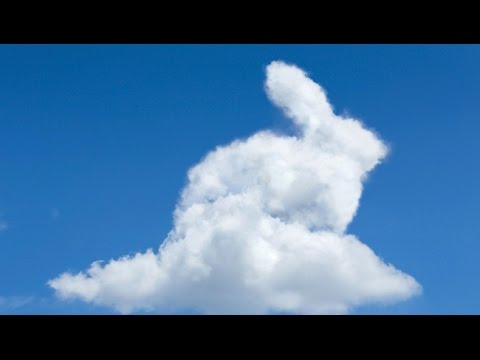
Client work keeps me humble. I’ll spend half a day hunting for the perfect stock photo of a heart or a logo shape made from clouds, strike out completely, and then remember that Photoshop exists and I should just make the thing myself. That’s more or less where this technique lives for me, right at the intersection of “I genuinely need this” and “I had no idea you could do it this way.” In this Aaron Nace (PHLEARN) tutorial, the example project is a bunny made from clouds, which sounds absurdly specific until you realize the whole workflow is really just “any shape you want, made from real clouds.” Text, logos, holiday shapes, a client’s mascot, whatever. The method is the same. Watch the full tutorial on YouTube and follow along here for the step-by-step breakdown.
The core idea is that you’re not painting fake clouds from scratch. You’re working with real cloud photography and using it as raw material, isolating the cloud pixels, then sculpting them into a target shape using a reference image and a custom brush. The result looks genuinely photographic because it is. That’s the move that separates this from the usual “render clouds filter” approach that always looks like a screensaver from 2002.
Step 1: Set Up Your Two Source Images
 Bunny photo and cloud photo open side by side
Start with two open documents: your cloud photo and your reference shape image. Aaron uses a photo of a bunny as the shape reference, but this could be a silhouette of anything. Grab the Move tool (V), then click and drag from the shape image over into the cloud document to drop it as a new layer. Hit F for full screen to get a clean working view.
Bunny photo and cloud photo open side by side
Start with two open documents: your cloud photo and your reference shape image. Aaron uses a photo of a bunny as the shape reference, but this could be a silhouette of anything. Grab the Move tool (V), then click and drag from the shape image over into the cloud document to drop it as a new layer. Hit F for full screen to get a clean working view.
Step 2: Rough Out the Reference Shape with a Quick Mask
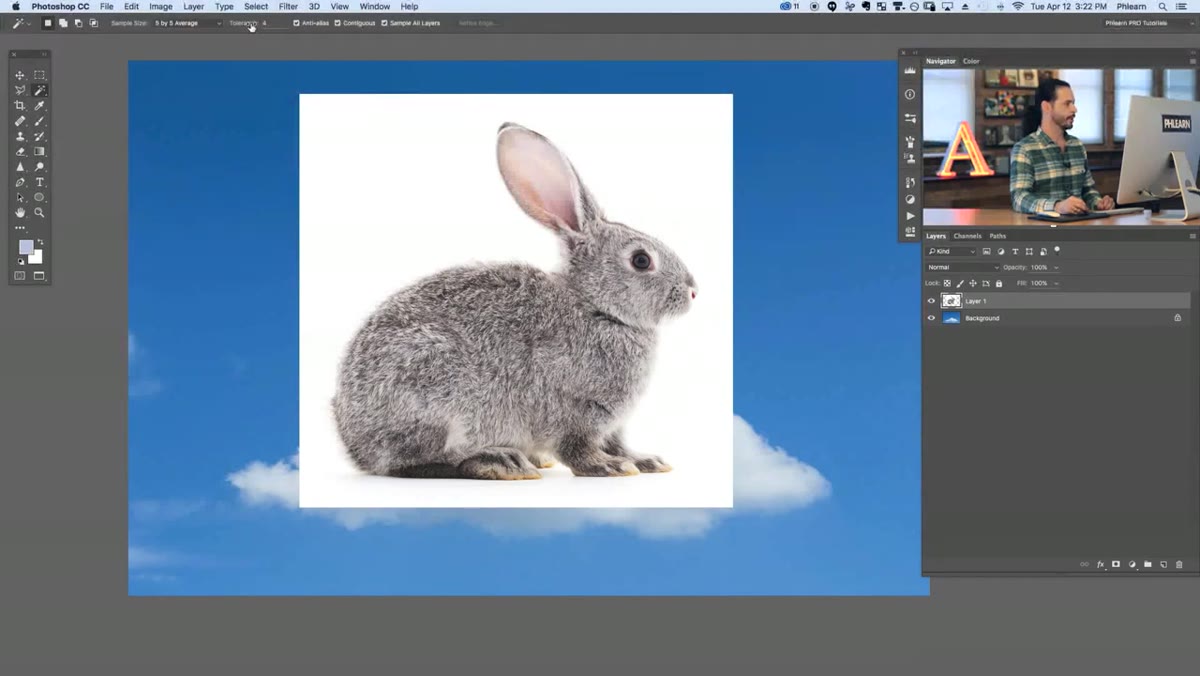 Magic Wand tool active, tolerance set in options bar
You need to isolate your reference shape, but it doesn’t need to be a perfect cut. Grab the Magic Wand tool (W) and bump the Tolerance up to somewhere between 10 and 15 in the options bar. Click on the background area around your shape to select it, then click the Layer Mask button at the bottom of the Layers panel. This will initially mask the wrong area, hiding the shape instead of the background. Click on the mask thumbnail and hit Command+I (Ctrl+I on Windows) to invert it. Now your shape is visible and the background is masked out.
Magic Wand tool active, tolerance set in options bar
You need to isolate your reference shape, but it doesn’t need to be a perfect cut. Grab the Magic Wand tool (W) and bump the Tolerance up to somewhere between 10 and 15 in the options bar. Click on the background area around your shape to select it, then click the Layer Mask button at the bottom of the Layers panel. This will initially mask the wrong area, hiding the shape instead of the background. Click on the mask thumbnail and hit Command+I (Ctrl+I on Windows) to invert it. Now your shape is visible and the background is masked out.
From here, use Command+T to enter Free Transform if you need to resize or reposition the reference so it sits comfortably in the frame. This layer is just a guide, not a finished element, so precision matters less than getting the proportions roughly right.
Step 3: Hide the Reference and Select the Cloud Pixels
 Color Range dialog open, white cloud areas selected
Toggle the reference layer’s visibility off. You don’t need to see it right now. Click on the background cloud layer to make it active, then go to Select, then Color Range. Inside the dialog, click directly on a bright white cloud area in the preview or on the canvas. The preview will show you a map where white areas represent what’s being selected. Adjust the Fuzziness slider until the clouds are well-selected without pulling in too much sky. Hit OK and you’ll see a standard selection appear around those cloud regions.
Color Range dialog open, white cloud areas selected
Toggle the reference layer’s visibility off. You don’t need to see it right now. Click on the background cloud layer to make it active, then go to Select, then Color Range. Inside the dialog, click directly on a bright white cloud area in the preview or on the canvas. The preview will show you a map where white areas represent what’s being selected. Adjust the Fuzziness slider until the clouds are well-selected without pulling in too much sky. Hit OK and you’ll see a standard selection appear around those cloud regions.
Step 4: Duplicate the Cloud Selection to a New Layer
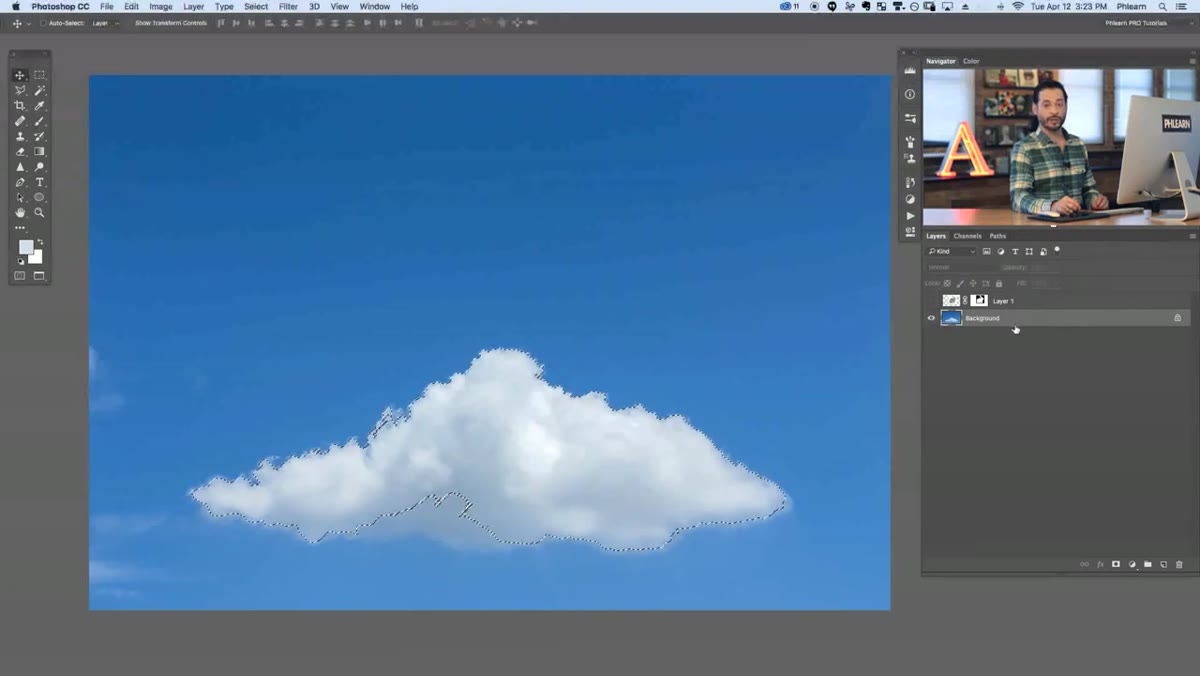 New cloud layer visible above background in Layers panel
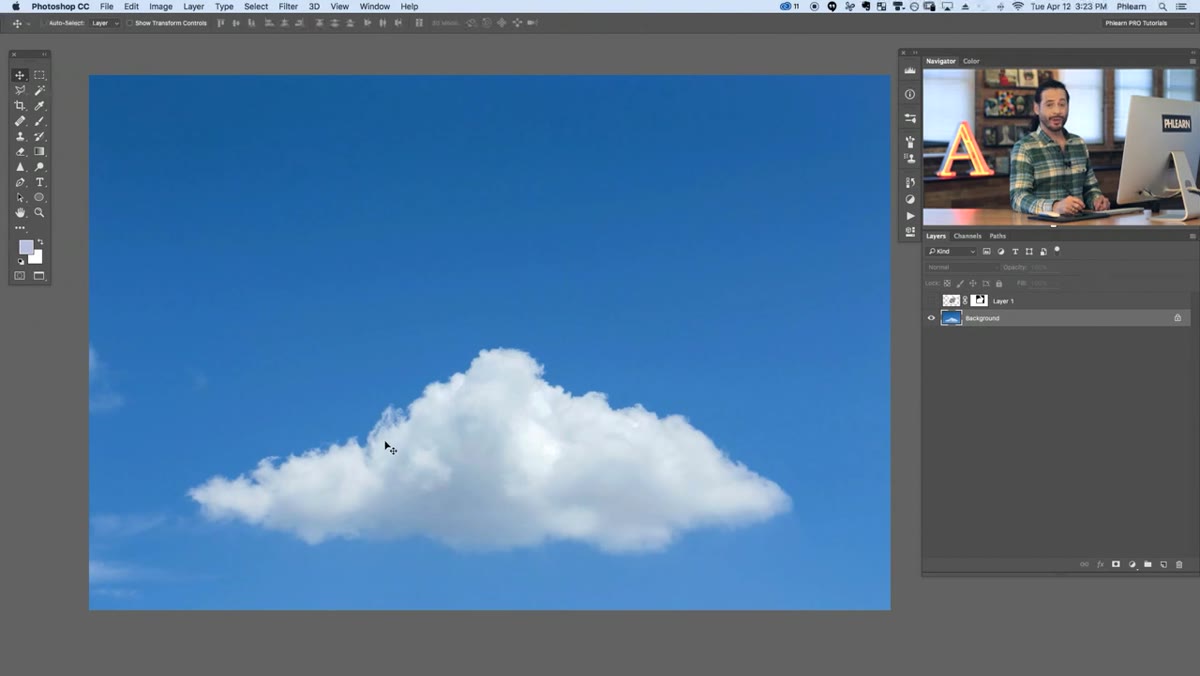
With the cloud selection still active, press Command+J (Ctrl+J) to copy just those selected pixels up onto a new layer. This gives you a clean cloud layer that’s separate from the background. If you move this new layer above everything else, you’ll see it’s exactly the cloud shapes from the original photo, now isolated and stackable.
New cloud layer visible above background in Layers panel
With the cloud selection still active, press Command+J (Ctrl+J) to copy just those selected pixels up onto a new layer. This gives you a clean cloud layer that’s separate from the background. If you move this new layer above everything else, you’ll see it’s exactly the cloud shapes from the original photo, now isolated and stackable.
Step 5: Switch the Blend Mode to Lighten
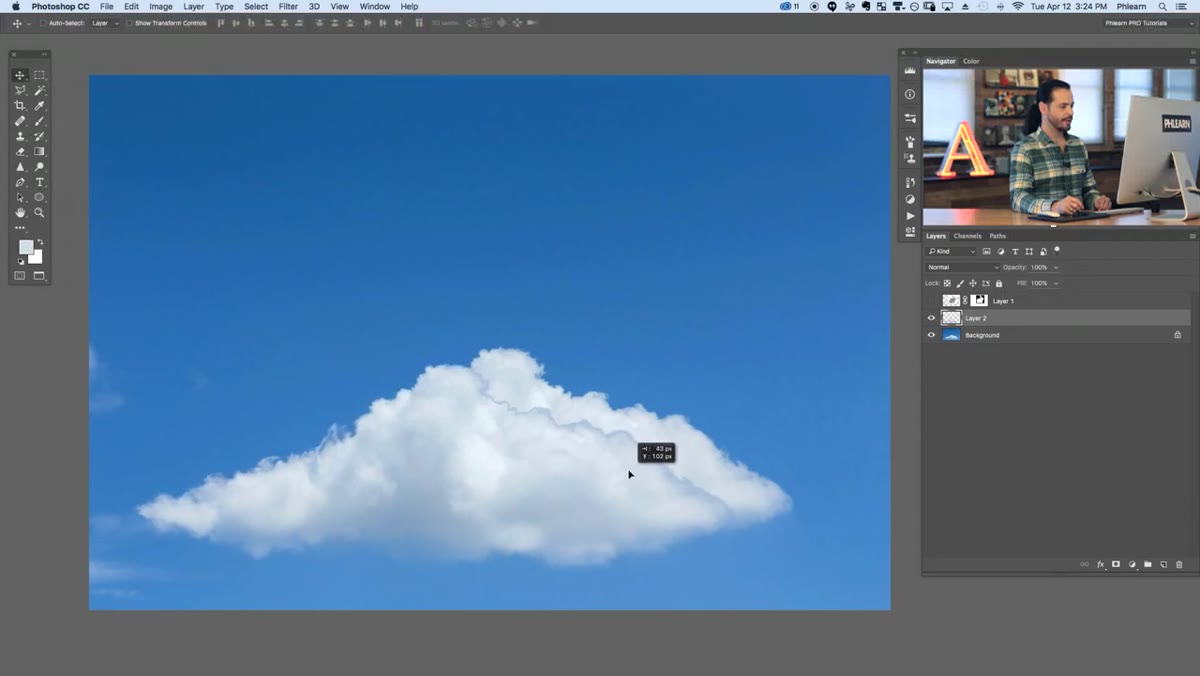 Blend mode dropdown set to Lighten on cloud layer
Here’s the part that makes the clouds look believable when layered. With your new cloud layer selected, click the blend mode dropdown in the Layers panel (it defaults to Normal) and switch it to Lighten. This tells Photoshop to only show pixels from this layer that are lighter than what’s below it. The hard edge artifact that shows up in Normal mode disappears, and the clouds blend seamlessly back into the image. It looks like one continuous sky because the blending logic mirrors how real clouds actually work against a bright background.
Blend mode dropdown set to Lighten on cloud layer
Here’s the part that makes the clouds look believable when layered. With your new cloud layer selected, click the blend mode dropdown in the Layers panel (it defaults to Normal) and switch it to Lighten. This tells Photoshop to only show pixels from this layer that are lighter than what’s below it. The hard edge artifact that shows up in Normal mode disappears, and the clouds blend seamlessly back into the image. It looks like one continuous sky because the blending logic mirrors how real clouds actually work against a bright background.
Step 6: Load the Custom Cloud Brush and Define Your Shape
 Custom cloud brush loaded in Brush panel
This is where the shaping actually happens. Aaron provides a free downloadable cloud brush (check the video description on YouTube for the link) that’s built from a real cloud photograph. Load it into Photoshop by going to the Brushes panel, clicking the menu icon, and choosing Import Brushes. Once loaded, select the brush and use it with a white foreground color to paint cloud texture along the edges of your shape.
Custom cloud brush loaded in Brush panel
This is where the shaping actually happens. Aaron provides a free downloadable cloud brush (check the video description on YouTube for the link) that’s built from a real cloud photograph. Load it into Photoshop by going to the Brushes panel, clicking the menu icon, and choosing Import Brushes. Once loaded, select the brush and use it with a white foreground color to paint cloud texture along the edges of your shape.
The trick is to toggle your reference layer back on at reduced opacity, maybe 40-50%, so you can see the silhouette as a guide while you paint. Work along the outer edges of the shape with the cloud brush to create that naturally lumpy, billowing cloud edge. Switch to black to erase areas where cloud is showing outside the shape boundary. You’re essentially sculpting with cloud texture rather than hard-edged selection tools, and the brush’s built-in texture does most of the heavy lifting.
Step 7: Clean Up and Refine the Silhouette
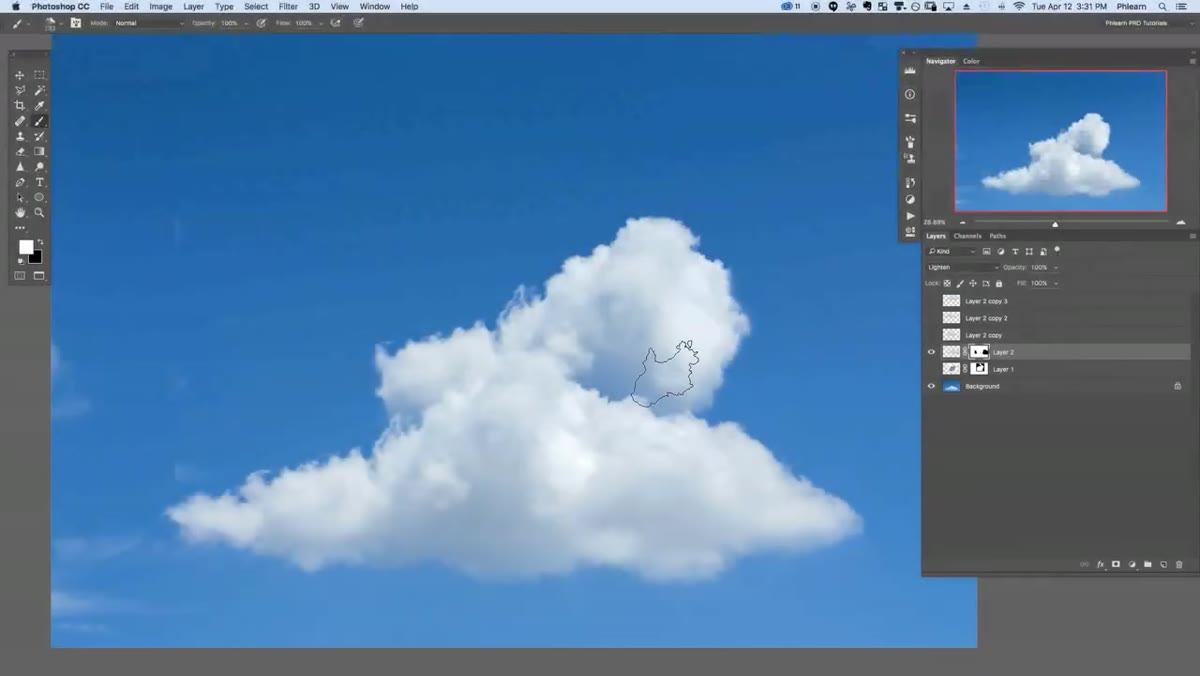 Cloud brush painting edges of bunny cloud shape
Once the basic silhouette is in, turn the reference layer off entirely and evaluate the shape on its own. Use smaller brush sizes at lower opacity to soften any areas that look too sharp or artificial. Real clouds have soft variation, not uniform edges. If you’ve got an area that looks over-painted, drop the brush opacity to around 20-30% and gradually work the edge back rather than trying to fix it in one stroke.
Cloud brush painting edges of bunny cloud shape
Once the basic silhouette is in, turn the reference layer off entirely and evaluate the shape on its own. Use smaller brush sizes at lower opacity to soften any areas that look too sharp or artificial. Real clouds have soft variation, not uniform edges. If you’ve got an area that looks over-painted, drop the brush opacity to around 20-30% and gradually work the edge back rather than trying to fix it in one stroke.
What I’d Add From My Own Workflow
One thing the tutorial doesn’t dwell on but I’ve found genuinely useful: duplicate your isolated cloud layer two or three times before you start painting. Keep the originals locked at the bottom of the stack. When you inevitably paint yourself into a corner, and you will, you’ve got clean cloud material to pull from without going back to the Color Range selection from scratch. I learned this the hard way on a project where I spent an hour on painted edges, merged the wrong layers, and had to rebuild the cloud selection entirely. Duplicate aggressively. It costs nothing.
The larger lesson here is that the most convincing composites in Photoshop come from using real photographic texture as your paint. A cloud brush made from an actual cloud photograph will always beat anything generated from scratch, whether that’s a render or a manual painting. The camera already did the hard work. Your job is just to reshape what it captured.
If you work in design, social media graphics, or photo compositing at any level, this technique is worth adding to your toolkit. The specific subject doesn’t matter. The workflow of isolation, duplication, blend mode adjustment, and texture-brush edge painting applies to water, smoke, fire, foliage, any organic material you’d want to shape.
Watch the full tutorial on YouTube to see Aaron walk through the complete process, grab the free cloud brush from the video description, and go make something weird.
Comments
Leave a Comment