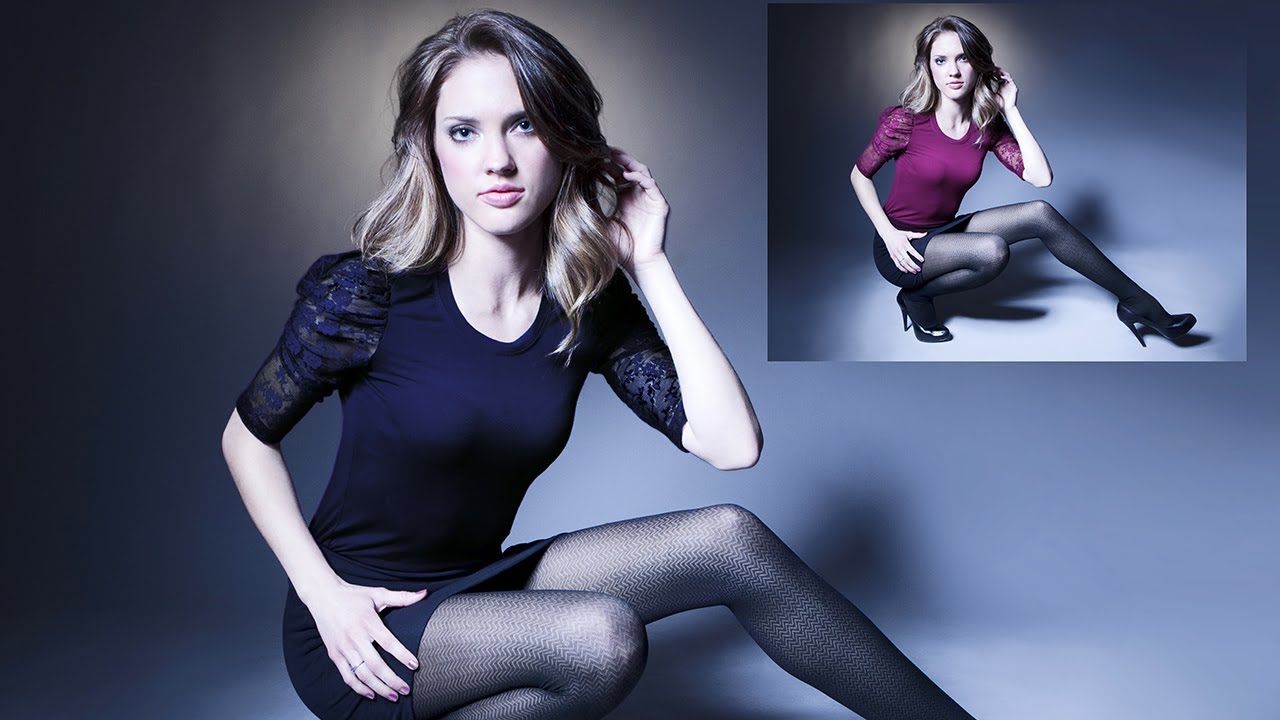
Client asks if you can “just swap the shirt to blue.” You say yes, obviously, because you are a professional. Then you spend forty minutes pushing sliders around wondering why the result looks like someone dumped a bucket of paint on the model. I have been that person more times than I care to admit.
The good news is there’s a clean, methodical way to do this that doesn’t involve guessing. In this The Slanted Lens tutorial, retoucher Julene Morgan walks through her actual production workflow for changing clothing color in Photoshop. Julene retouches for clients like Sony and Fox, so this isn’t a “here’s a fun effect to try” situation. It’s a real working process, and it’s more layered (pun intended) than most people expect. Watch the full tutorial on YouTube
The technique breaks down into three distinct phases: isolate the garment, adjust the color, then use a blending layer to fix whatever the color adjustment couldn’t. That last part is the one most tutorials skip, and it’s often what separates a convincing result from something that looks like a Halloween costume.
Step 1: Select the Shirt with the Quick Selection Tool
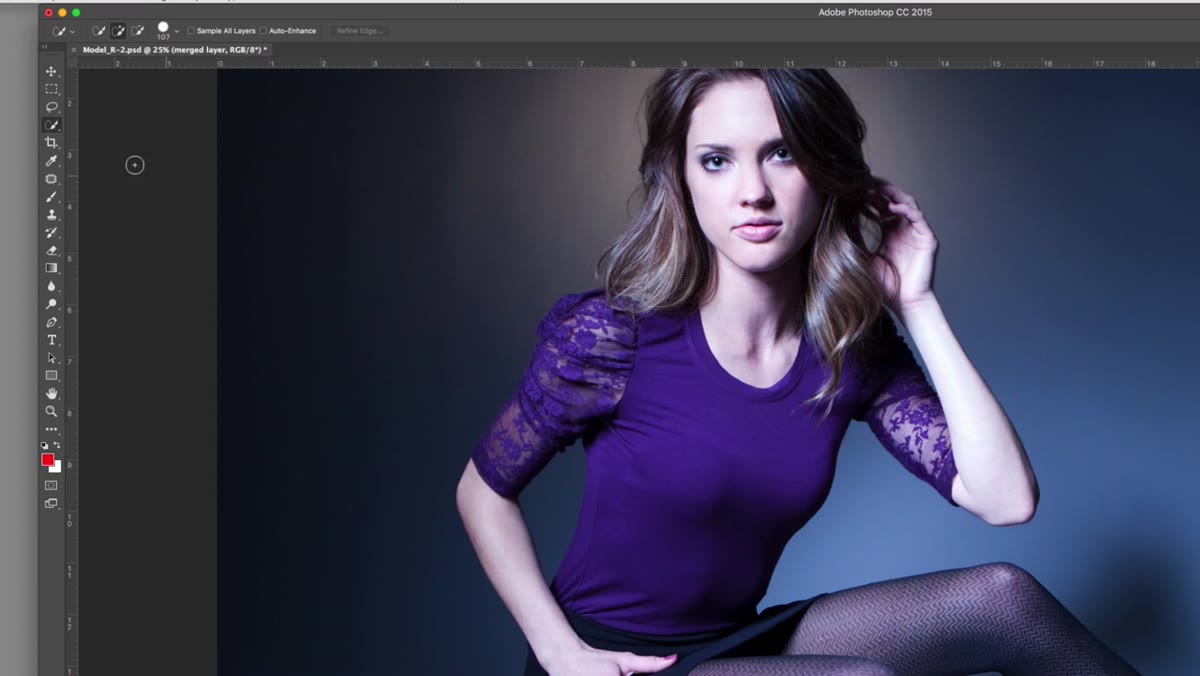 Quick Selection tool active, painting over a shirt
Grab the Quick Selection tool from your toolbar. It looks like a paintbrush with a dotted circle. Click and drag across the shirt and Photoshop will try to detect the edges automatically based on contrast and color. Work in strokes, not one giant drag. If the selection bleeds into the background or skin, hold Option (Mac) or Alt (PC) to switch into subtract mode. You’ll see the cursor change to show a minus sign. Paint over the areas you want to remove from the selection. It doesn’t need to be perfect at this stage, especially around hair or complex edges. You’ll refine it in the next step.
Quick Selection tool active, painting over a shirt
Grab the Quick Selection tool from your toolbar. It looks like a paintbrush with a dotted circle. Click and drag across the shirt and Photoshop will try to detect the edges automatically based on contrast and color. Work in strokes, not one giant drag. If the selection bleeds into the background or skin, hold Option (Mac) or Alt (PC) to switch into subtract mode. You’ll see the cursor change to show a minus sign. Paint over the areas you want to remove from the selection. It doesn’t need to be perfect at this stage, especially around hair or complex edges. You’ll refine it in the next step.
A Wacom tablet helps here because the pressure sensitivity gives you more control over stroke size, but a mouse or trackpad works fine. The Quick Selection tool is forgiving enough that the input device rarely matters much on simpler garments.
Step 2: Add a Layer Mask and Refine the Edge
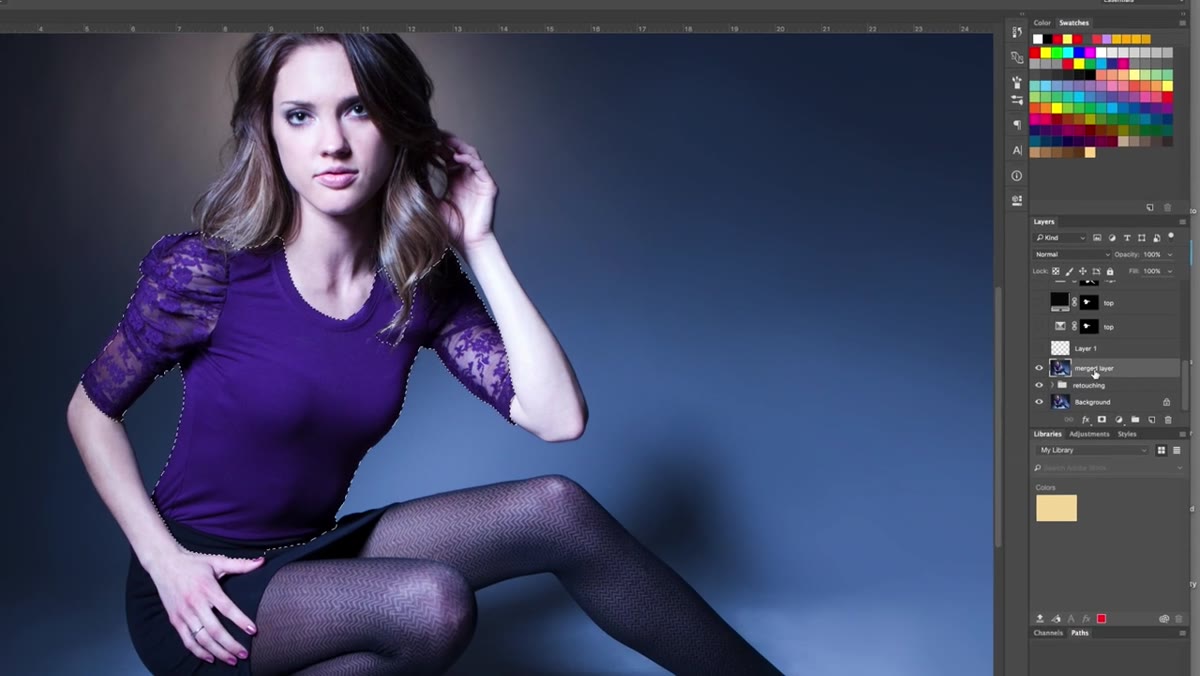 Layer mask added, Mask Edge properties panel open
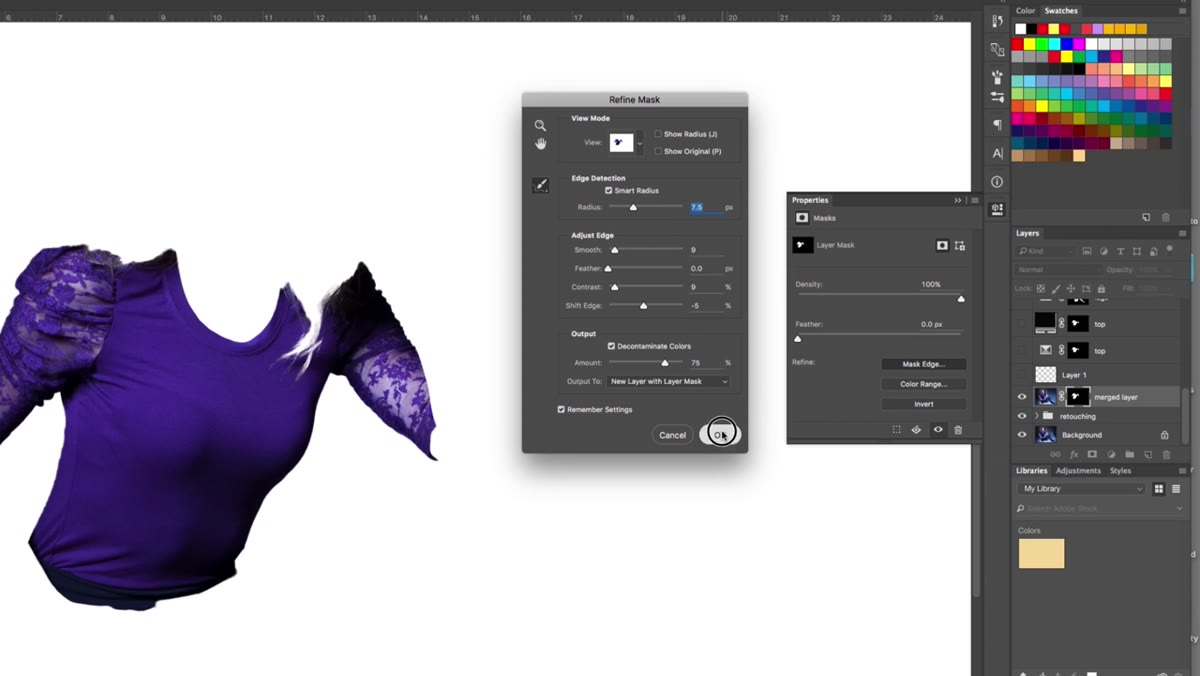
With your selection active, go to Layer > Layer Mask > Reveal Selection. This hides everything outside your selection and leaves the shirt visible. Now double-click the mask thumbnail in your Layers panel to open its Properties panel, then click “Mask Edge” (in newer versions of Photoshop this is labeled “Select and Mask”). This opens a dedicated workspace where you can clean up the selection edge.
Layer mask added, Mask Edge properties panel open
With your selection active, go to Layer > Layer Mask > Reveal Selection. This hides everything outside your selection and leaves the shirt visible. Now double-click the mask thumbnail in your Layers panel to open its Properties panel, then click “Mask Edge” (in newer versions of Photoshop this is labeled “Select and Mask”). This opens a dedicated workspace where you can clean up the selection edge.
The two controls worth focusing on here are the Refine Radius tool and the Decontaminate Colors checkbox. Run the Refine Radius tool along any hair or flyaway edges near the collar. It samples the area and blends the transition far more naturally than any manual brush work. Decontaminate Colors is particularly useful if the shirt color is bleeding into a nearby hair or skin edge. It removes color fringing at the mask boundary. Click OK when you’re done and Photoshop commits the refined mask.
Step 3: Add a Selective Color Adjustment Layer
 Selective Color panel open, reds channel selected with sliders adjusted
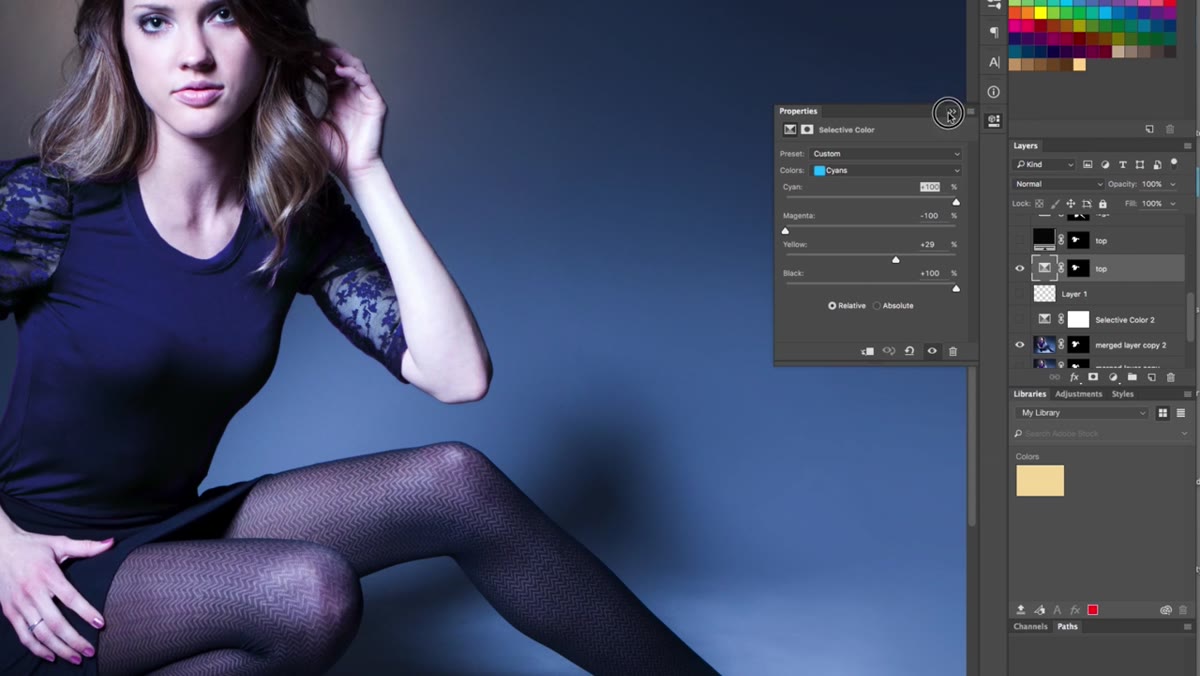
This is where the actual color change happens. At the bottom of the Layers panel, click the half-circle Adjustments icon and choose Selective Color. This adjustment works by targeting a specific color range and shifting its component values, rather than recoloring everything at once.
Selective Color panel open, reds channel selected with sliders adjusted
This is where the actual color change happens. At the bottom of the Layers panel, click the half-circle Adjustments icon and choose Selective Color. This adjustment works by targeting a specific color range and shifting its component values, rather than recoloring everything at once.
In the dropdown at the top of the Selective Color panel, choose the color range that most closely matches your shirt. For a red or pink shirt, start with Reds. For a purple shirt, you may need to adjust both the Reds and Magentas channels. Julene’s example shirt was pushing into purple, so she dragged Cyan way up and pulled Magenta way down in both the Reds and Magentas channels. Toggling the adjustment layer’s visibility on and off is a good gut-check. If the difference is dramatic, you’re on the right track. If the magenta is still bleeding through despite your adjustments, don’t panic. That’s what the next step handles.
Step 4: Clip the Adjustment Layer to Your Mask
 Layers panel showing adjustment layer clipped to shirt layer
If your Selective Color adjustment is affecting the whole image and not just the shirt, you need to clip it to the shirt layer. Hold Option (Mac) or Alt (PC) and click between the adjustment layer and the shirt layer in the Layers panel. You’ll see a small downward arrow appear on the adjustment layer, which means it’s now only affecting the layer directly below it. This is a basic but important step if you built your mask on a separate layer. It keeps your edit contained and non-destructive.
Layers panel showing adjustment layer clipped to shirt layer
If your Selective Color adjustment is affecting the whole image and not just the shirt, you need to clip it to the shirt layer. Hold Option (Mac) or Alt (PC) and click between the adjustment layer and the shirt layer in the Layers panel. You’ll see a small downward arrow appear on the adjustment layer, which means it’s now only affecting the layer directly below it. This is a basic but important step if you built your mask on a separate layer. It keeps your edit contained and non-destructive.
Step 5: Add a Solid Color Layer to Kill Stubborn Casts
 Solid Color layer on top, blending mode set to Overlay
Here’s the part that most tutorials leave out, and it’s the step that often saves a tricky shirt. If Selective Color got you 80% of the way there but there’s still a stubborn hue bleeding through, add a Solid Color fill layer. Click the same Adjustments icon at the bottom of the Layers panel and choose Solid Color from the top of the list. Pick the target color you want the shirt to be, then click OK.
Solid Color layer on top, blending mode set to Overlay
Here’s the part that most tutorials leave out, and it’s the step that often saves a tricky shirt. If Selective Color got you 80% of the way there but there’s still a stubborn hue bleeding through, add a Solid Color fill layer. Click the same Adjustments icon at the bottom of the Layers panel and choose Solid Color from the top of the list. Pick the target color you want the shirt to be, then click OK.
Right now it looks terrible. The shirt is a flat, opaque block of color with no texture. Change the blending mode of this layer from Normal to Overlay. Overlay preserves the luminosity of whatever is underneath, so the fabric texture, wrinkles, and shadows all show through while the color is pushed in your chosen direction. Then dial the Opacity down. Julene landed around 41% for her example. The exact number depends on the shirt, so drag it slowly and watch the fabric detail come back. Clip this layer to the shirt layer the same way you did with the Selective Color layer.
One Thing I’d Add: Check Your Colors in Grayscale Before Committing
Before I call a color change done, I temporarily desaturate the whole comp using a Hue/Saturation adjustment layer at 100% Saturation reduction, just to check that the luminosity of the new shirt color still reads naturally against the skin and background. Color changes can accidentally make a garment look too dark or too light in ways that are hard to catch when you’re focused on the hue. A quick grayscale check catches those issues fast. Julene’s workflow handles this implicitly through the Overlay blending mode, but an explicit check is a habit worth building into your own process, especially if you’re doing this for print or advertising where a client is going to scrutinize the final carefully.
The real insight from this tutorial is that no single tool does the whole job. The Quick Selection tool plus Mask Edge gets you a clean isolation. Selective Color handles the primary hue shift. And when Selective Color hits its limits, the Solid Color layer on Overlay mode picks up the slack. Each tool covers a different gap, and knowing when to hand off from one to the next is what makes the result actually convincing. Watch the full tutorial on YouTube and follow along with Julene’s walkthrough to see exactly how each setting interacts in a real retouching scenario.
Comments
Leave a Comment