
Portrait retouching is full of small disasters, and eyeglass glare is one of the most common ones clients will actually notice. Nobody’s going to flag slightly off skin tone, but they will absolutely see a white blob where their eye is supposed to be. I’ve lost count of how many portrait shoots I’ve had to rescue in post because someone’s studio umbrella decided to park itself right in the middle of a subject’s lens. It’s the kind of thing that looks completely fixable until you sit down and actually try to fix it.
That’s what makes Watch the full tutorial on YouTube from Aaron Nace at PHLEARN so useful. It’s not a “just use the healing brush” handwave. It walks through the Clone Source panel, which most people open once, get confused by, and never touch again. The technique hinges on flipping and overlaying your clone source so you can mirror one eye’s detail onto the other. Once you see it, it’s one of those tools that permanently changes how you retouch.
One thing worth flagging before you even open the file: this technique only works cleanly if at least one eye is free of glare. You’re essentially borrowing detail from the good eye to fix the bad one. If both lenses are blown out, you’re in a much harder situation and no tutorial is going to save you from a reshoot. But when you’ve got one clean eye and one reflective mess, this approach is elegant.
Step 1: Set Up a New Layer and Configure the Clone Stamp
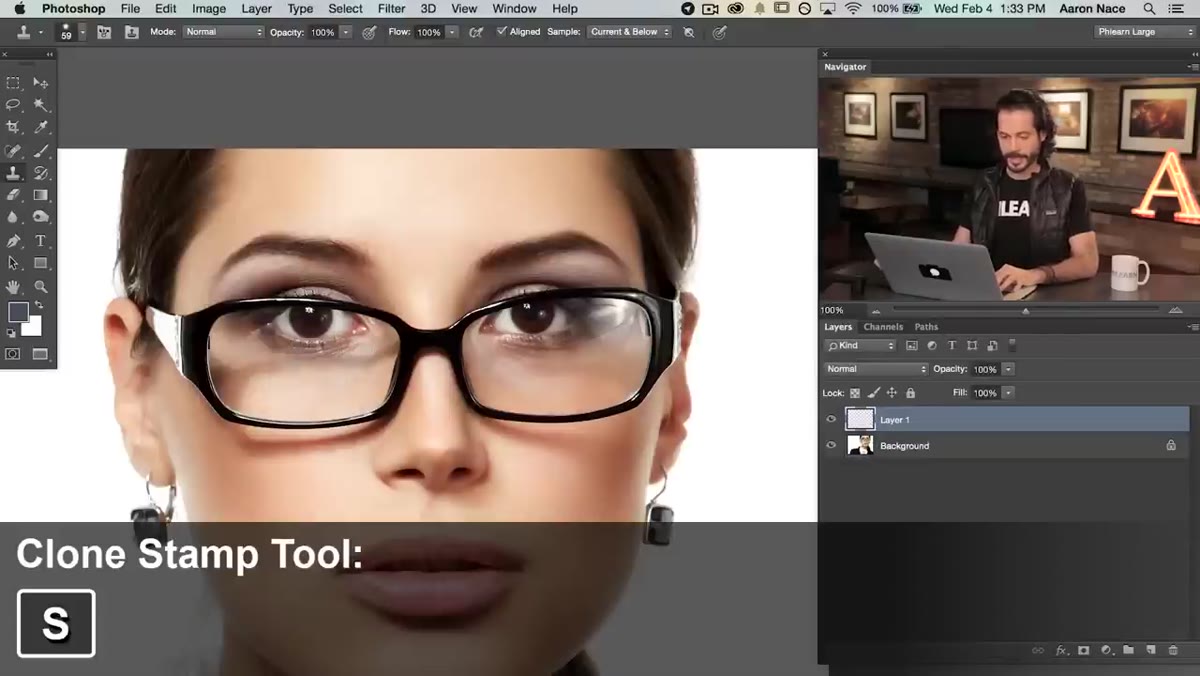 Clone Stamp tool selected with new blank layer active
Before you touch anything, create a new blank layer above your background. This is non-negotiable. Working on a separate layer means you can move, adjust, or erase your corrections without ever touching the original pixels. Once the layer’s there, hit S to grab the Clone Stamp tool. In the options bar, set Opacity to 100, Flow to 100, and change the Sample dropdown to “Current and Below.” That last setting is what allows the Clone Stamp to see the original image while painting onto the empty layer above it.
Clone Stamp tool selected with new blank layer active
Before you touch anything, create a new blank layer above your background. This is non-negotiable. Working on a separate layer means you can move, adjust, or erase your corrections without ever touching the original pixels. Once the layer’s there, hit S to grab the Clone Stamp tool. In the options bar, set Opacity to 100, Flow to 100, and change the Sample dropdown to “Current and Below.” That last setting is what allows the Clone Stamp to see the original image while painting onto the empty layer above it.
Step 2: Open the Clone Source Panel
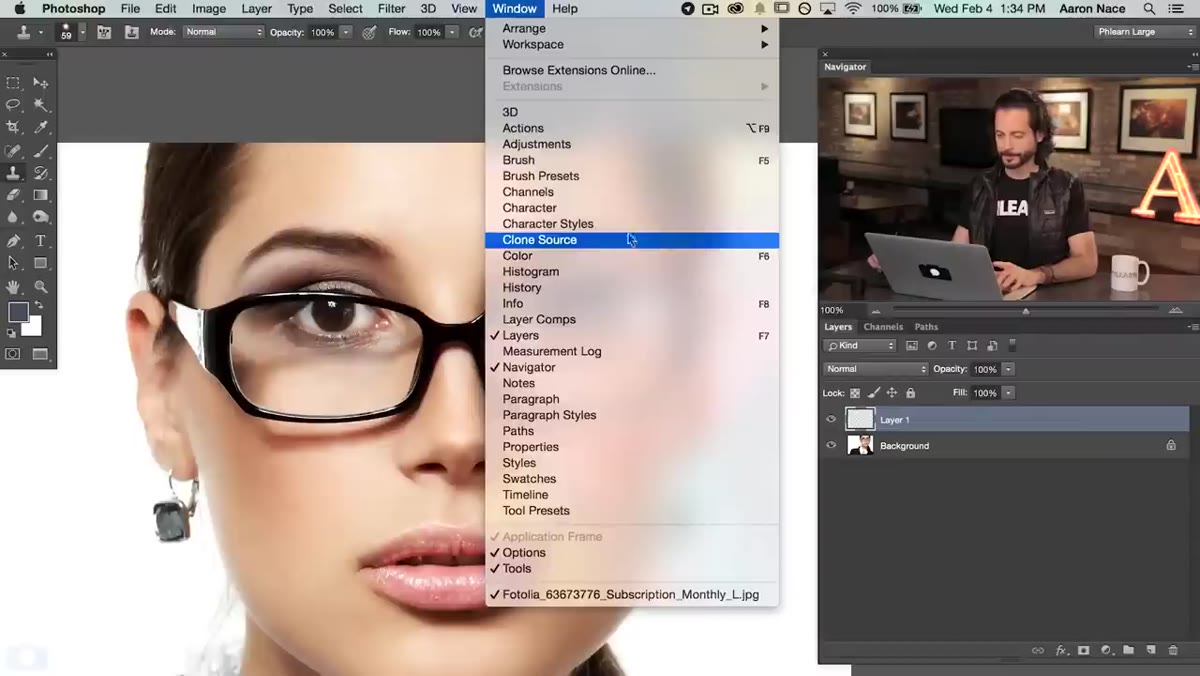 Clone Source panel open under Window menu
Go to Window > Clone Source. If you’ve never been in here before, welcome. This panel is where the actual power lives. A standard Clone Stamp just copies pixels from point A to point B. The Clone Source panel lets you transform what you’re copying, including scaling it, rotating it, and flipping it, before a single pixel gets painted. For the eyeglass glare problem specifically, the flip function is the whole game.
Clone Source panel open under Window menu
Go to Window > Clone Source. If you’ve never been in here before, welcome. This panel is where the actual power lives. A standard Clone Stamp just copies pixels from point A to point B. The Clone Source panel lets you transform what you’re copying, including scaling it, rotating it, and flipping it, before a single pixel gets painted. For the eyeglass glare problem specifically, the flip function is the whole game.
Step 3: Enable the Overlay Preview
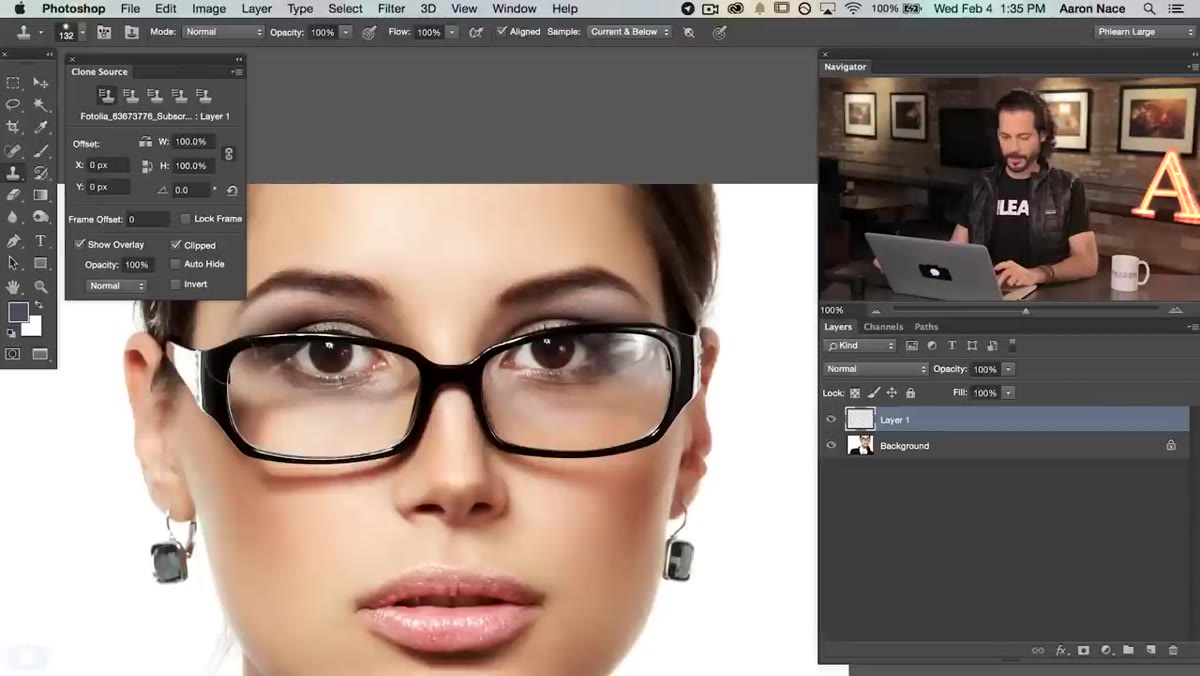 Show Overlay checkbox enabled in Clone Source panel
Check the “Show Overlay” box inside the Clone Source panel. This turns on a live ghost preview that shows you exactly what’s going to be painted before you commit to a single brushstroke. When you’re working around eyes, which are incredibly detailed and asymmetrical, painting blind is a bad idea. The overlay lets you position things precisely so the iris, pupil, and eyelid contours actually line up. Think of it as a stencil preview. Use it every time you’re doing detailed clone work. There’s no good reason not to.
Show Overlay checkbox enabled in Clone Source panel
Check the “Show Overlay” box inside the Clone Source panel. This turns on a live ghost preview that shows you exactly what’s going to be painted before you commit to a single brushstroke. When you’re working around eyes, which are incredibly detailed and asymmetrical, painting blind is a bad idea. The overlay lets you position things precisely so the iris, pupil, and eyelid contours actually line up. Think of it as a stencil preview. Use it every time you’re doing detailed clone work. There’s no good reason not to.
Step 4: Sample the Good Eye
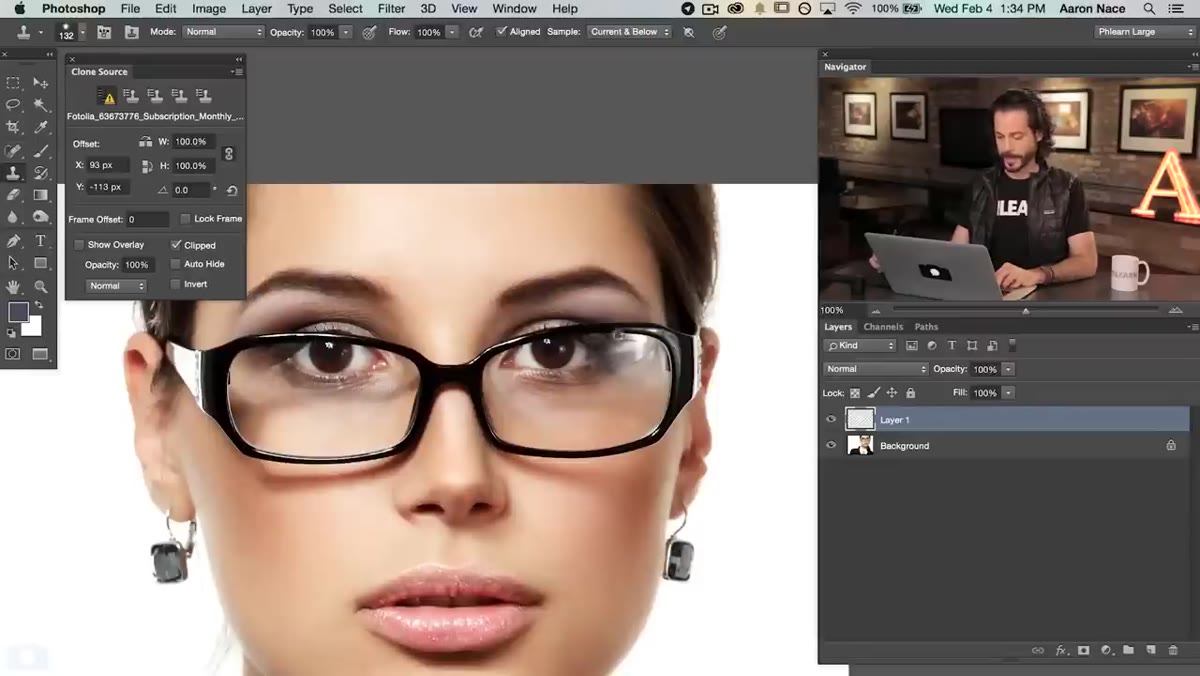 Alt-click setting sample point on the clear eye area
Hold Alt (Windows) or Option (Mac) and click on the eye that has clean, glare-free detail to set your sample point. Choose a spot that captures the full structure of the eye: iris, some surrounding skin, the eyelid edge. You want enough context that when you start painting, the geometry makes sense in the destination area. The overlay will immediately show you what you’ve sampled hovering near your cursor, which is where Step 3 starts paying off.
Alt-click setting sample point on the clear eye area
Hold Alt (Windows) or Option (Mac) and click on the eye that has clean, glare-free detail to set your sample point. Choose a spot that captures the full structure of the eye: iris, some surrounding skin, the eyelid edge. You want enough context that when you start painting, the geometry makes sense in the destination area. The overlay will immediately show you what you’ve sampled hovering near your cursor, which is where Step 3 starts paying off.
Step 5: Flip the Clone Source Horizontally
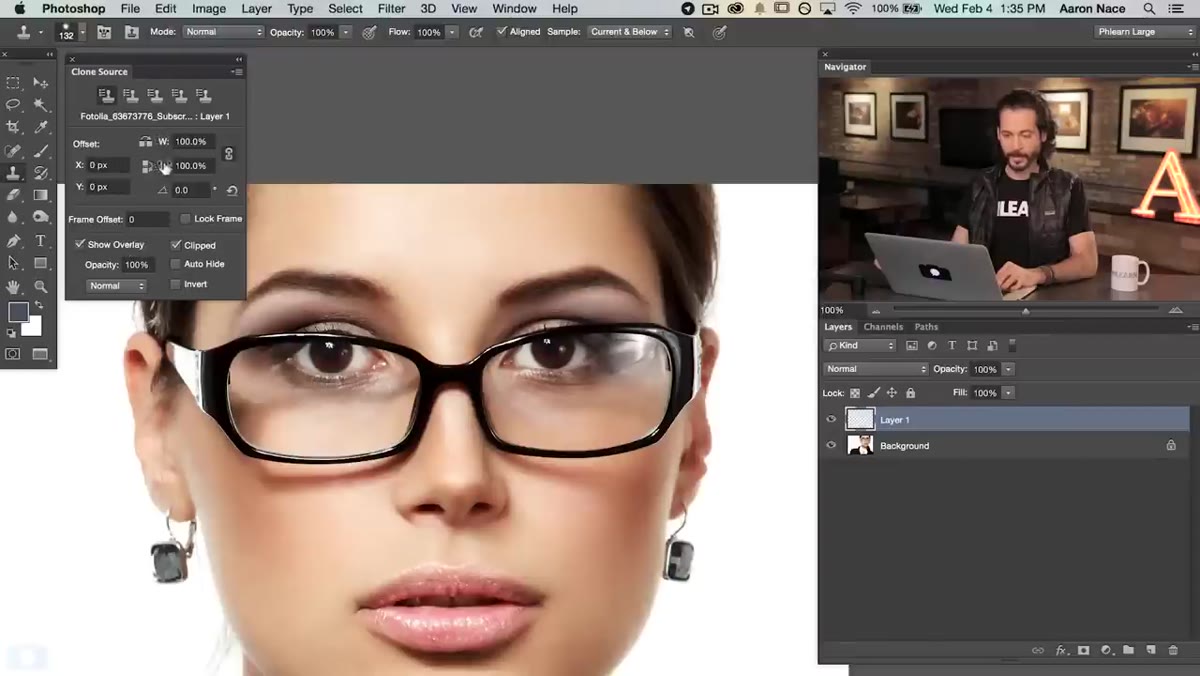 Horizontal flip icon activated in Clone Source panel
Here’s the move that makes this whole technique work. In the Clone Source panel, click the horizontal flip icon. Because both eyes are mirror images of each other (roughly, accounting for angle), flipping the sample horizontally means the detail from the right eye maps correctly onto the left eye, or vice versa. Without this step, you’d be pasting an eye that curves and shades in the wrong direction, and it would look immediately wrong even if you couldn’t articulate why. With the flip active, the overlay should start looking like it actually belongs in the destination area.
Horizontal flip icon activated in Clone Source panel
Here’s the move that makes this whole technique work. In the Clone Source panel, click the horizontal flip icon. Because both eyes are mirror images of each other (roughly, accounting for angle), flipping the sample horizontally means the detail from the right eye maps correctly onto the left eye, or vice versa. Without this step, you’d be pasting an eye that curves and shades in the wrong direction, and it would look immediately wrong even if you couldn’t articulate why. With the flip active, the overlay should start looking like it actually belongs in the destination area.
Step 6: Adjust Width and Height to Match the Lens
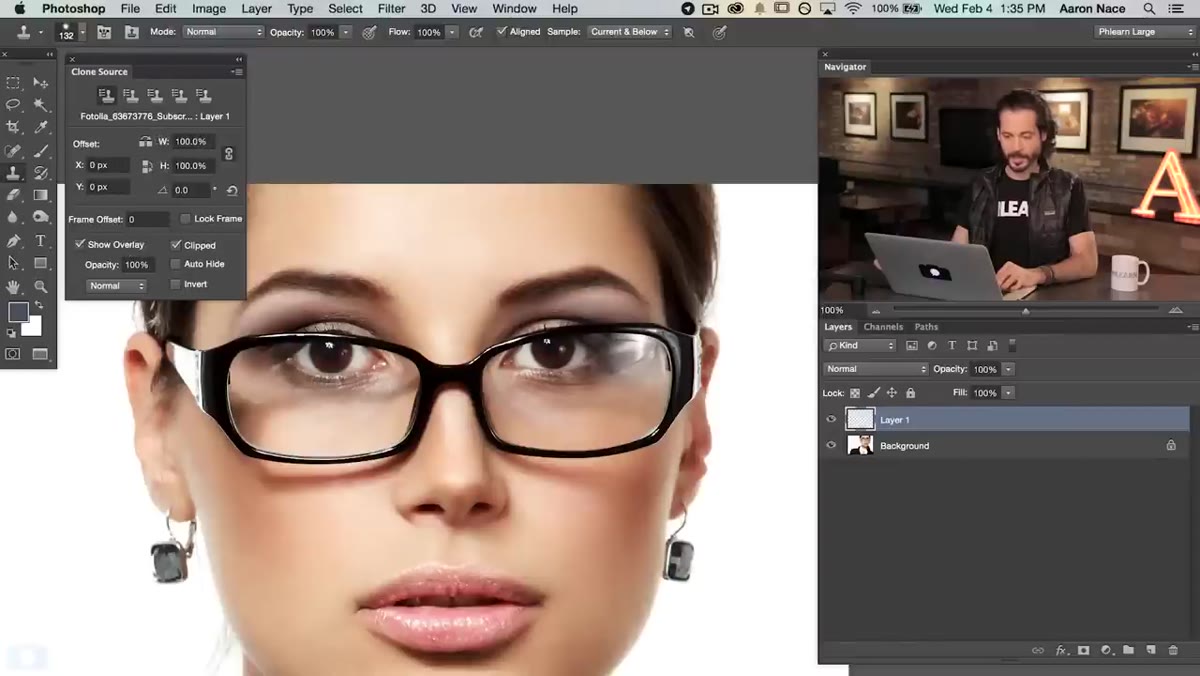 Width and height percentage fields in Clone Source panel
The two eyes in a portrait aren’t always the same apparent size, especially if the subject’s head is turned slightly or if lens distortion is a factor. Use the Width and Height fields in the Clone Source panel to scale your clone source up or down as a percentage until the overlaid preview matches the size of the glare-affected lens. Small adjustments here, a few percentage points in either direction, can make the difference between a retouch that reads as natural and one that looks like a transplant. Keep the proportions locked unless something is genuinely distorted.
Width and height percentage fields in Clone Source panel
The two eyes in a portrait aren’t always the same apparent size, especially if the subject’s head is turned slightly or if lens distortion is a factor. Use the Width and Height fields in the Clone Source panel to scale your clone source up or down as a percentage until the overlaid preview matches the size of the glare-affected lens. Small adjustments here, a few percentage points in either direction, can make the difference between a retouch that reads as natural and one that looks like a transplant. Keep the proportions locked unless something is genuinely distorted.
Step 7: Paint Over the Glare
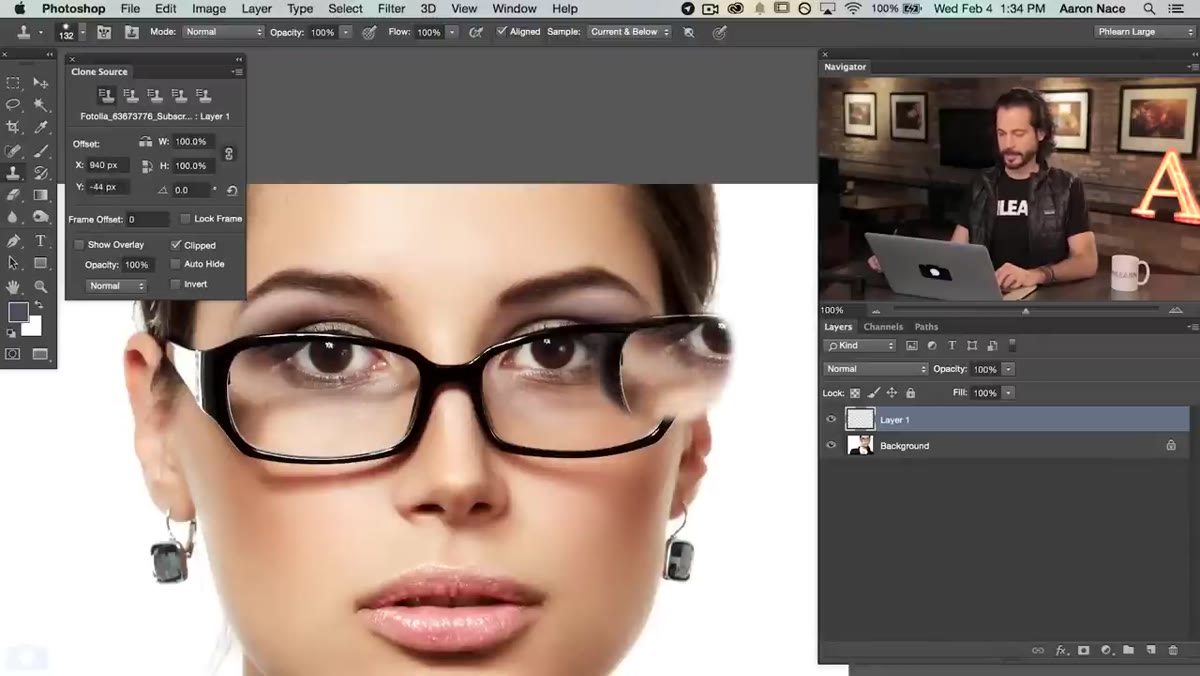 Clone Stamp brush painting over glare area on glasses
With your overlay lined up and looking right, start painting over the glare in smooth, confident strokes. Use a brush size that fits comfortably within the lens area without straying onto the frame. Because you’re working on a separate layer, you can always grab the Eraser tool and clean up edges where you’ve gone too far. Take your time around the pupil and the corner of the eye nearest the nose since those areas have the most structure and are the most visually obvious if something’s off. When the overlay disappears under your strokes and you’re left with clean eye detail, you’re done.
Clone Stamp brush painting over glare area on glasses
With your overlay lined up and looking right, start painting over the glare in smooth, confident strokes. Use a brush size that fits comfortably within the lens area without straying onto the frame. Because you’re working on a separate layer, you can always grab the Eraser tool and clean up edges where you’ve gone too far. Take your time around the pupil and the corner of the eye nearest the nose since those areas have the most structure and are the most visually obvious if something’s off. When the overlay disappears under your strokes and you’re left with clean eye detail, you’re done.
One Thing the Tutorial Doesn’t Cover (But Should)
The technique works beautifully in controlled studio shots where both eyes are photographed under the same light. But I’ve used this on environmental portraits where the lighting on each side of the face was genuinely different, and the cloned eye detail, even flipped correctly, looked a little flat or tonally off. If that happens, don’t just accept it. After you’ve painted your correction layer, try adding a Curves or Hue/Saturation adjustment clipped to that layer and nudge the brightness to match the surrounding area. Sometimes a 5-point brightness drop is all it takes to make the fix invisible. The Clone Source panel handles geometry; you handle light.
The single most important thing to take away from this technique is that the Clone Source panel’s overlay and flip functions turn a frustrating, fiddly repair into something you can actually control. Eyes are unforgiving. Any retoucher who’s tried to fake eye detail with a generic heal or patch knows how fast it falls apart. Having a real, properly oriented sample from the subject’s own face is always going to beat any workaround.
Watch the full tutorial on YouTube to see Aaron walk through the entire process in real time. His overlay demo alone is worth the watch.
Comments (2)
Printing this out and pinning it next to my monitor. That good.
The tip about clone stamp secrets how to act was the missing piece for me. Thank you.
Leave a Comment