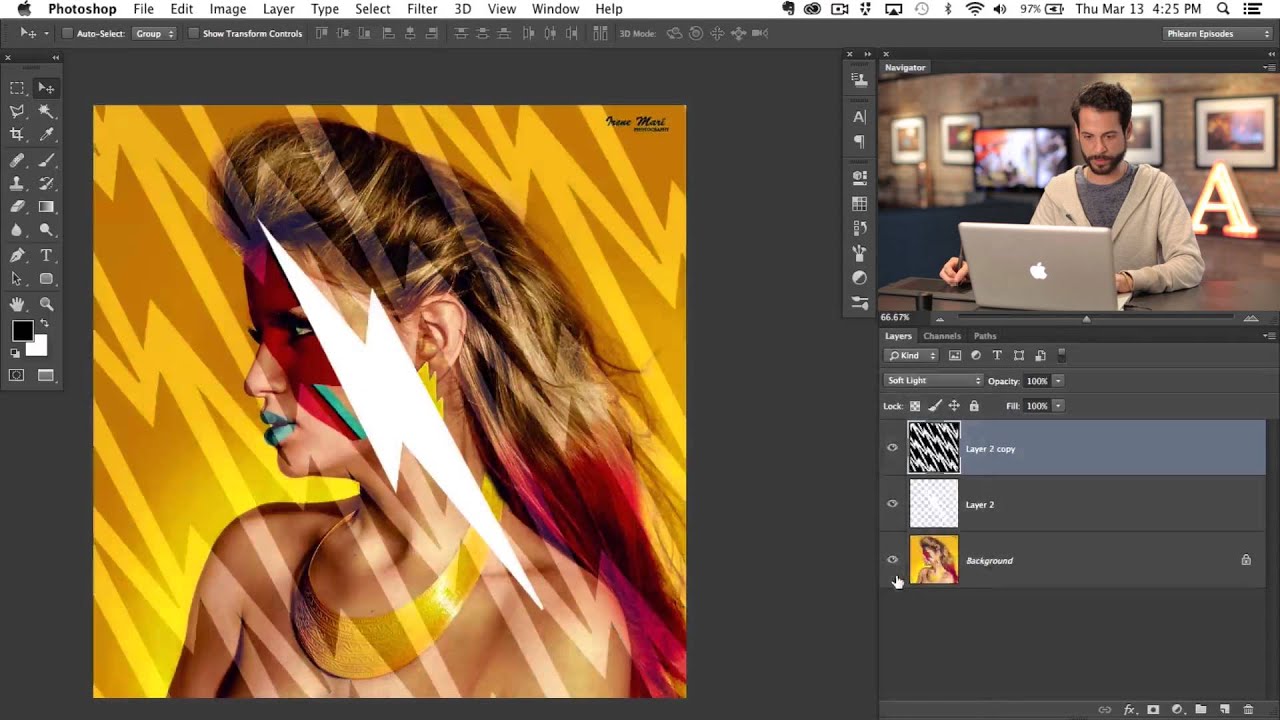
There’s a specific kind of panic that hits when a client asks for “something more interesting” in the background of a portrait shot that’s already been edited, color-graded, and basically signed off. You don’t want to blow up the existing work. You just need to add a layer of visual energy without rebuilding the whole thing from scratch. This is exactly the situation Aaron Nace tackles in this PHLEARN tutorial, and the approach he takes is genuinely clever. Watch the full tutorial on YouTube before or after you read through this, because seeing it in motion helps lock in the technique.
The core idea: pull a graphic element from the existing photo, reconstruct it as a clean vector-style shape on its own layer, then tile it across a massively expanded canvas using a step-and-repeat method. Then you drop it back into the original image. No stock assets, no third-party plugins. Just Photoshop doing what Photoshop does. I’ve started using this approach for client work when I need a background to feel custom and connected to the subject, rather than like something I grabbed off a texture site at midnight.
The subject in Aaron’s example is a portrait with bold makeup and a lightning bolt earring. He uses that earring as the jumping-off point for the pattern. Your image doesn’t need to have a lightning bolt in it. The method works with any repeatable shape you want to build.
Step 1: Sample the Graphic Element with the Clone Stamp Tool
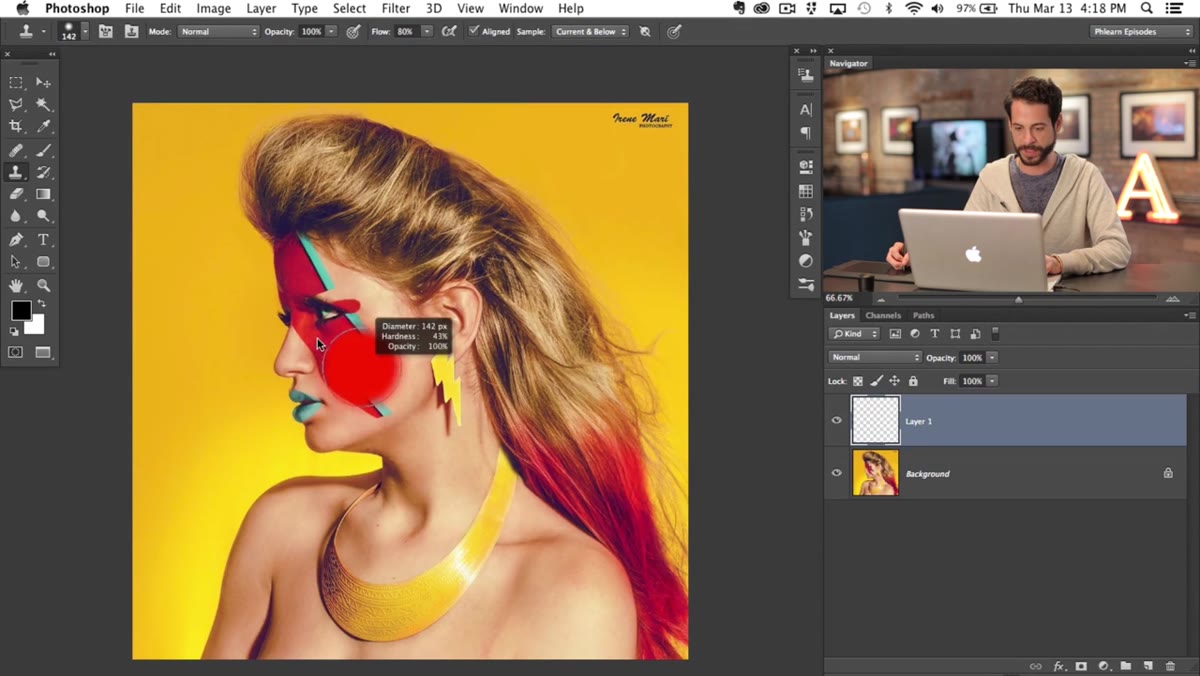 Clone Stamp tool sampling the earring area on a new layer
Create a new blank layer above your image. Grab the Clone Stamp tool (keyboard shortcut: S) and make sure the Sample dropdown at the top is set to “Current and Below.” This lets the tool pull pixel data from the layers underneath, so you’re sampling the actual photo content even though you’re painting onto an empty layer. Alt-click (Option-click on Mac) on the element you want to borrow, in this case the earring, and paint it onto your new layer.
Clone Stamp tool sampling the earring area on a new layer
Create a new blank layer above your image. Grab the Clone Stamp tool (keyboard shortcut: S) and make sure the Sample dropdown at the top is set to “Current and Below.” This lets the tool pull pixel data from the layers underneath, so you’re sampling the actual photo content even though you’re painting onto an empty layer. Alt-click (Option-click on Mac) on the element you want to borrow, in this case the earring, and paint it onto your new layer.
Don’t stress if it looks rough. Aaron points out that scaling up a Clone Stamp sample significantly destroys quality, which is exactly what happens here. That’s fine, because this sampled version is just a reference. You’re about to replace it with something cleaner.
Step 2: Redraw the Shape Using the Lasso Tool
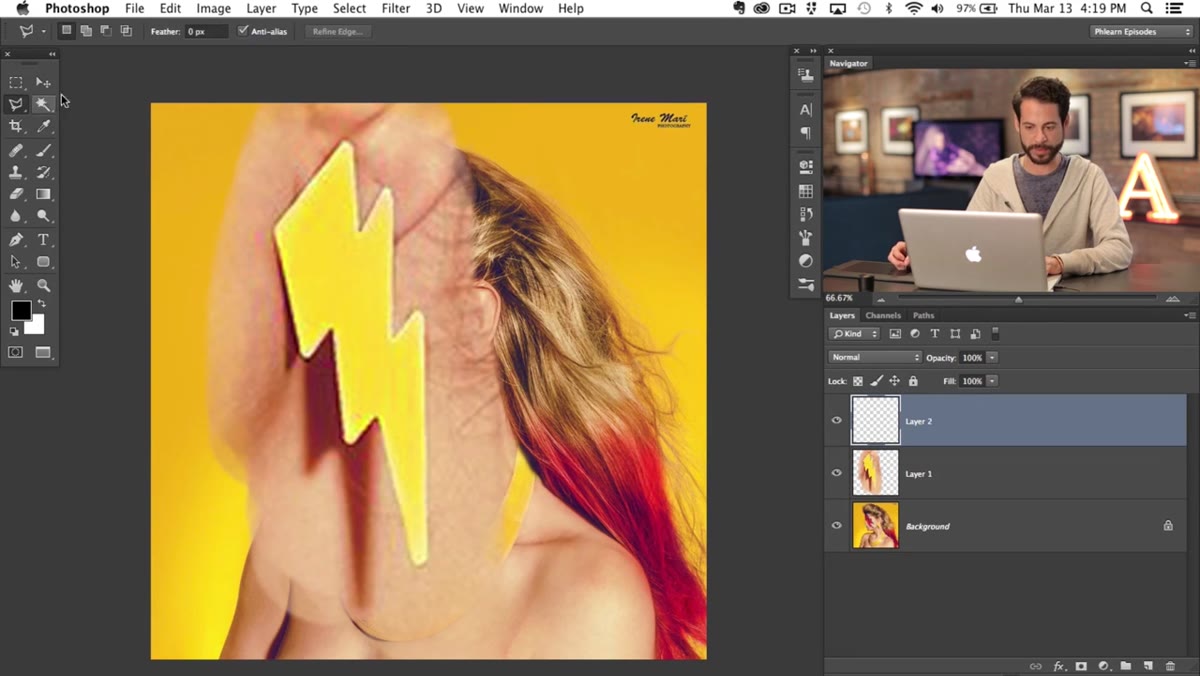 Lasso tool drawing a lightning bolt shape on a new layer
Create another new layer. Grab the Lasso tool (L) and freehand draw the shape you want to tile. For a lightning bolt, you’re looking for a sharp, angular zigzag path. Start at one edge, work your way diagonally, and close the selection back where you started. It does not need to be perfect. The slight hand-drawn irregularity is actually part of the appeal.
Lasso tool drawing a lightning bolt shape on a new layer
Create another new layer. Grab the Lasso tool (L) and freehand draw the shape you want to tile. For a lightning bolt, you’re looking for a sharp, angular zigzag path. Start at one edge, work your way diagonally, and close the selection back where you started. It does not need to be perfect. The slight hand-drawn irregularity is actually part of the appeal.
Once you’ve got your selection closed, hit Shift+Delete (Shift+Backspace on PC) to open the Fill dialog, choose White, and hit OK. You now have a clean white lightning bolt on its own isolated layer. Delete or hide the messy Clone Stamp version from Step 1. It’s done its job.
Step 3: Transform and Rotate the Shape
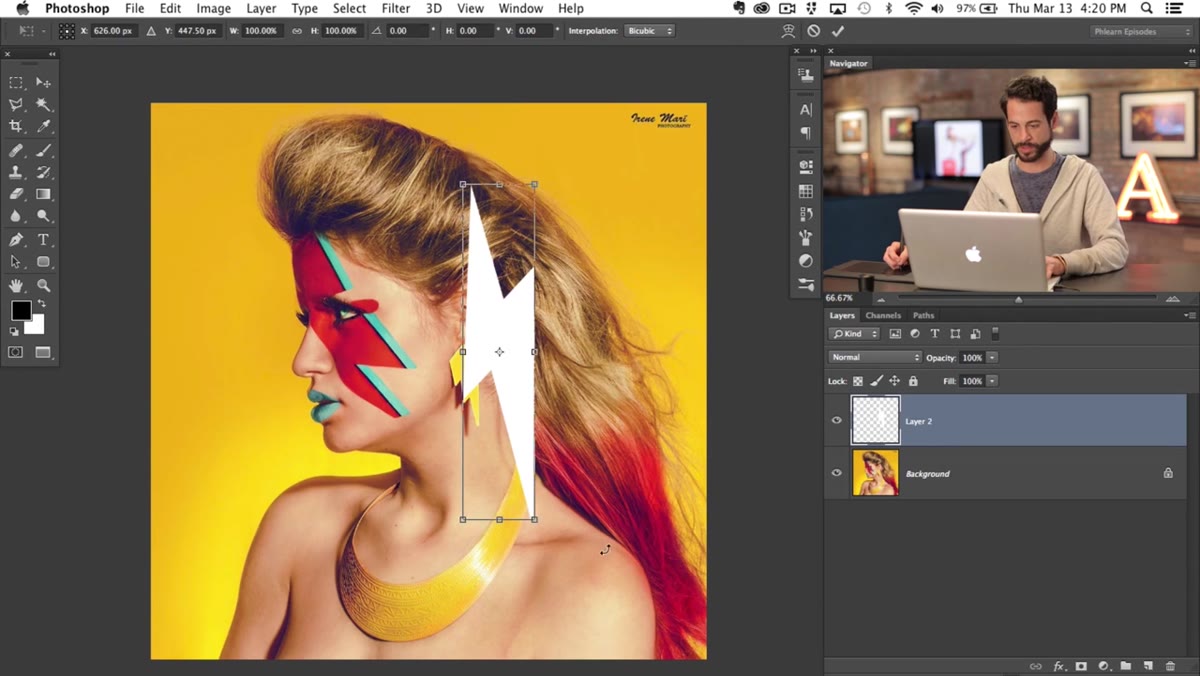 Transform handles rotating and scaling the lightning bolt
Hit Command+T (Ctrl+T on PC) to enter Free Transform. Rotate the bolt so it’s pointing diagonally, because, as Aaron puts it, lightning always comes from the side. Hold Shift while dragging a corner handle to scale it proportionally. Get it to a size that feels like a repeating element rather than a hero graphic. You want this thing to tile convincingly, so err on the side of smaller than you think.
Transform handles rotating and scaling the lightning bolt
Hit Command+T (Ctrl+T on PC) to enter Free Transform. Rotate the bolt so it’s pointing diagonally, because, as Aaron puts it, lightning always comes from the side. Hold Shift while dragging a corner handle to scale it proportionally. Get it to a size that feels like a repeating element rather than a hero graphic. You want this thing to tile convincingly, so err on the side of smaller than you think.
This is also a good moment to consider aspect ratio. A very tall, narrow bolt will repeat differently than a wide, squat one. Think about the rhythm of the pattern you’re building before you commit.
Step 4: Duplicate the Layer to a New Document
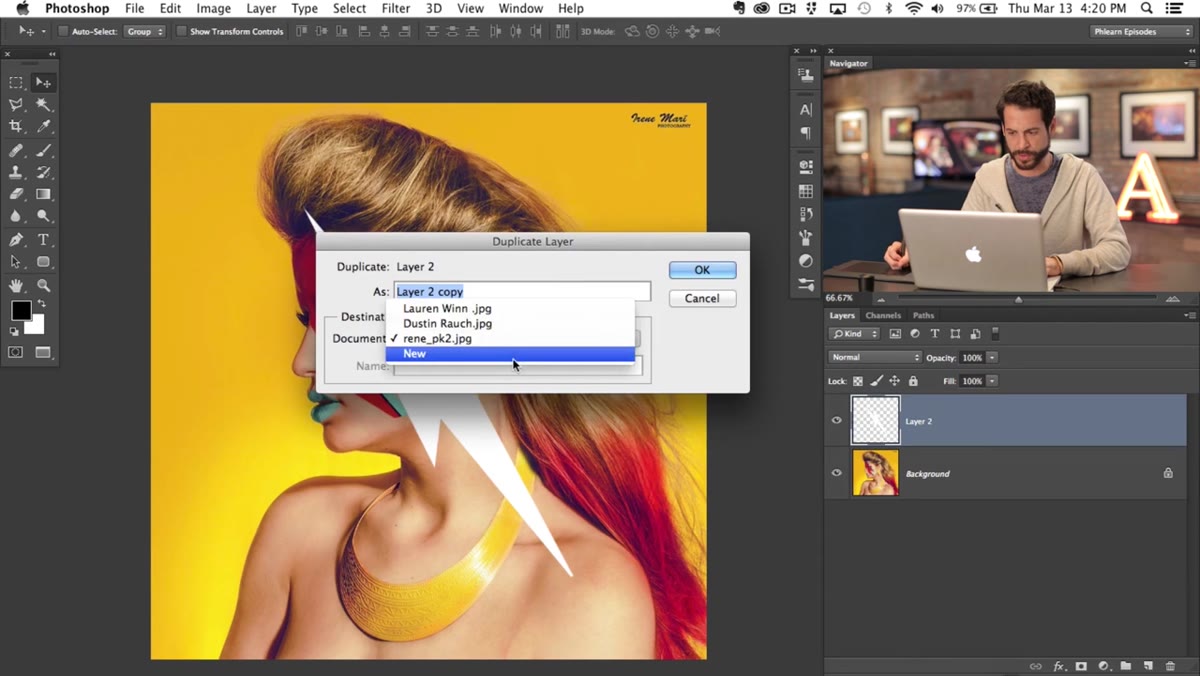 Duplicate Layer dialog with New Document option selected
Right-click the lightning bolt layer in the Layers panel and choose “Duplicate Layer.” In the dialog that pops up, set the Destination Document dropdown to “New.” This moves the shape into its own fresh Photoshop document, which gives you a clean workspace for the tiling step without cluttering your original file.
Duplicate Layer dialog with New Document option selected
Right-click the lightning bolt layer in the Layers panel and choose “Duplicate Layer.” In the dialog that pops up, set the Destination Document dropdown to “New.” This moves the shape into its own fresh Photoshop document, which gives you a clean workspace for the tiling step without cluttering your original file.
This is a small workflow habit that pays off. Keeping the tiling work separate from your master file means you can iterate on the pattern without any risk to the original image.
Step 5: Expand the Canvas to Give Yourself Room to Work
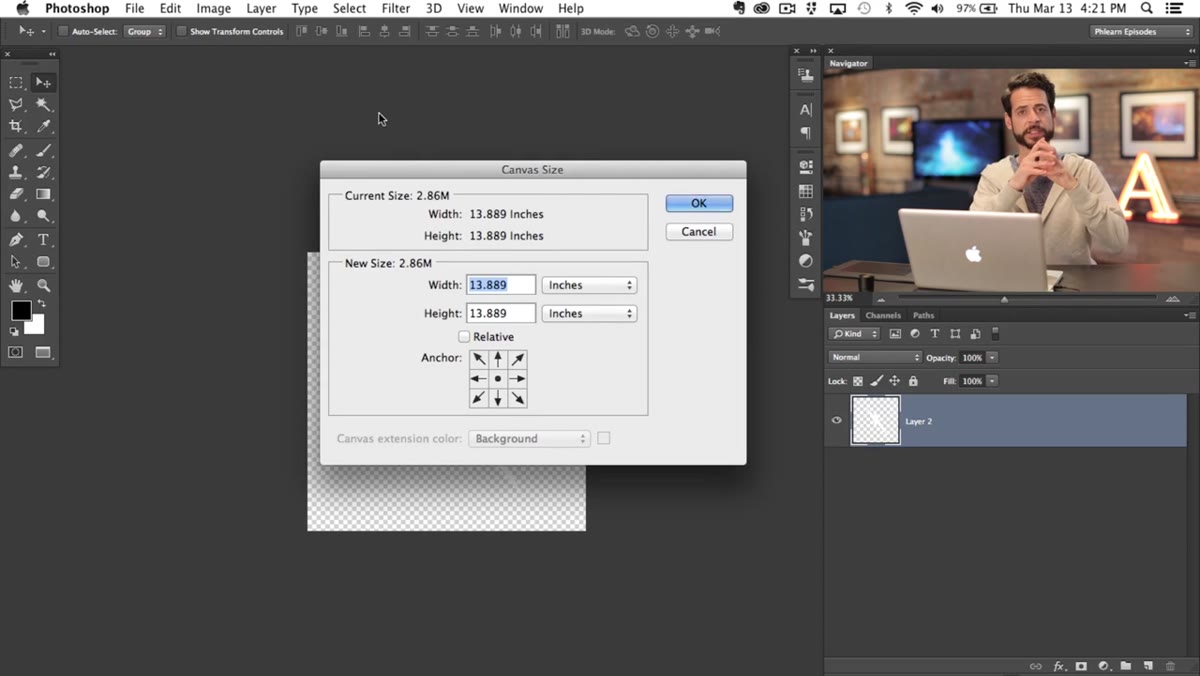 Canvas Size dialog showing 500% width and height values
With your new document open, go to Image > Canvas Size. Switch the width and height fields to Percent if they aren’t already, then set both to 500%. Hit OK. Your tiny canvas suddenly has a massive amount of empty real estate around the lightning bolt. This extra space is where you’re going to build out your tiled pattern using the step-and-repeat technique.
Canvas Size dialog showing 500% width and height values
With your new document open, go to Image > Canvas Size. Switch the width and height fields to Percent if they aren’t already, then set both to 500%. Hit OK. Your tiny canvas suddenly has a massive amount of empty real estate around the lightning bolt. This extra space is where you’re going to build out your tiled pattern using the step-and-repeat technique.
The lightning bolt will look almost comically small in the center of this new canvas, but that’s exactly where you want to be. You need room to duplicate and position without shapes getting clipped at the edges.
Step 6: Step and Repeat to Build the Pattern
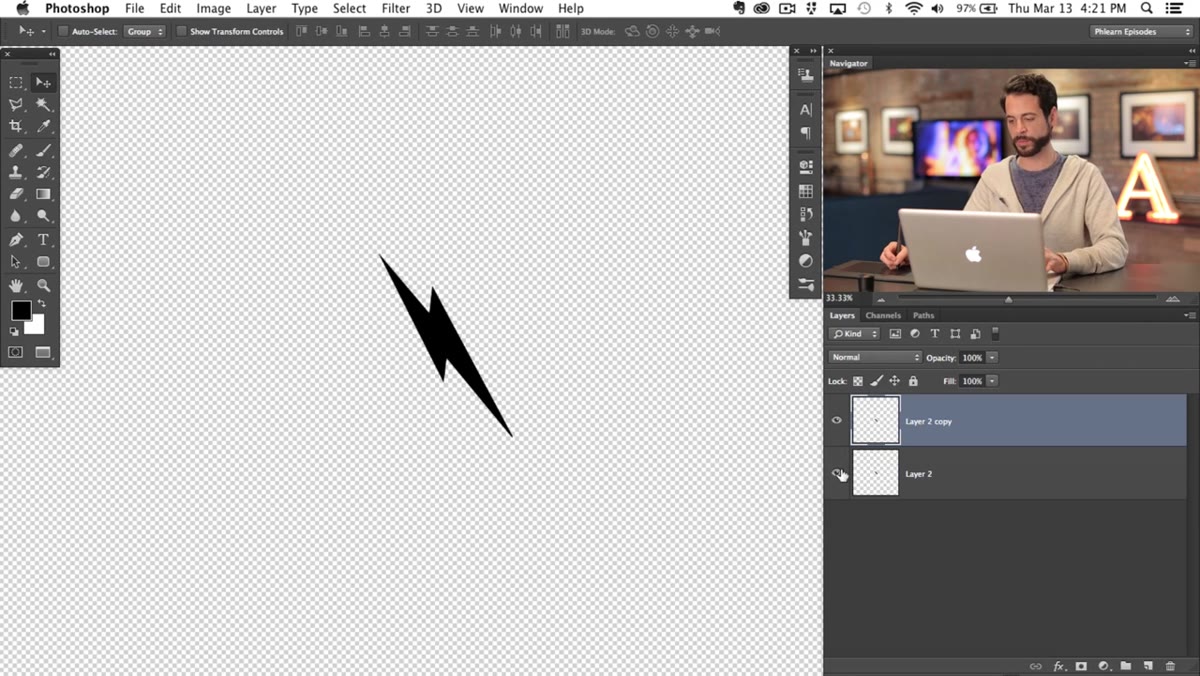 Duplicating the lightning bolt layer with Command+J to begin tiling
Select your lightning bolt layer and hit Command+J (Ctrl+J) to duplicate it. Use the Move tool to position the duplicate offset from the original, either horizontally, vertically, or both. Then duplicate again, offset again. Keep going until you’ve built a grid that covers the canvas.
Duplicating the lightning bolt layer with Command+J to begin tiling
Select your lightning bolt layer and hit Command+J (Ctrl+J) to duplicate it. Use the Move tool to position the duplicate offset from the original, either horizontally, vertically, or both. Then duplicate again, offset again. Keep going until you’ve built a grid that covers the canvas.
The trick to making this feel like a real pattern rather than a sloppy copy-paste job is consistency in your offset distance. Move each duplicate the same number of pixels in the same direction. A quick way to do this: after your first move, use the arrow keys with Shift held down (which moves in 10px increments) to keep your spacing uniform. Once you’ve got a solid field of bolts, flatten or merge the pattern layers, then bring the result back into your original document as a new layer.
Why I’d Use a Smart Object Here
Aaron moves fast in the tutorial, which is one of the things I like about his style. But if I’m using this technique for a paying client, I’d convert that lightning bolt to a Smart Object before I start duplicating it. That way, if the client comes back and wants the bolt slightly thicker or at a different angle, I can edit one instance and have every duplicate update automatically. I learned this lesson the hard way on a project where I had 40 hand-positioned copies of a shape that suddenly needed to change. It was not a fun afternoon.
It also means you can double-click into the Smart Object and adjust the shape non-destructively at any point, without rebuilding the whole pattern from scratch.
The real value of this tutorial is the mindset shift it represents: your subject’s accessories, tattoos, patterns on their clothing, any of those graphic elements can become the raw material for a custom background. You’re not reaching for a generic texture. You’re pulling something that’s already in the image and making the whole composition feel intentional. That’s the kind of detail that separates work people scroll past from work that makes someone stop and ask who shot it.
Watch the full tutorial on YouTube to see Aaron build this out in real time, including how he brings the finished pattern back into the original portrait.
Comments (2)
I keep coming back to this article. It's that useful.
Love how you break down complex stuff into manageable steps.
Leave a Comment