Here’s something nobody tells you when you’re starting out: your monitor is lying to you. Not maliciously, just… constantly. The warm glow of a coffee shop window, a slightly uncalibrated display, a room with yellow overhead lighting, all of it conspires to make you think a photo looks great when it’s actually a little green, or magenta, or just off in a way that a client will immediately notice and you won’t be able to explain.
Skin tone correction has always been the part of my retouching workflow where I felt least confident. I’d push the sliders until it “looked right,” export, and then open the file at home under completely different lighting and wonder what I was thinking. So when I came across this tutorial from Aaron Nace over at PHLEARN, covering Camera Raw’s new Vectorscope tool, I paid close attention. It’s the first time I’ve seen a workflow that actually gives you something measurable to aim at instead of vibes. Watch the full tutorial on YouTube if you want to follow along with the sample images.
The short version: Camera Raw 18.4 added a Vectorscope with a dedicated Skin Tone Indicator, and it changes how you think about color correction entirely. Here’s how to use it.
Step 1: Convert Your Layer to a Smart Object
 Background layer being converted to Smart Object via Filters menu
Before you even open Camera Raw, right-click your background layer and go to Filter, then “Convert for Smart Filters.” This turns your layer into a Smart Object, which means Camera Raw becomes non-destructive. Every slider adjustment stays editable. You can go back in a week and tweak things without starting over. I learned the importance of this step in the most painful way possible, so just do it now and save yourself the grief.
Background layer being converted to Smart Object via Filters menu
Before you even open Camera Raw, right-click your background layer and go to Filter, then “Convert for Smart Filters.” This turns your layer into a Smart Object, which means Camera Raw becomes non-destructive. Every slider adjustment stays editable. You can go back in a week and tweak things without starting over. I learned the importance of this step in the most painful way possible, so just do it now and save yourself the grief.
Once that’s done, go to Filter, Camera Raw. Make sure you’re running Camera Raw version 18.4 or later. If you haven’t updated recently, this is your sign. And yes, this feature is only in Camera Raw. Not Lightroom. Not Lightroom Classic. Just Camera Raw.
Step 2: Find and Enable the Vectorscope
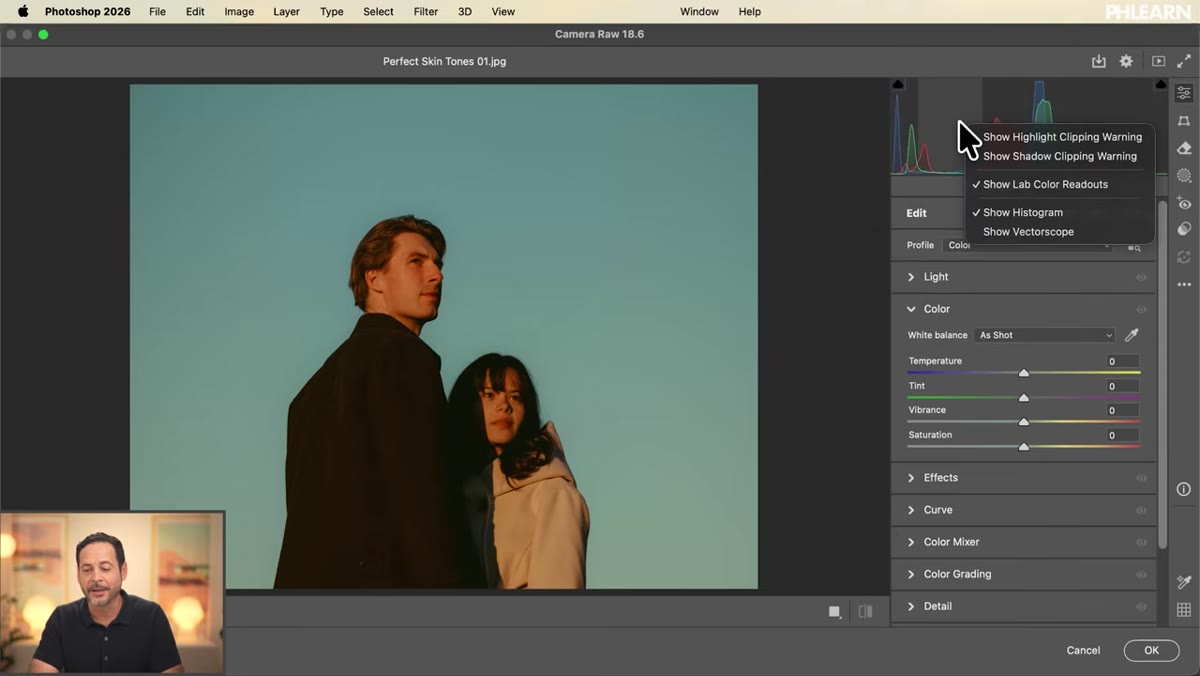 Right-click context menu on histogram showing “Show Vectorscope” option
The Vectorscope is genuinely, aggressively hidden. You won’t find it in any menu or panel label. What you need to do is right-click directly on the histogram in Camera Raw and look at the very bottom of the context menu. There it is: “Show Vectorscope.” Click it and the Vectorscope appears alongside the histogram. You can right-click the histogram again and hide it if you want to give the Vectorscope more room to breathe, which Aaron recommends and I agree with.
Right-click context menu on histogram showing “Show Vectorscope” option
The Vectorscope is genuinely, aggressively hidden. You won’t find it in any menu or panel label. What you need to do is right-click directly on the histogram in Camera Raw and look at the very bottom of the context menu. There it is: “Show Vectorscope.” Click it and the Vectorscope appears alongside the histogram. You can right-click the histogram again and hide it if you want to give the Vectorscope more room to breathe, which Aaron recommends and I agree with.
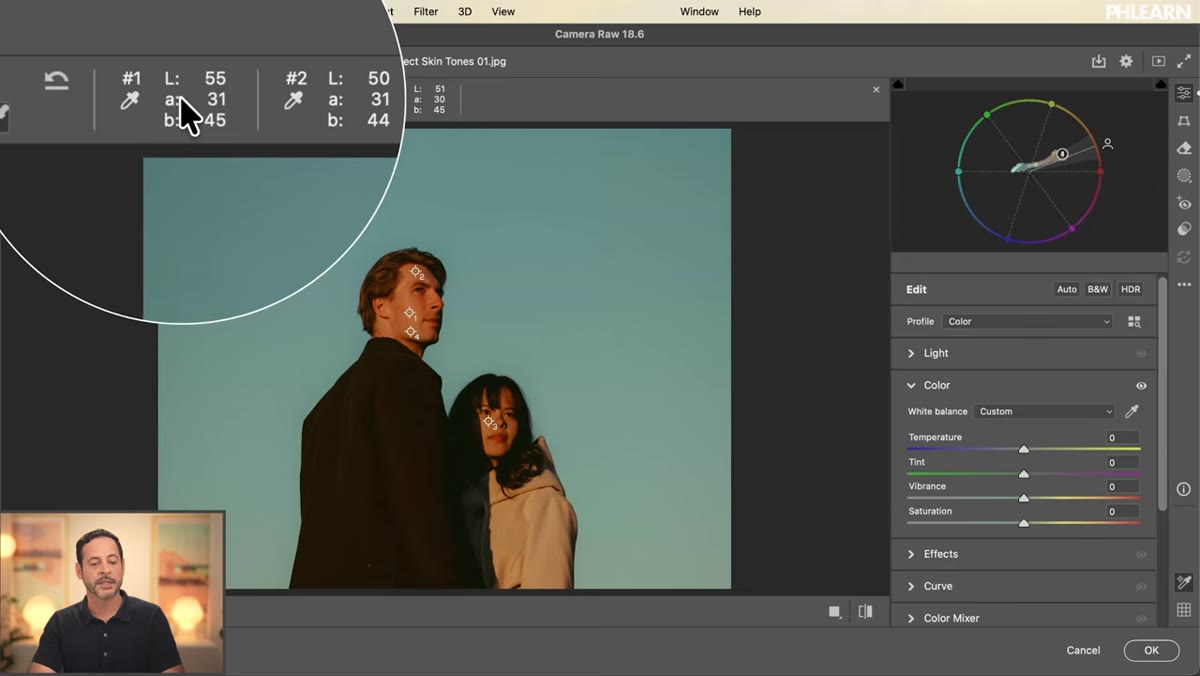
While you’re right-clicking around in there, enable two more options from the Vectorscope’s own context menu: “Show Skin Tone Indicator” and “Show Red at 3:00.” The first one draws a line on the color wheel that represents where accurate skin tones should land, regardless of how light or dark the skin is. The second option rotates the wheel to match the layout used in video editing software, which makes it more intuitive if you ever move between the two.
Step 3: Learn to Read the Vectorscope
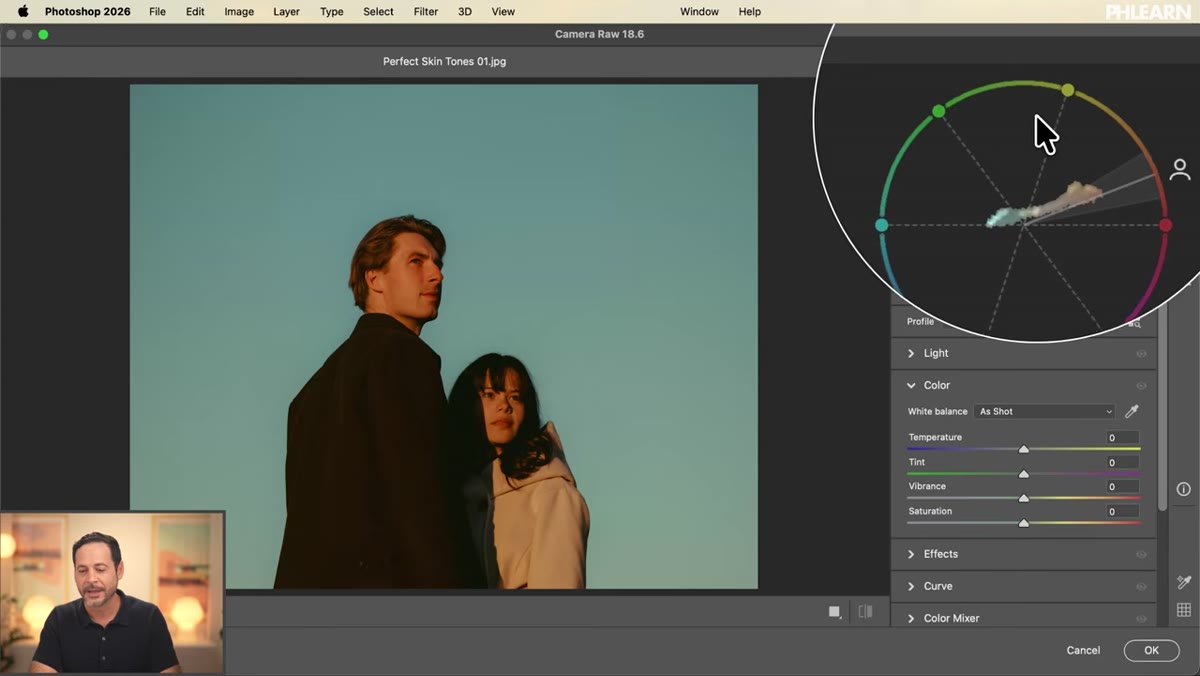 Vectorscope color wheel with colors shifting as Temperature slider moves
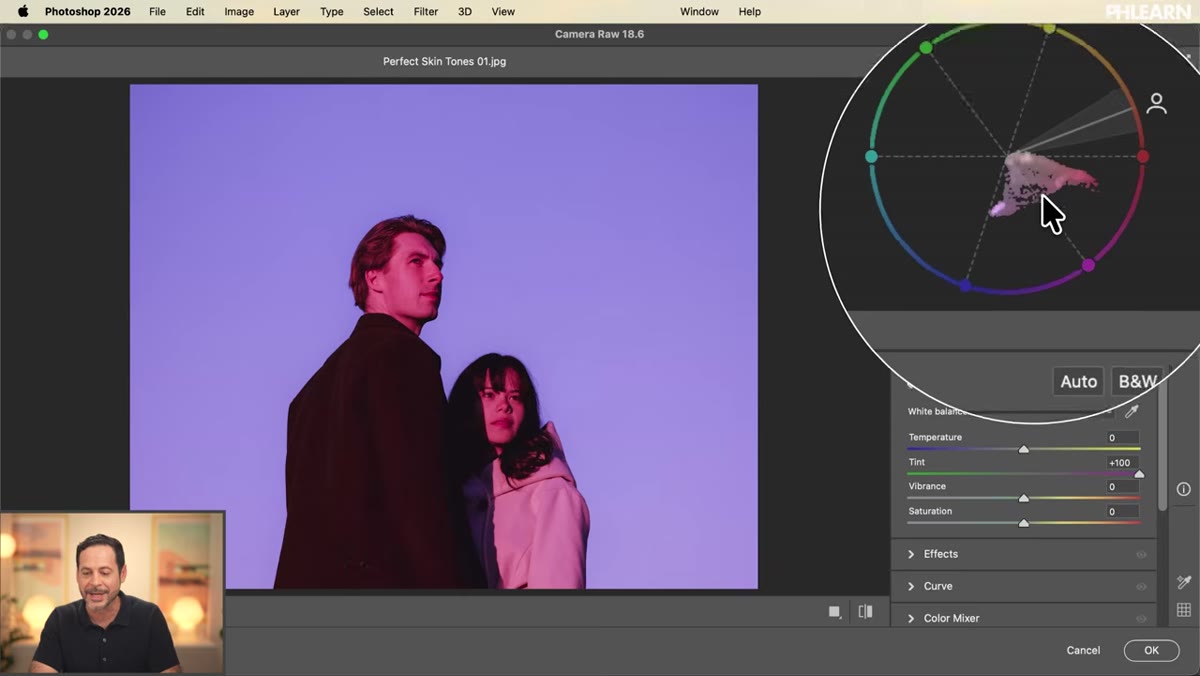
The Vectorscope is a color wheel. The center is neutral gray, and as you move outward toward the edges, saturation increases. The angle you land on represents hue. When you pull the Temperature slider to the left, the cluster of dots in the Vectorscope shifts toward blue. Pull it right, they drift toward orange/warm territory. Same thing happens with Tint: drag left and things push green, drag right and they go magenta.
Vectorscope color wheel with colors shifting as Temperature slider moves
The Vectorscope is a color wheel. The center is neutral gray, and as you move outward toward the edges, saturation increases. The angle you land on represents hue. When you pull the Temperature slider to the left, the cluster of dots in the Vectorscope shifts toward blue. Pull it right, they drift toward orange/warm territory. Same thing happens with Tint: drag left and things push green, drag right and they go magenta.
This is genuinely useful because you can watch the Vectorscope respond in real time as you adjust. You’re not guessing whether the image got cooler. You can see it moving. The skin tone indicator line cuts diagonally across the wheel, and your goal is to get the skin tone data to land on or very close to that line.
Step 4: Isolate the Skin with a Mask
 Select People AI mask being applied to isolate skin from background
Before you start pushing sliders around, you want to isolate just the skin so your corrections aren’t also tanking the background colors. In Camera Raw, open the Masking panel and use “Select People.” Photoshop’s AI will attempt to detect the subject and offer options to select skin specifically. When it works, it’s fast and accurate.
Select People AI mask being applied to isolate skin from background
Before you start pushing sliders around, you want to isolate just the skin so your corrections aren’t also tanking the background colors. In Camera Raw, open the Masking panel and use “Select People.” Photoshop’s AI will attempt to detect the subject and offer options to select skin specifically. When it works, it’s fast and accurate.
When it doesn’t detect anyone, which does happen with certain angles, heavy shadows, or unusual crops, you’ll need to fall back on a brush mask and paint the skin areas manually. It’s slower, but the result is the same. The important thing is that your color adjustments are scoped to the skin only.
Step 5: Correct in Order - Temperature, Tint, then Saturation
 Color panel sliders being adjusted in sequence with Vectorscope responding
Order matters here. Start with Temperature. Move the slider until the skin tone cluster in the Vectorscope is roughly aligned with the skin tone indicator line in terms of angle, meaning you’ve got the hue pointing in roughly the right direction. Then adjust Tint to fine-tune the vertical position on that line. Think of Temperature as getting you in the right neighborhood, and Tint as parking the car.
Color panel sliders being adjusted in sequence with Vectorscope responding
Order matters here. Start with Temperature. Move the slider until the skin tone cluster in the Vectorscope is roughly aligned with the skin tone indicator line in terms of angle, meaning you’ve got the hue pointing in roughly the right direction. Then adjust Tint to fine-tune the vertical position on that line. Think of Temperature as getting you in the right neighborhood, and Tint as parking the car.
Once the hue is dialed in, adjust Saturation to move the cluster closer to or farther from the center of the wheel. Skin tones that are too saturated will sit too far out from center, looking plastic or sunburned. Too desaturated and the skin looks flat and gray. The goal is to land on the skin tone line at a natural distance from center. Take your time with each slider before moving to the next.
Step 6: Blend the Correction Back In
 Mask Amount slider being reduced to blend corrected and original skin tone
Here’s where it gets nuanced. A mathematically “correct” skin tone can look weirdly clinical next to the rest of the photo, especially if the original image has intentional warmth or a stylized grade. Camera Raw lets you control the mask’s Amount slider, which blends your fully corrected version back with the original. Pulling it back to 70 or 80 percent can give you accuracy without stripping all the character from the image.
Mask Amount slider being reduced to blend corrected and original skin tone
Here’s where it gets nuanced. A mathematically “correct” skin tone can look weirdly clinical next to the rest of the photo, especially if the original image has intentional warmth or a stylized grade. Camera Raw lets you control the mask’s Amount slider, which blends your fully corrected version back with the original. Pulling it back to 70 or 80 percent can give you accuracy without stripping all the character from the image.
This is the step that separates a technically correct photo from one that actually looks good. The Vectorscope gets you to an honest baseline. The Amount slider lets you be a human about it.
My Take: Use This as a Calibration Check, Not Just a Correction Tool
I’ve started using the Vectorscope at the beginning of portrait edits, before I’ve done anything else, just to see where the skin tones land naturally. It’s taught me a lot about what kinds of lighting situations produce what kinds of color casts. Overcast outdoor shots almost always push slightly green. Golden hour looks great to the eye but often reads as oversaturated on the Vectorscope. Having that data up front helps me decide how much to correct versus how much to preserve.
It’s also made me realize how inconsistent my previous corrections were. Photos I thought were nailed were all over the place on the wheel. That’s not a fun discovery, but it’s a useful one.
The single most important thing this workflow gives you is a consistent target that doesn’t change when you move to a different room or open your laptop somewhere new. Your eyes adapt. The Vectorscope doesn’t. That’s the whole point.
Watch the full tutorial on YouTube and grab the sample images from PHLEARN to follow along. Aaron walks through everything at a pace that actually makes sense, and the PDF guide that comes with it is worth downloading too.
Comments
Leave a Comment