I have a deeply embarrassing confession: for longer than I care to admit, I was manually clicking through Filter > Blur > Gaussian Blur every single time I needed it. Which, when you’re doing any kind of compositing or light painting work, is approximately nine hundred times per session. I just assumed it didn’t have a shortcut. I accepted my fate like someone who refuses to ask for directions and ends up in a different state.
Turns out, you can assign a keyboard shortcut to virtually any command in Photoshop that doesn’t already have one. I stumbled onto this through an Aaron Nace tutorial from PHLEARN, where he walks through the process while adding a painted sunset glow effect to a photo. The actual color work is beautiful, but the shortcut setup is the part that genuinely changed how I work. Watch the full tutorial on YouTube if you want to see both pieces together. Below, I’ll walk you through the shortcut setup step by step so you can follow along in your own Photoshop session.
The technique itself takes about two minutes to set up and then pays you back every single day after that. Here’s exactly how it works.
Step 1: Set Up Your Working Layer and Convert to Smart Object
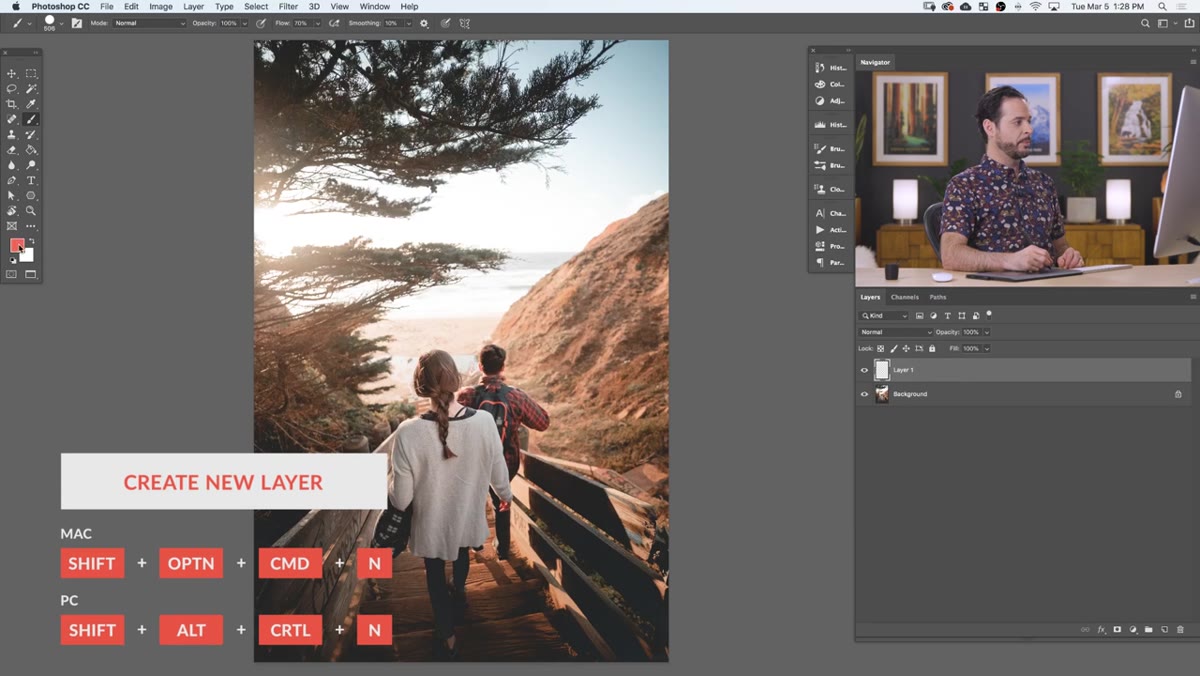 New layer created above background in Layers panel
Create a new layer above your image and do whatever painting or color work you’re planning before you apply any blur. In Aaron’s example, he’s brushing in warm sunset tones, yellows into oranges into reds, to build up a light flare from scratch. The exact colors don’t matter for this tutorial; what matters is that you’re on a separate layer.
Before you touch any filters, right-click the layer in the Layers panel and choose “Convert to Smart Object.” This is non-negotiable if you want to stay flexible. Smart Objects let you re-edit any filter you apply later, including Gaussian Blur, so you can dial in the radius after the fact instead of committing to a value and hoping for the best. I learned this lesson the hard way on a client project once, and I’ll spare you the details, but just trust me on this one.
Step 2: Open the Keyboard Shortcuts Panel
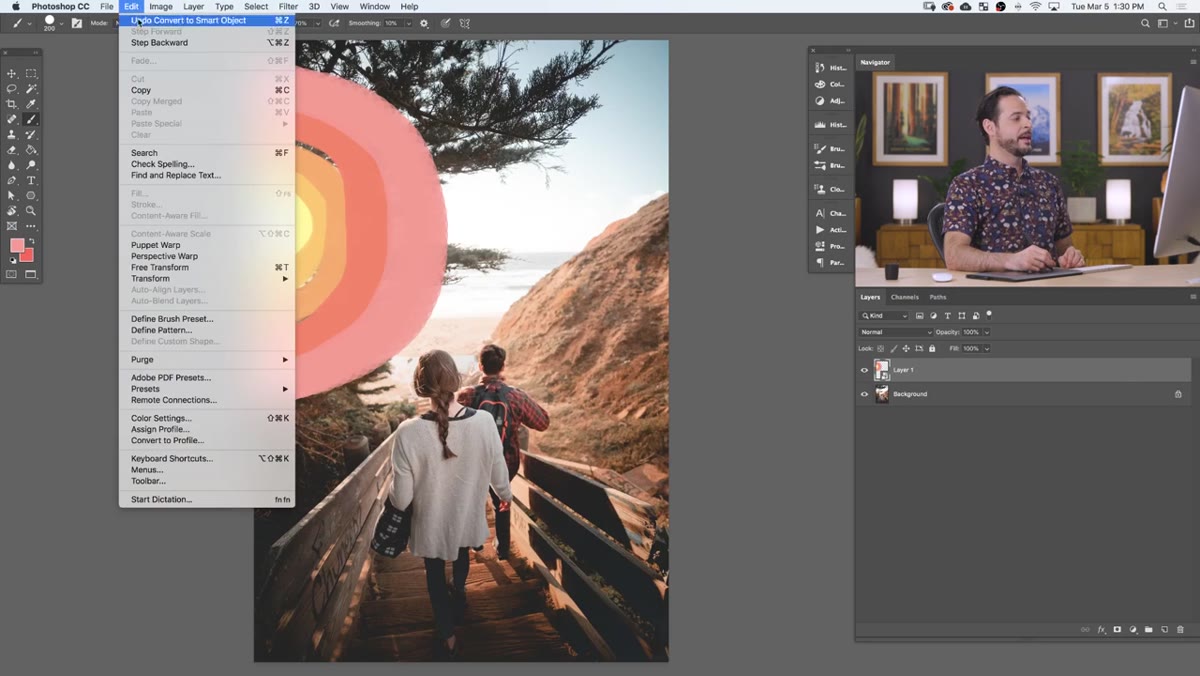 Edit menu open with Keyboard Shortcuts option highlighted
Go to Edit in the top menu bar and scroll down to “Keyboard Shortcuts.” This opens the full shortcut editor, which looks a little intimidating at first but is actually pretty logical once you know how it maps to the menu structure you already know.
The key thing to understand is that the shortcut editor mirrors your actual Photoshop menus. If a command lives under Filter > Blur > Gaussian Blur in your workspace, you’ll find it in the exact same hierarchy inside this panel. That makes navigation intuitive once you know where to look.
Step 3: Navigate to the Command You Want
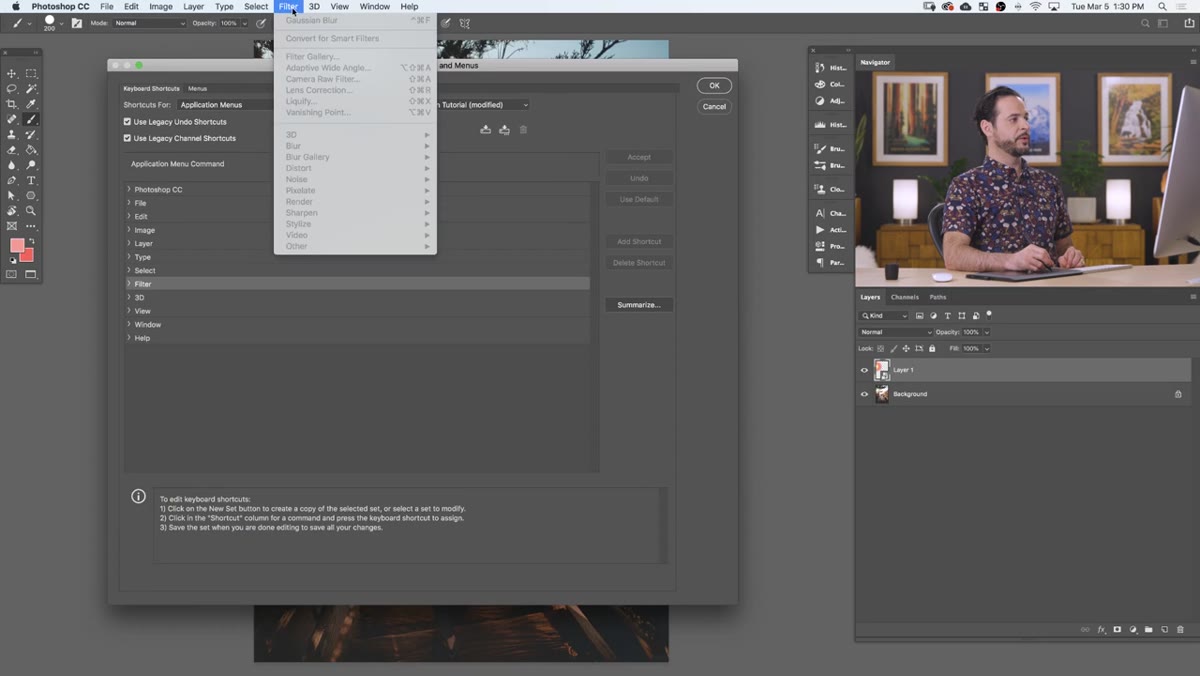 Keyboard Shortcuts panel open, Filter menu selected in dropdown
In the Keyboard Shortcuts panel, use the “Shortcuts For” dropdown and make sure you’re looking at Application Menus. Then find the top-level menu that contains your target command. For Gaussian Blur, that means clicking on “Filter” inside the panel, then expanding “Blur,” and then finding “Gaussian Blur” in the list.
You’ll notice immediately that Gaussian Blur has no shortcut assigned by default. That blank space next to it is exactly what we’re about to fix. This same process works for any command sitting there with an empty shortcut field. Anything you find yourself clicking to repeatedly is a candidate for this treatment.
Step 4: Click the Shortcut Field and Assign Your Keys
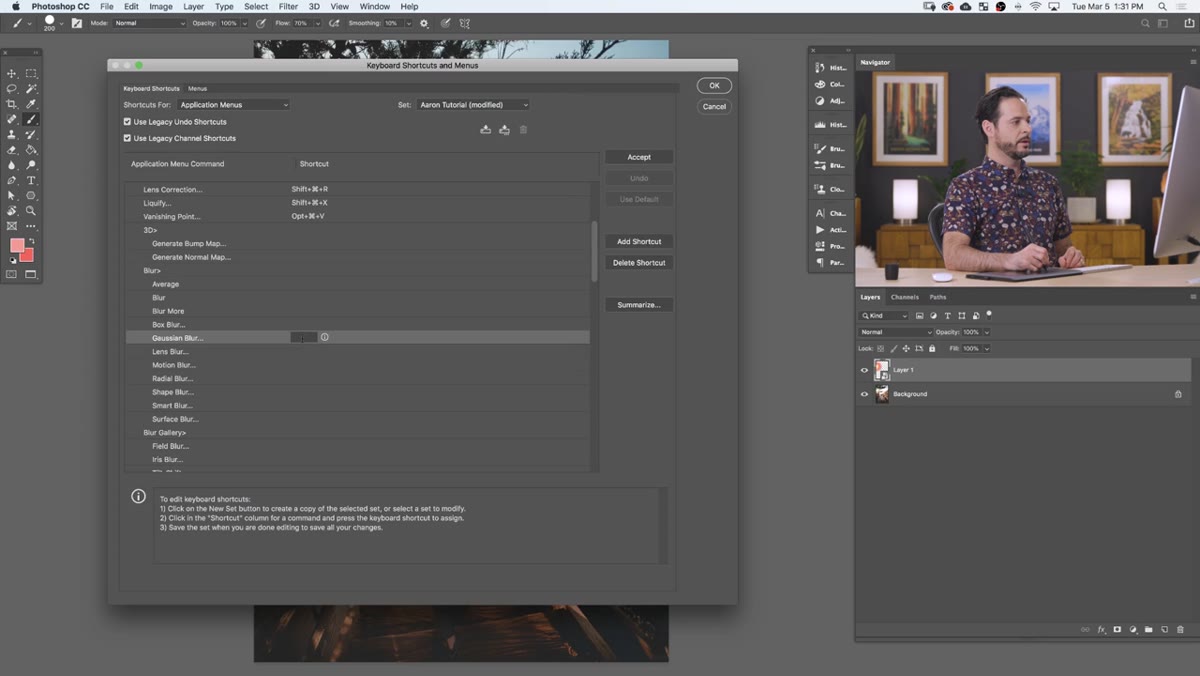 Gaussian Blur row selected in panel, shortcut input field active
Click directly on the Gaussian Blur row, in the area under the “Shortcut” column. It’s a little subtle and Aaron even flags that it can be unclear where exactly to click, but once the field activates you’ll see a cursor appear. At that point, just press the key combination you want to assign.
Aaron’s tip here is genuinely useful: avoid simple combos like Ctrl+A or Cmd+A because they’re almost certainly already taken. Instead, reach for a three-modifier combo. On Mac, that’s Shift + Option + Command + a letter. On PC, it’s Shift + Alt + Ctrl + a letter. These triple-modifier combos are almost always available because most built-in shortcuts don’t use all three modifiers at once. Aaron assigns Shift + Option + Command + G for Gaussian Blur, using G as a mnemonic for the command name. That kind of logic makes shortcuts easier to remember long-term.
Step 5: Accept and Save the Shortcut
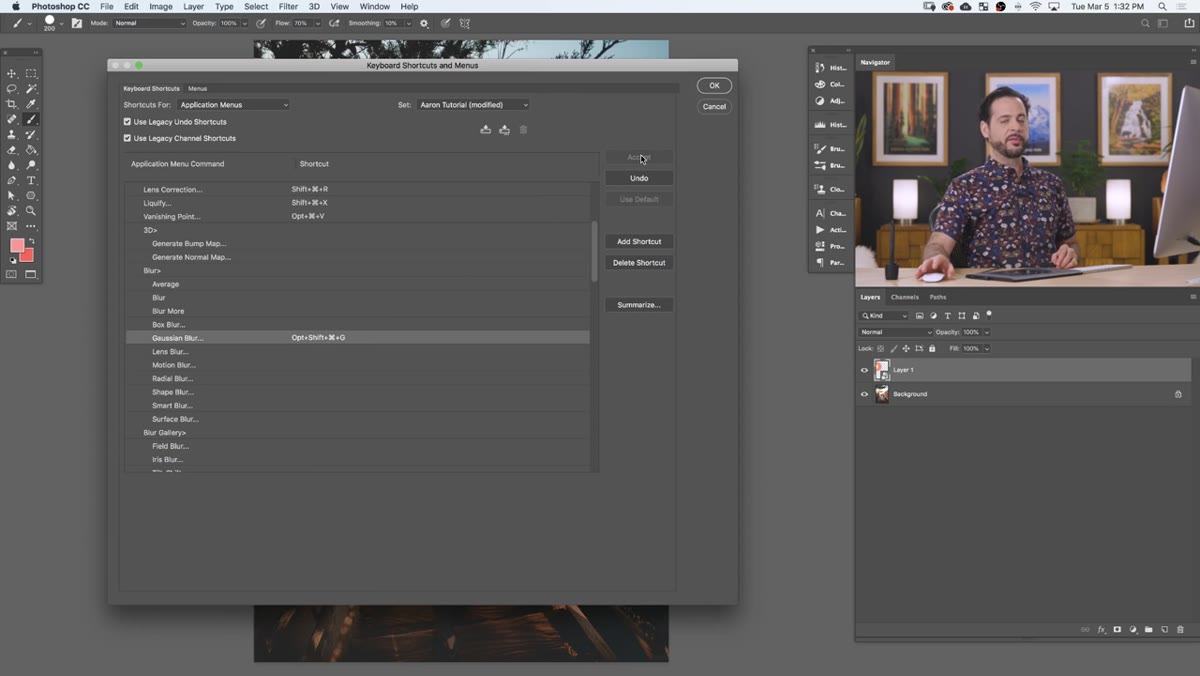
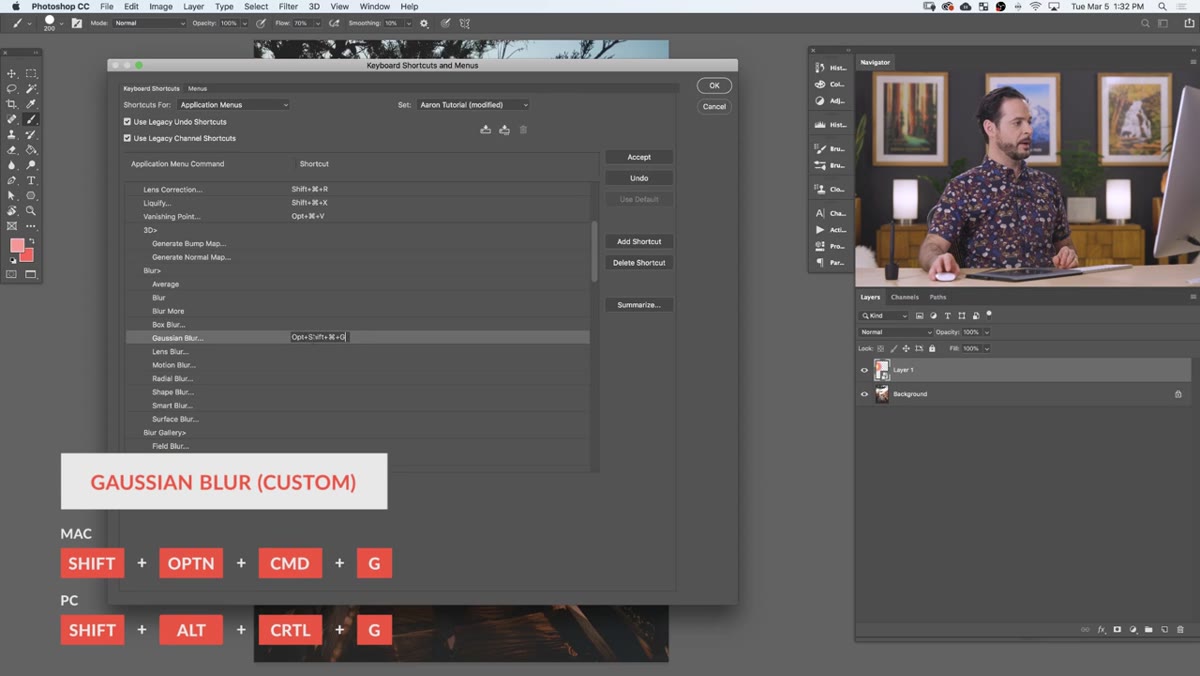 Shortcut confirmed in panel, Accept button visible
After you press your key combination, Photoshop will display it in the shortcut field. Click “Accept” to lock it in. If nothing has changed, hitting OK closes the panel and your shortcut is live immediately.
There’s one scenario worth knowing about: if your chosen combo is already assigned to something else, Photoshop will warn you and tell you exactly which command would lose its shortcut. Aaron demonstrates this by accidentally trying to assign Cmd+M, which is already claimed by Curves. In that case you get a choice: steal the shortcut from Curves and give it to your new command, or back out and pick a different combo. If you’re reassigning shortcuts for commands you never use, stealing is fine. If it’s something essential like Curves, pick a different key.
Step 6: Test Your New Shortcut in Action
 Gaussian Blur dialog opening after keyboard shortcut is triggered
Close the panel and go back to your canvas. With your Smart Object layer selected, press your new shortcut. The Gaussian Blur dialog should pop open immediately, ready for you to set your radius. No menus, no clicking around, just a direct jump to the tool.
From here, dial in the blur radius to taste. Because you converted to a Smart Object first, the blur shows up as a Smart Filter in your Layers panel, which means you can double-click it anytime to reopen the dialog and adjust.
A Note on Building Your Own Shortcut System
When I first found this feature, I went a little overboard and tried to shortcut everything in one sitting. Bad idea. The shortcuts you’ll actually remember are the ones tied to commands you use constantly, or ones with obvious mnemonic logic like G for Gaussian. I keep a sticky note on my laptop (yes, a physical one, I work from coffee shops and my notes app has too many tabs) with the three or four custom shortcuts I’ve built, until they become muscle memory.
The other thing worth doing: treat this as a living system. Photoshop lets you export your shortcut sets, so once you build a solid setup, export it and keep a backup. If you ever reinstall Photoshop or switch machines, you don’t have to rebuild from scratch.
The single biggest takeaway from Aaron’s tutorial is this: Photoshop’s default shortcuts only cover a fraction of what the software can do. The Keyboard Shortcuts panel is your opportunity to build a workflow that actually matches how you work, not how Adobe assumes you work.
Watch the full tutorial on YouTube to see Aaron build the sunset effect alongside the shortcut setup. The two pieces together make for a satisfying watch.
Comments (1)
Bookmarked. Coming back to this one for sure.
Leave a Comment