Client wants a cutout. You’ve got five minutes. You open Photoshop, stare at the toolbar, and suddenly realize you’re not totally sure which of the three automatic selection tools you should be using or whether it even matters. That used to be me, and honestly it got embarrassing fast. When you’re freelancing and someone’s paying by the hour, “let me just try all three” is not a workflow.
Watch the full tutorial on YouTube
In this Matt Kloskowski tutorial, he does the thing none of us have the patience to do ourselves: he runs the same image through all three of Photoshop 2020’s auto-selection tools, Select Subject, Object Selection, and Remove Background, and then zooms in to actually compare the results. No sales pitch for any of them. Just pixel-peeping and honest notes. I watched it, ran my own tests alongside it, and here’s everything broken down into steps you can follow right now.
Step 1: Set Up the Experiment With Duplicate Layers
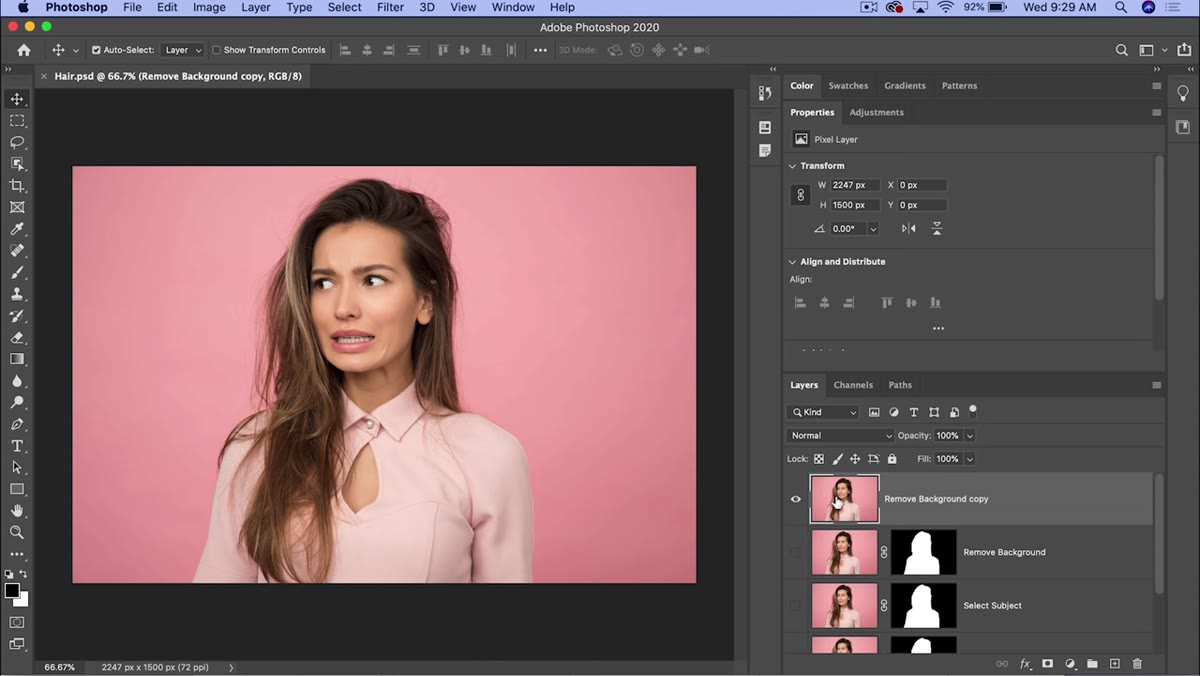 Three duplicate layers each assigned a different selection method
Before you touch a single selection tool, get your file organized so you can compare results without destroying your original. Duplicate your base layer three times using Command+J (Mac) or Ctrl+J (Windows). Name them clearly, something like “Object Selection,” “Select Subject,” and “Remove Background.” This isn’t busywork. If you’re toggling between three invisible masks trying to remember which is which, you’ve already lost.
Three duplicate layers each assigned a different selection method
Before you touch a single selection tool, get your file organized so you can compare results without destroying your original. Duplicate your base layer three times using Command+J (Mac) or Ctrl+J (Windows). Name them clearly, something like “Object Selection,” “Select Subject,” and “Remove Background.” This isn’t busywork. If you’re toggling between three invisible masks trying to remember which is which, you’ve already lost.
Each layer will hold one version of your selection as a layer mask. Keeping them stacked lets you flip between results instantly using Layer Comps, which Matt uses in the video. Go to Window > Layer Comps, create a comp for each layer’s visibility state, and you’ve got a one-click comparison system. It’s the kind of setup that takes three minutes and saves you fifteen.
Step 2: Apply the Object Selection Tool
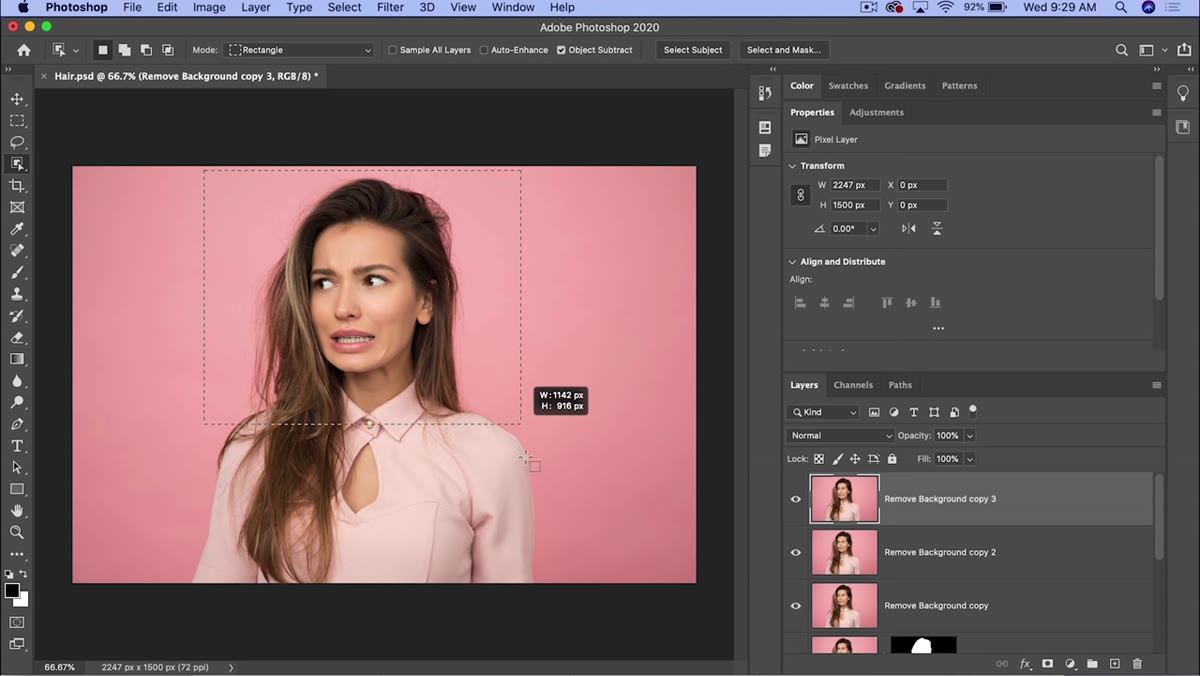 Object Selection Tool active, rectangle drawn around subject
Grab the Object Selection Tool from the toolbar (it lives with the Quick Selection Tool, shortcut W). Draw a rough rectangle or lasso around your subject. You don’t need to be precise. The whole point of this tool is that it figures out the subject within the region you define. Once you release, Photoshop analyzes the contents of that box and snaps the selection to the edges of your subject.
Object Selection Tool active, rectangle drawn around subject
Grab the Object Selection Tool from the toolbar (it lives with the Quick Selection Tool, shortcut W). Draw a rough rectangle or lasso around your subject. You don’t need to be precise. The whole point of this tool is that it figures out the subject within the region you define. Once you release, Photoshop analyzes the contents of that box and snaps the selection to the edges of your subject.
After the selection is active, add a layer mask by clicking the mask icon at the bottom of the Layers panel. The selection becomes a mask, and you can see exactly how well the tool read your subject’s edges. This tool gives you more control than the others because you’re telling Photoshop where to look. That turns out to matter more than you’d expect.
Step 3: Apply Select Subject
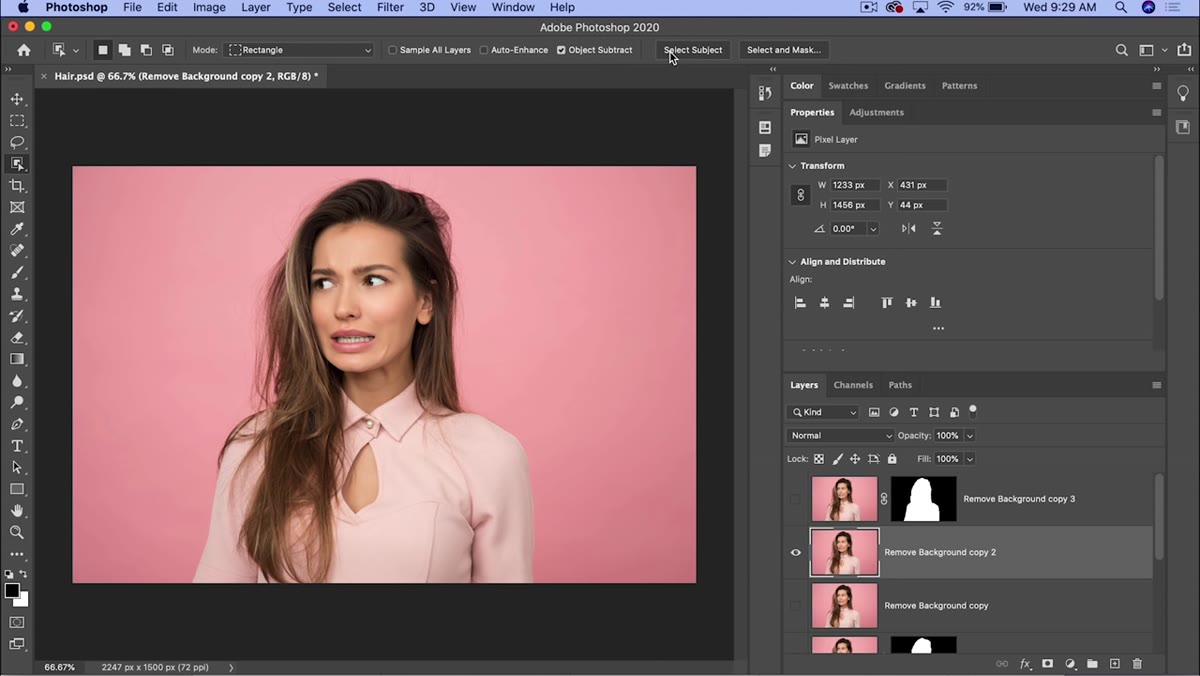 Select Subject applied, layer mask added to duplicate layer
Switch to your second duplicate layer and head up to Select > Subject. One click. No drawing, no dragging. Photoshop looks at the entire image and decides what the subject is, then makes a selection around it. Add your layer mask the same way you did in Step 2.
Select Subject applied, layer mask added to duplicate layer
Switch to your second duplicate layer and head up to Select > Subject. One click. No drawing, no dragging. Photoshop looks at the entire image and decides what the subject is, then makes a selection around it. Add your layer mask the same way you did in Step 2.
This tool has been around longer than the others and it’s had time to mature. For straightforward shots, a person against a reasonably clear background, it does a solid job. The limitation is that you have zero input. If Photoshop misreads the scene, you’re either refining or starting over. It works best when the subject is obvious and centered.
Step 4: Apply Remove Background
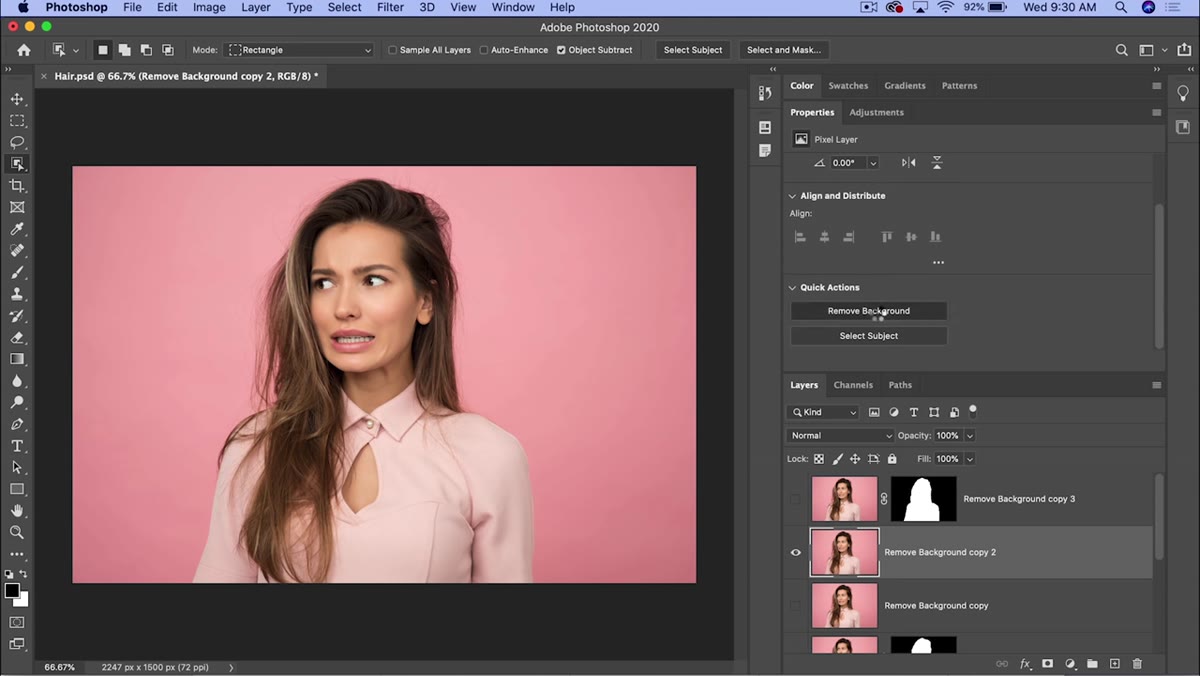 Properties panel open, Remove Background button at bottom
For the third layer, instead of going through the Select menu, open the Properties panel (Window > Properties) while your layer is selected. Scroll to the bottom and you’ll find the Remove Background button. Click it. Unlike the previous two methods, this one automatically adds a layer mask for you. There’s no separate “make selection, then mask” step.
Properties panel open, Remove Background button at bottom
For the third layer, instead of going through the Select menu, open the Properties panel (Window > Properties) while your layer is selected. Scroll to the bottom and you’ll find the Remove Background button. Click it. Unlike the previous two methods, this one automatically adds a layer mask for you. There’s no separate “make selection, then mask” step.
Under the hood, Remove Background is running essentially the same algorithm as Select Subject. The output is nearly identical in most cases. The difference is really just workflow convenience. It skips a step, which is nice, but it also means you never see the raw selection before it becomes a mask. If precision matters on a tricky shot, that intermediate selection step gives you a chance to adjust before committing.
Step 5: Compare the Results by Zooming In
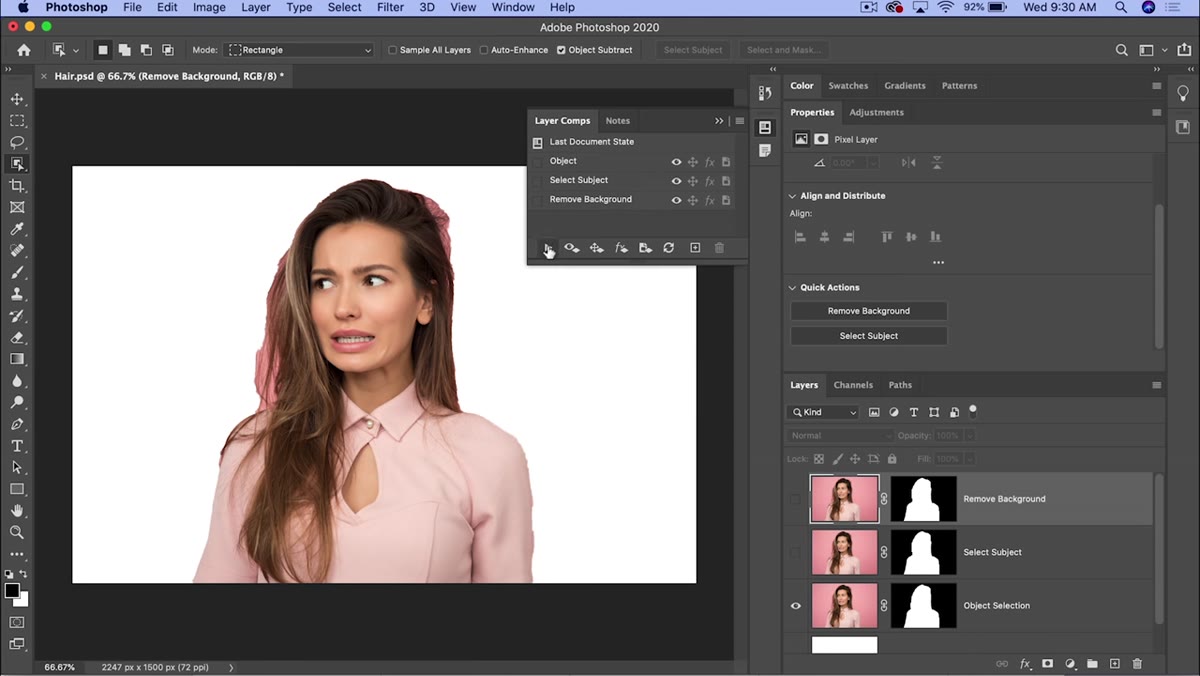 Zoomed-in view toggling between three layer comp results
Now flip between your three Layer Comps and zoom into the edges, especially around hair, fur, or anything with fine detail. This is where the differences show up. At thumbnail size, all three look basically the same. At 100% or higher, the gaps start to appear.
Zoomed-in view toggling between three layer comp results
Now flip between your three Layer Comps and zoom into the edges, especially around hair, fur, or anything with fine detail. This is where the differences show up. At thumbnail size, all three look basically the same. At 100% or higher, the gaps start to appear.
What Matt finds, and what I kept seeing in my own tests, is that Select Subject and Remove Background produce almost identical results. They’re effectively the same tool with a different entry point. The Object Selection Tool, where you drew the bounding box yourself, tends to grab a bit more of the fine detail around the edges, like stray hairs, because you’ve given it a tighter frame to work within. It’s not dramatic, but it’s consistent enough to be worth noting.
Step 6: Refine the Mask for Hair and Fine Edges
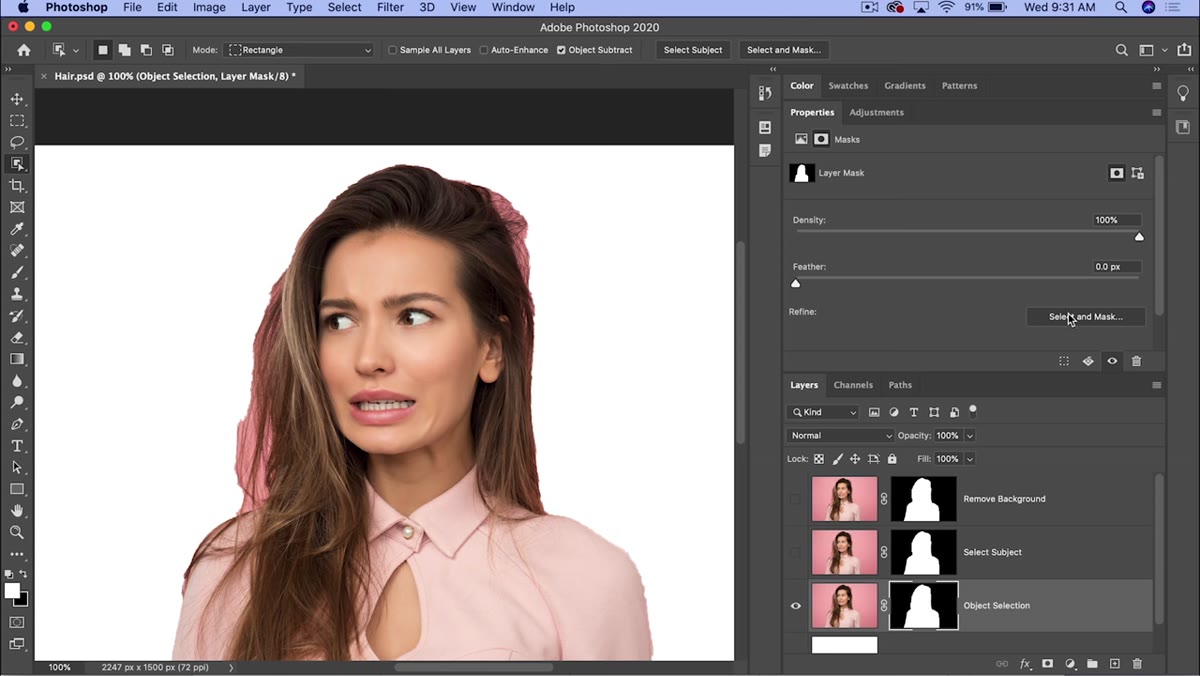 Select and Mask dialog open with Refine Edge brush active on hair
None of these tools will get you a clean cutout on hair or fur by themselves. That’s not a flaw, it’s just physics. The auto-selection tools get you 80 to 90 percent of the way there. The last mile needs the Select and Mask workspace.
Select and Mask dialog open with Refine Edge brush active on hair
None of these tools will get you a clean cutout on hair or fur by themselves. That’s not a flaw, it’s just physics. The auto-selection tools get you 80 to 90 percent of the way there. The last mile needs the Select and Mask workspace.
Click on your layer mask thumbnail, then go to Select > Select and Mask. Switch the view to a background color that contrasts with your subject (white works well for dark hair). Grab the Refine Edge Brush, the second brush in the toolbar on the left, and paint along the areas where hair meets background. Photoshop will sample the pixels there and try to separate the strands from the background. It’s not magic, but combined with a solid initial auto-selection, it gets you to a result you can actually deliver to a client.
What I’d Add From My Own Experience
Here’s the thing nobody says out loud: the tool you pick first actually affects how much work you do in the refinement step. I’ve run this comparison on product shots, portraits, and a very chaotic photo of someone’s Labrador, and the Object Selection Tool consistently gives me cleaner starting edges on complex subjects. That means less painting in Select and Mask, which means faster turnaround.
My current default is Object Selection for anything where I need a tight, accurate cutout, especially around hair or irregular shapes. I use Remove Background when I’m doing quick mockups or concept work where I just need the subject isolated and I don’t care about the last two percent. Select Subject lands somewhere in the middle, and honestly, Remove Background has mostly replaced it in my regular workflow since they produce nearly the same output.
The bottom line is this: all three tools are useful, but they’re not interchangeable. Object Selection gives you the most control for the least extra effort. Remove Background is the fastest path when you just need something cut out. And none of them replace a few minutes in Select and Mask when the details actually matter.
Watch the full tutorial on YouTube to see Matt’s side-by-side comparisons on multiple images. Seeing the pixel-level differences in motion is worth your time.
Comments (2)
Simple but effective. Sometimes that's all you need.
This is the kind of content that keeps me coming back.
Leave a Comment