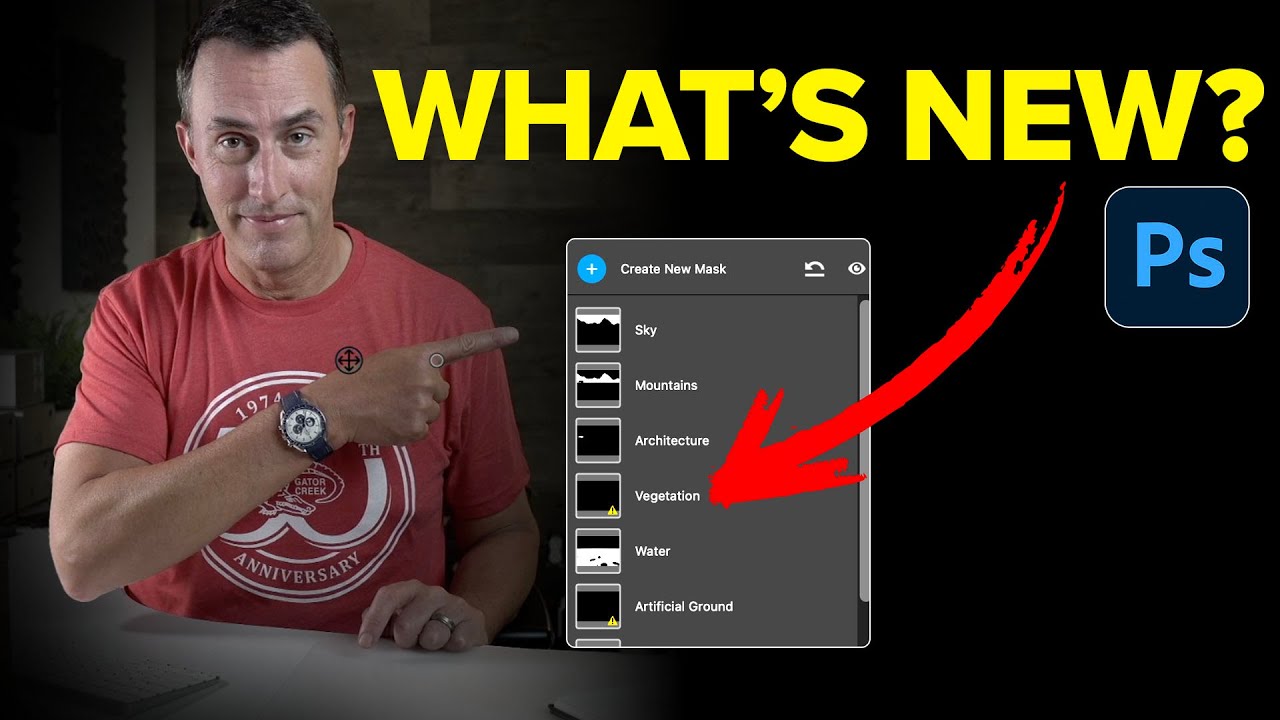
I’ll be honest with you. My relationship with Camera Raw masking has always been “good enough.” Select sky, paint in the foreground with a gradient, argue with a brush tool for fifteen minutes over some tree branches, call it done. It works. It’s not elegant, but it gets the job done between my third and fourth coffee of the morning. Then I watched this Matt Kloskowski tutorial on the April 2025 Photoshop update and realized I’d been doing the equivalent of cutting a steak with a butter knife.
The feature that stopped me mid-sip is called Landscape Masking, and it lives inside Camera Raw’s masking panel. Adobe has quietly dropped what amounts to an AI scene parser directly into your raw editing workflow. It identifies up to seven distinct landscape elements in a photo and generates individual masks for each one automatically. We’re talking sky, mountains, water, vegetation, natural ground, artificial ground (roads, paths, that kind of thing), and architecture. That’s seven layers of selective control without painting a single stroke. For anyone who edits landscape or travel photography with any regularity, this is genuinely a big deal.
What I found most useful in Matt’s breakdown wasn’t just the “look at this shiny new thing” demo. It was watching how he combined these AI-generated masks with the existing masking toolkit to do surgical edits that would have taken a lot more manual work before. Here’s how the whole thing comes together.
Step 1: Open Camera Raw and Find the Landscape Masking Option
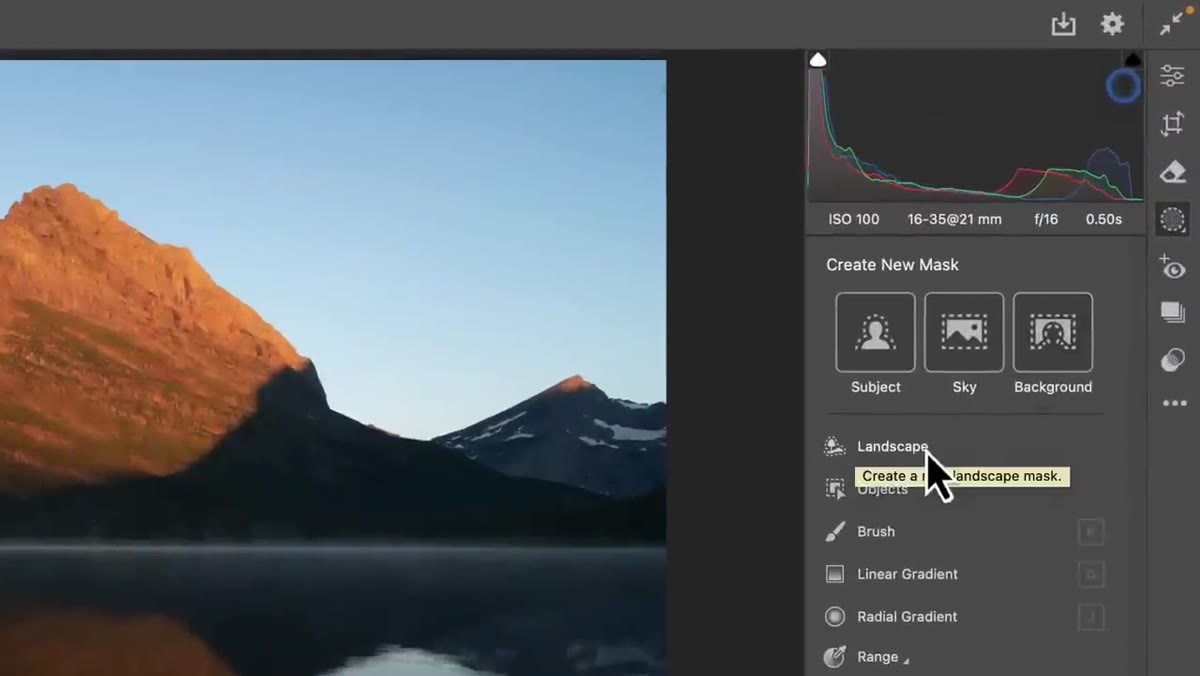 Masking panel open in Camera Raw showing Landscape option
Get your raw file into Camera Raw the way you normally would, then head straight to the masking panel. If you’re in Photoshop, that’s Filter > Camera Raw Filter. In the masking panel you’ll now see a dedicated “Landscape” option sitting alongside the other selection tools. This is the new entry point. You won’t see it if your Photoshop isn’t updated to the April 2025 release, so check your Creative Cloud app if it’s missing.
Masking panel open in Camera Raw showing Landscape option
Get your raw file into Camera Raw the way you normally would, then head straight to the masking panel. If you’re in Photoshop, that’s Filter > Camera Raw Filter. In the masking panel you’ll now see a dedicated “Landscape” option sitting alongside the other selection tools. This is the new entry point. You won’t see it if your Photoshop isn’t updated to the April 2025 release, so check your Creative Cloud app if it’s missing.
Step 2: Let the AI Generate Your Segments
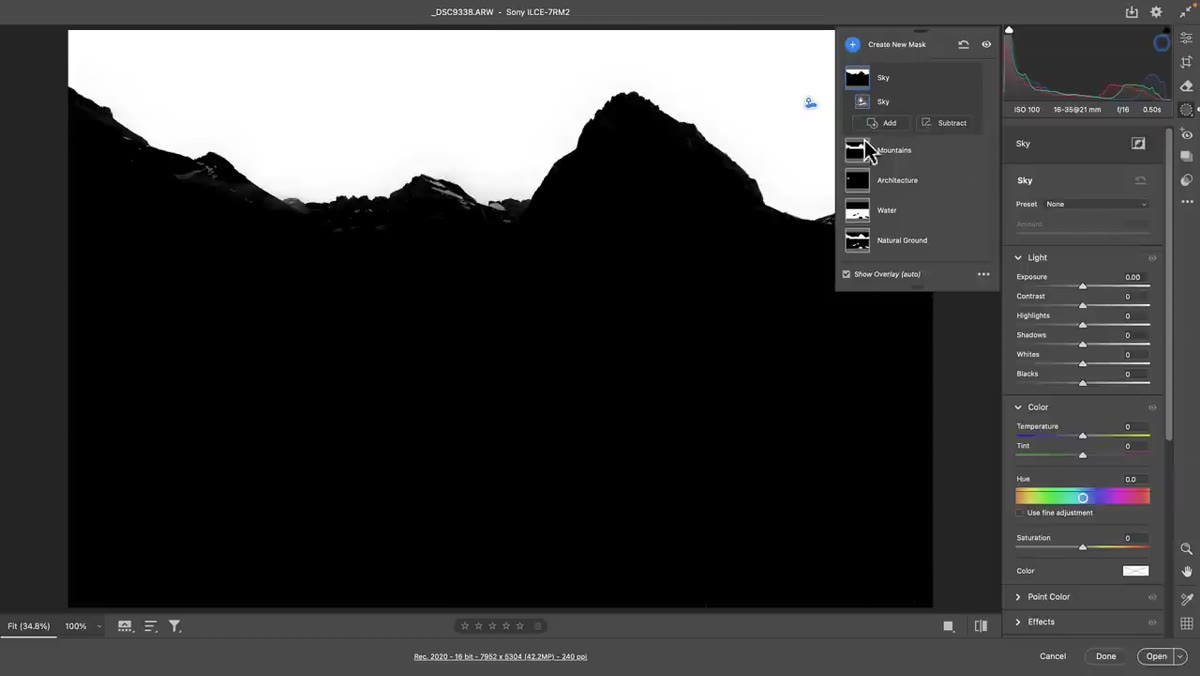 Camera Raw generating landscape masks after clicking Create
Click on the Landscape option and Camera Raw will analyze the photo. It’s going to detect whatever landscape elements it can actually find in the image, so you won’t always get all seven. A photo of a forest path might give you vegetation, artificial ground, and natural ground. A coastal shot might give you sky, water, and natural ground. In Matt’s example, one photo returned vegetation, water, and natural ground. Once you see the list of detected segments, hit Create and Camera Raw generates a separate mask for each one. This takes a few seconds depending on your machine, but it’s doing a lot of heavy lifting in that time.
Camera Raw generating landscape masks after clicking Create
Click on the Landscape option and Camera Raw will analyze the photo. It’s going to detect whatever landscape elements it can actually find in the image, so you won’t always get all seven. A photo of a forest path might give you vegetation, artificial ground, and natural ground. A coastal shot might give you sky, water, and natural ground. In Matt’s example, one photo returned vegetation, water, and natural ground. Once you see the list of detected segments, hit Create and Camera Raw generates a separate mask for each one. This takes a few seconds depending on your machine, but it’s doing a lot of heavy lifting in that time.
Step 3: Review the Masks Using Color Overlay
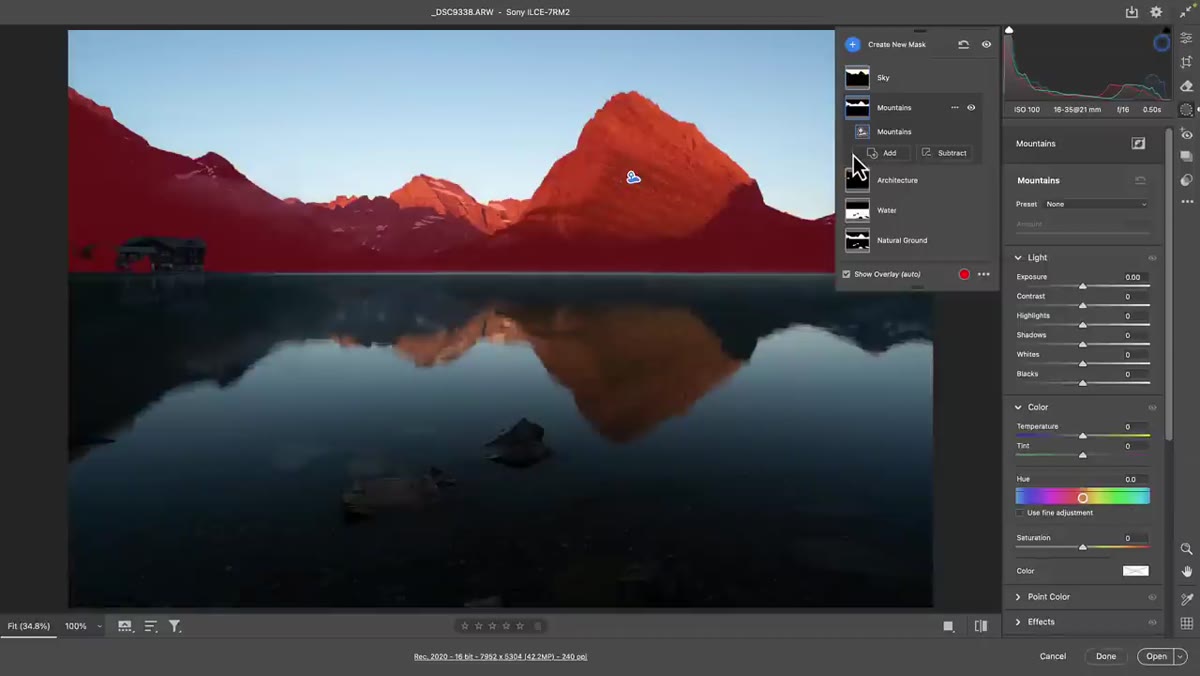 Color overlay mode showing individual landscape segment masks
Once the masks are created, switch to the color overlay view so you can actually see what got selected. Each segment shows up as a colored overlay on the photo. This is where you want to slow down and be critical. AI selections are impressive but not infallible. Check the edges of your vegetation mask against the sky, look at how the water boundary sits, and see if natural ground bled into areas you wouldn’t expect. In most cases you’ll find the selections are surprisingly clean, but it’s worth a look before you start pushing sliders.
Color overlay mode showing individual landscape segment masks
Once the masks are created, switch to the color overlay view so you can actually see what got selected. Each segment shows up as a colored overlay on the photo. This is where you want to slow down and be critical. AI selections are impressive but not infallible. Check the edges of your vegetation mask against the sky, look at how the water boundary sits, and see if natural ground bled into areas you wouldn’t expect. In most cases you’ll find the selections are surprisingly clean, but it’s worth a look before you start pushing sliders.
Step 4: Start Editing Individual Segments
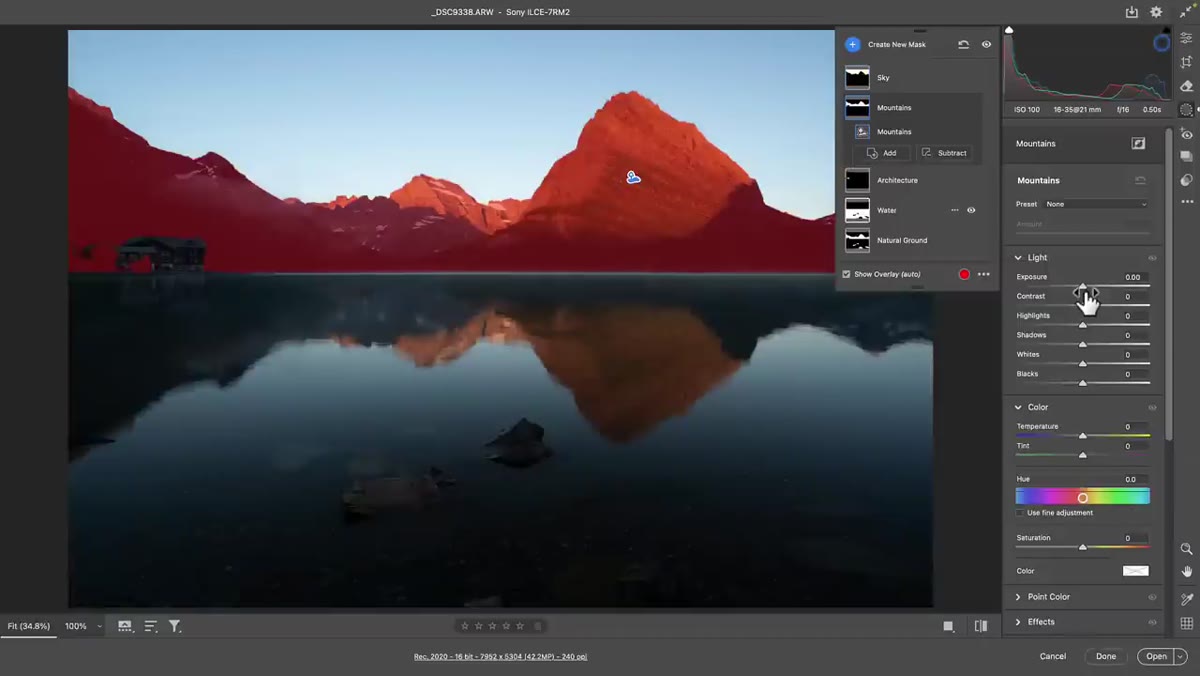 Editing adjustments applied to a selected landscape segment mask
Now the fun part. Click on any segment mask and your familiar Camera Raw adjustment sliders are right there waiting. Want to pump the exposure on the sky without blowing out the foreground? Click the sky mask and drag. Want to add warmth to the vegetation without it creeping into the water? Click vegetation and adjust white balance. You’re essentially working with layers inside Camera Raw, which is a way of thinking about it that Matt puts really well. Each segment is its own isolated editing environment, and because Camera Raw’s adjustments are non-destructive, you can go back and change anything at any point.
Editing adjustments applied to a selected landscape segment mask
Now the fun part. Click on any segment mask and your familiar Camera Raw adjustment sliders are right there waiting. Want to pump the exposure on the sky without blowing out the foreground? Click the sky mask and drag. Want to add warmth to the vegetation without it creeping into the water? Click vegetation and adjust white balance. You’re essentially working with layers inside Camera Raw, which is a way of thinking about it that Matt puts really well. Each segment is its own isolated editing environment, and because Camera Raw’s adjustments are non-destructive, you can go back and change anything at any point.
Step 5: Use the AI Segments to Subtract From Each Other
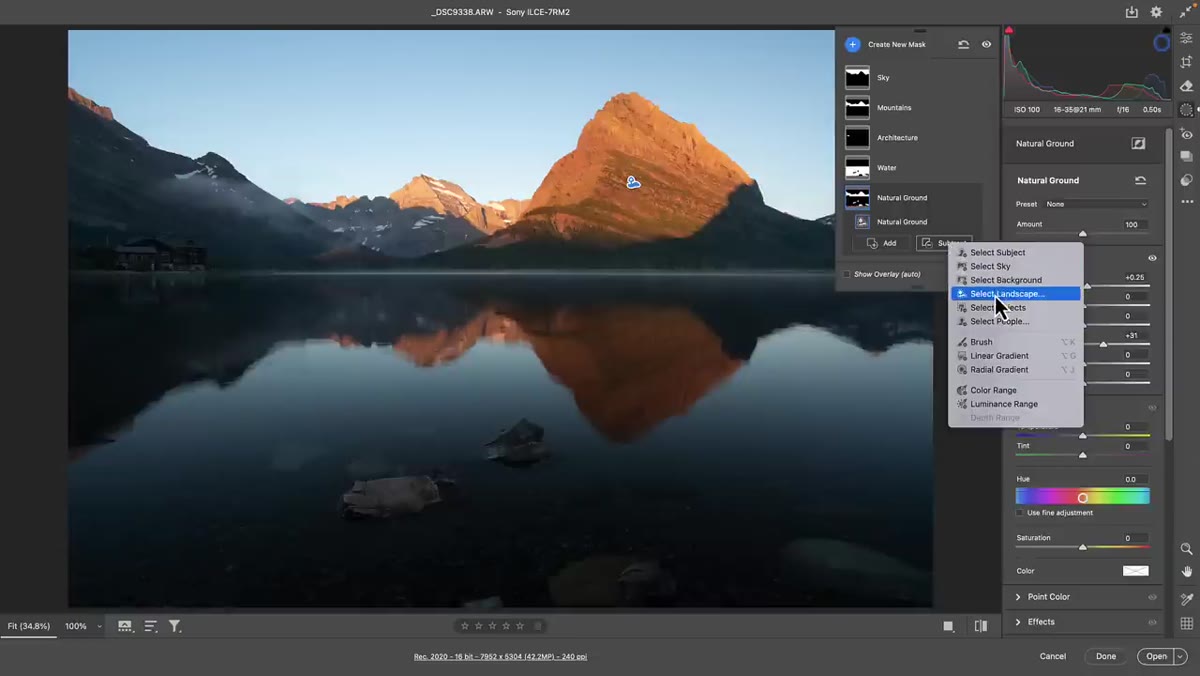 Subtract mode using one landscape segment to refine another
This is the part of Matt’s tutorial that genuinely impressed me. Say your natural ground mask is selecting more of the scene than you want because it’s picking up foreground AND some distant terrain. Instead of grabbing a brush and painting it out manually, you can go to Subtract, then open the Landscape selector again, and use a different AI segment to carve out the part you don’t want. In Matt’s example, he subtracted the mountains segment from the natural ground mask to isolate just the foreground area. The AI segments can be combined and subtracted from each other, which means you can build very precise selections using pieces that were already intelligently detected.
Subtract mode using one landscape segment to refine another
This is the part of Matt’s tutorial that genuinely impressed me. Say your natural ground mask is selecting more of the scene than you want because it’s picking up foreground AND some distant terrain. Instead of grabbing a brush and painting it out manually, you can go to Subtract, then open the Landscape selector again, and use a different AI segment to carve out the part you don’t want. In Matt’s example, he subtracted the mountains segment from the natural ground mask to isolate just the foreground area. The AI segments can be combined and subtracted from each other, which means you can build very precise selections using pieces that were already intelligently detected.
Step 6: Refine With Traditional Tools if Needed
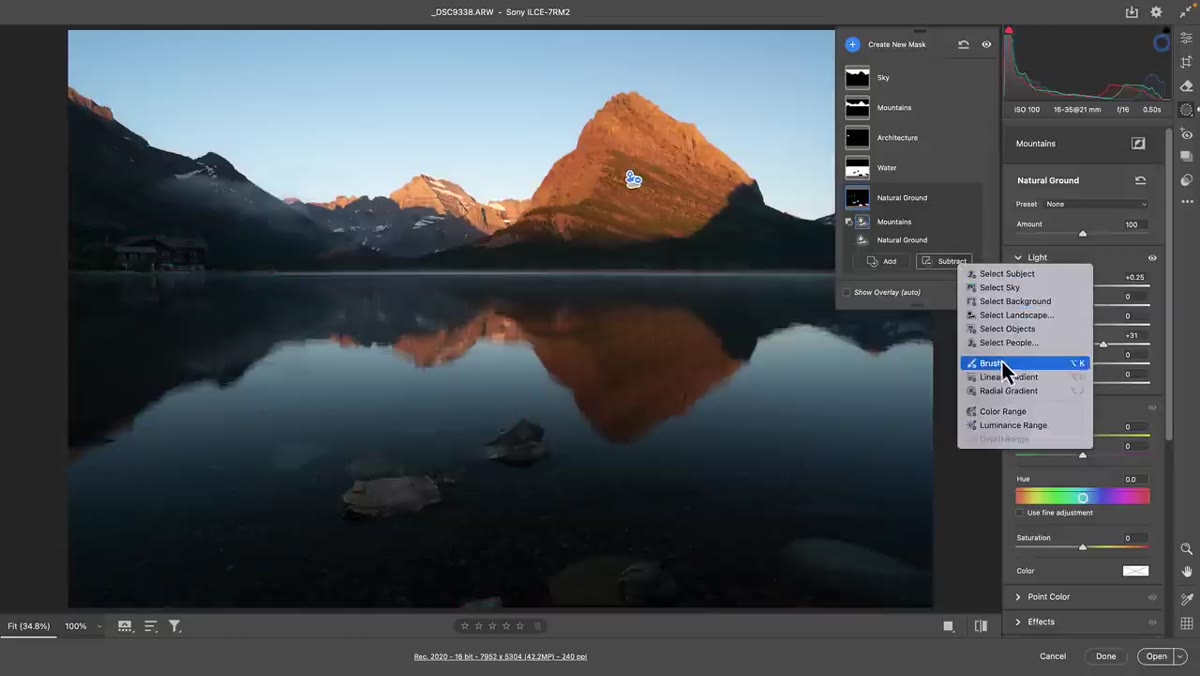 Brush tool being used to subtract from a landscape mask
After you’ve done the AI-powered heavy lifting, the regular masking tools are still fully available. If there’s a small area that wasn’t covered correctly, drop into the Subtract mode and grab the brush. Paint out the spots you don’t want. You can also add a radial or linear gradient to any mask if you need to feather the effect in a particular direction. Nothing about adding this landscape masking feature took away the manual control that was already there. It just means you’re doing far less manual work to get to a good starting point.
Brush tool being used to subtract from a landscape mask
After you’ve done the AI-powered heavy lifting, the regular masking tools are still fully available. If there’s a small area that wasn’t covered correctly, drop into the Subtract mode and grab the brush. Paint out the spots you don’t want. You can also add a radial or linear gradient to any mask if you need to feather the effect in a particular direction. Nothing about adding this landscape masking feature took away the manual control that was already there. It just means you’re doing far less manual work to get to a good starting point.
One Thing Worth Knowing Before You Dive In
Matt mentions in the tutorial that generating all seven masks at once can feel slow if you’re doing it on every photo in a session. His solution is a free preset that creates all the masks in one click, which you can find linked in his video description. I haven’t used that preset myself yet, but the underlying point is a good one: build this into a starting template rather than repeating the setup manually every time. If you do a lot of landscape work, creating a Camera Raw preset that includes the landscape masking step as part of your standard starting edit could save you a surprising amount of friction over a week of editing sessions.
The single most important thing I took away from this is that the value isn’t just in the individual masks. It’s in being able to combine and subtract them to build selections that would have required significant manual masking time before. That subtract-one-segment-from-another trick alone is worth updating your Photoshop for.
Watch the full tutorial on YouTube to see Matt walk through multiple photo examples and explain how he’s integrated this into his day-to-day workflow. His real-world examples make it click faster than any written breakdown can.
Comments (1)
Finally someone explains this in a way that actually makes sense.
Leave a Comment