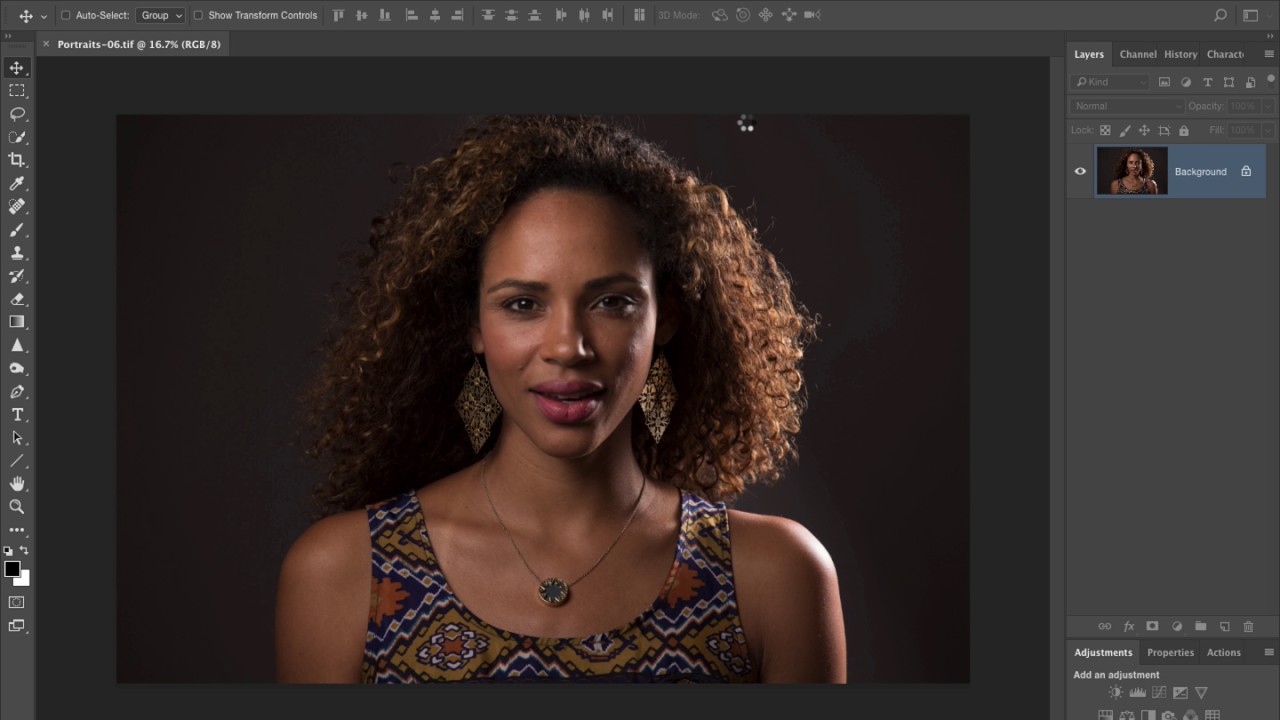
There’s a specific kind of freelance misery that hits when a client asks for “the JPEGs, the PSDs, and also could you resize them for web?” You have 40 raw files, three format requirements, and a cold oat milk latte going warm on the table next to your laptop. I used to handle this by opening files one at a time, exporting, renaming, and quietly resenting every click. Then I watched Scott Kelby’s KelbyOne tutorial on Photoshop’s Image Processor and felt that particular shame of realizing a better solution had been sitting under my nose the whole time.
Watch the full tutorial on YouTube
Image Processor lives under File > Scripts, which is exactly the kind of menu location that guarantees most people will never find it. It looks intimidating when it first opens, but the interface is literally numbered, like a form you fill out at the DMV, except this one actually makes your life easier. The whole thing takes about 30 seconds to configure, and then Photoshop just… handles it. All of it. Here’s how to use it.
Step 1: Open Image Processor
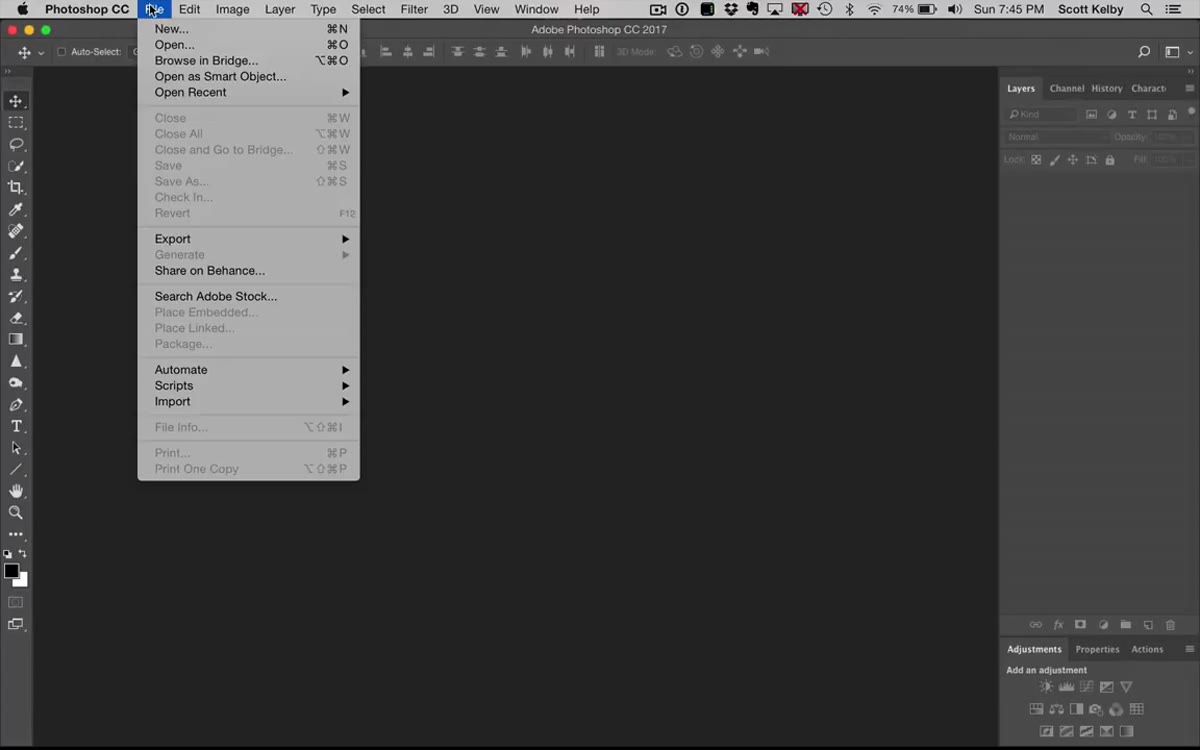 File menu open, Scripts submenu visible with Image Processor listed
Go to File > Scripts > Image Processor. That’s the whole step. The dialog that opens has four numbered sections running top to bottom, which is Kelby’s point about it being simpler than it looks. You’re not configuring a spaceship. You’re filling in four fields and hitting Run.
File menu open, Scripts submenu visible with Image Processor listed
Go to File > Scripts > Image Processor. That’s the whole step. The dialog that opens has four numbered sections running top to bottom, which is Kelby’s point about it being simpler than it looks. You’re not configuring a spaceship. You’re filling in four fields and hitting Run.
Step 2: Choose Your Source Folder
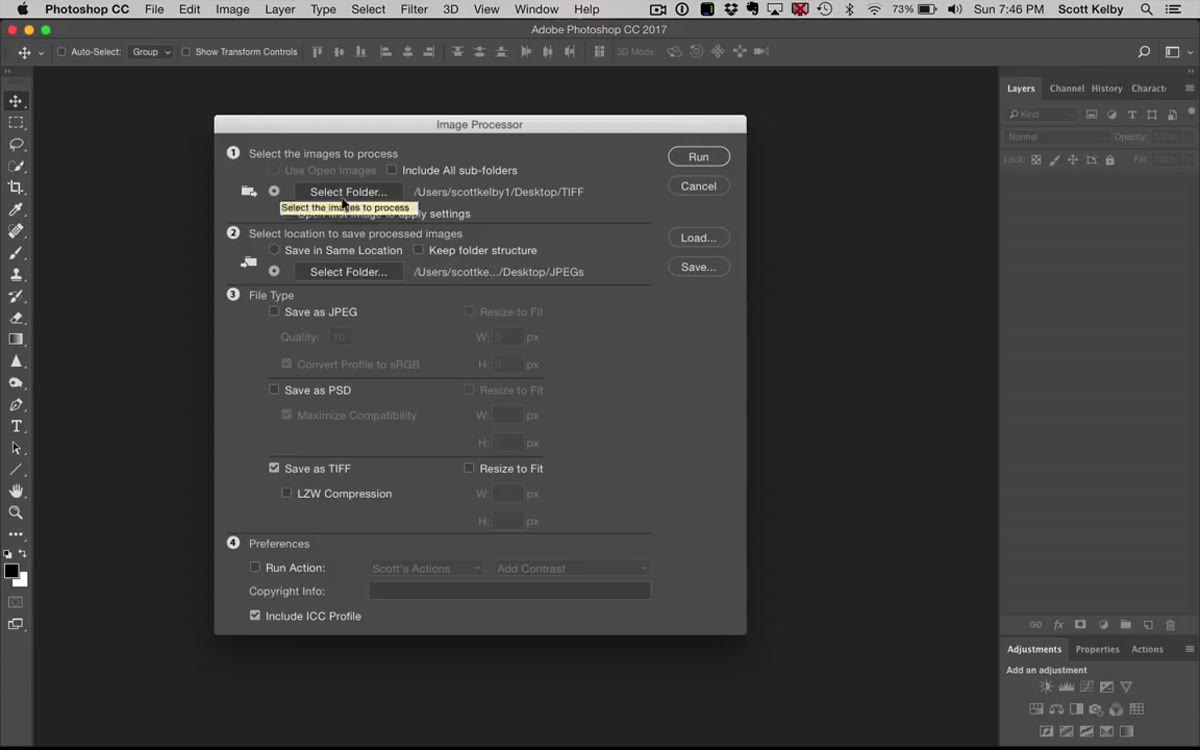 Image Processor dialog open, Step 1 folder selection highlighted
Section one of the dialog asks where your images live. Click “Select Folder” and point it at whatever folder holds the files you want to process. This works with basically anything Photoshop can open, including raw files, TIFFs, JPEGs, PSDs. You’re not locked into one format coming in. Kelby uses a folder of TIFFs in the tutorial, but the logic is identical no matter what you’re starting with.
Image Processor dialog open, Step 1 folder selection highlighted
Section one of the dialog asks where your images live. Click “Select Folder” and point it at whatever folder holds the files you want to process. This works with basically anything Photoshop can open, including raw files, TIFFs, JPEGs, PSDs. You’re not locked into one format coming in. Kelby uses a folder of TIFFs in the tutorial, but the logic is identical no matter what you’re starting with.
Step 3: Set Your Save Location
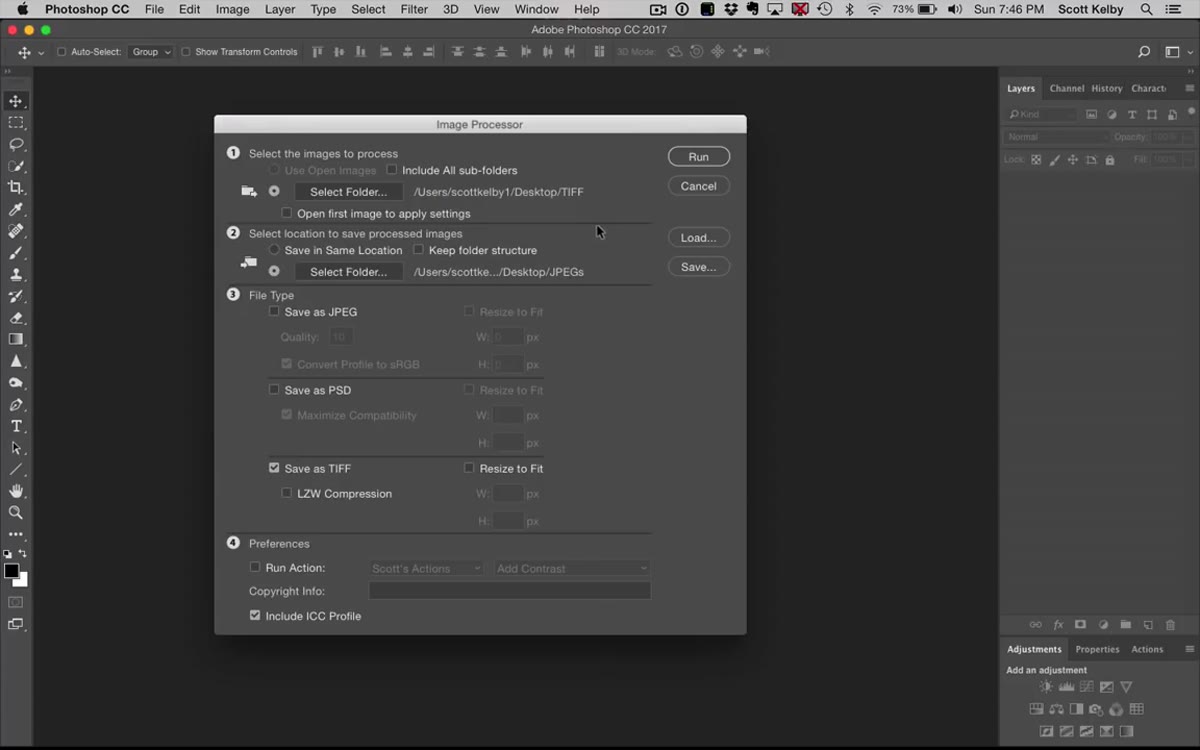 Save location options shown, “Save in New Location” selected
Section two asks where the processed files should go. You can either save them back into the same folder as the originals, or pick a completely separate destination. I almost always choose a separate folder just to keep things clean. Kelby creates a folder called “JPEGs” on his desktop and points the processor there. Whatever you name it, Photoshop will drop the finished files in neatly organized subfolders based on format. It’s tidy in a way that makes you feel like you have your life together.
Save location options shown, “Save in New Location” selected
Section two asks where the processed files should go. You can either save them back into the same folder as the originals, or pick a completely separate destination. I almost always choose a separate folder just to keep things clean. Kelby creates a folder called “JPEGs” on his desktop and points the processor there. Whatever you name it, Photoshop will drop the finished files in neatly organized subfolders based on format. It’s tidy in a way that makes you feel like you have your life together.
Step 4: Choose Your Output File Types
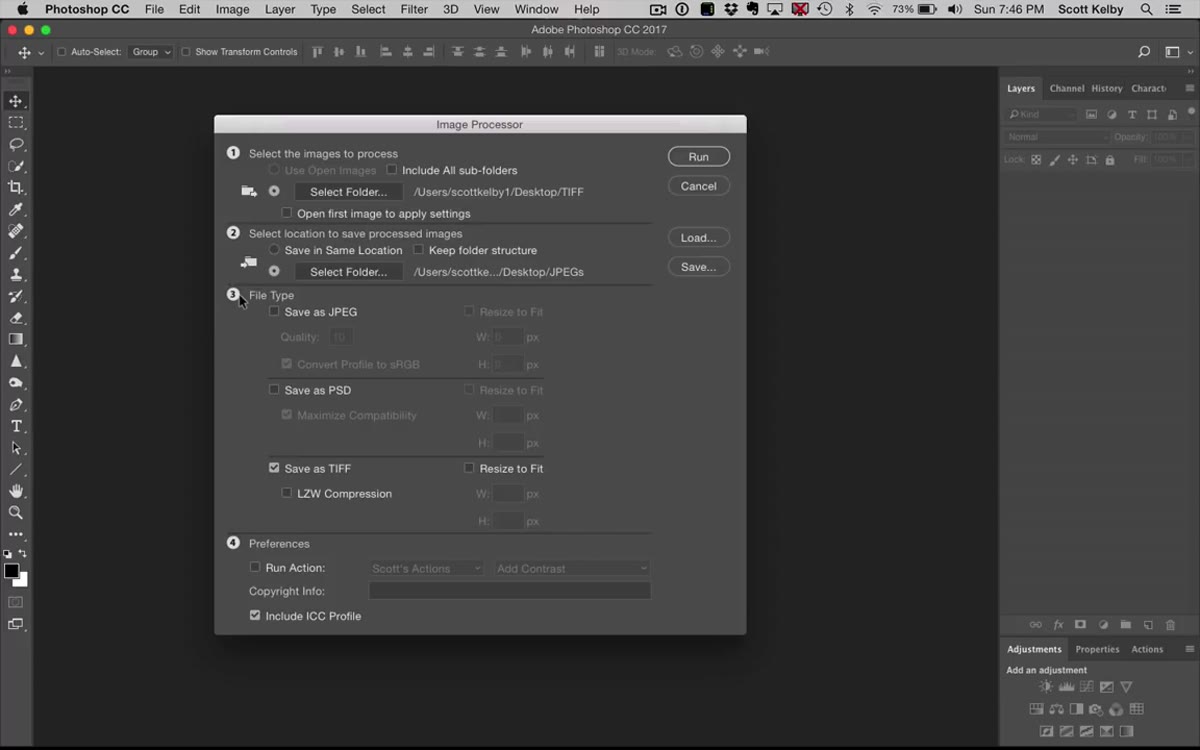 File type checkboxes showing JPEG, PSD, and TIFF options with settings
Section three is where the actual power lives. You can check any combination of JPEG, PSD, and TIFF, and Photoshop will export your source files into each of those formats simultaneously. For JPEG, you set a quality value from 1 to 12. There are also two useful options here: one converts color profiles to sRGB automatically (which is what you want if you’re sending files to a photo lab or posting anywhere online), and another lets you resize every image to a specific width or height. That resize option alone has saved me from a completely unnecessary amount of manual scaling. Check the formats you need, set your quality, and move on.
File type checkboxes showing JPEG, PSD, and TIFF options with settings
Section three is where the actual power lives. You can check any combination of JPEG, PSD, and TIFF, and Photoshop will export your source files into each of those formats simultaneously. For JPEG, you set a quality value from 1 to 12. There are also two useful options here: one converts color profiles to sRGB automatically (which is what you want if you’re sending files to a photo lab or posting anywhere online), and another lets you resize every image to a specific width or height. That resize option alone has saved me from a completely unnecessary amount of manual scaling. Check the formats you need, set your quality, and move on.
Step 5: Run an Action on Every File (Optional but Powerful)
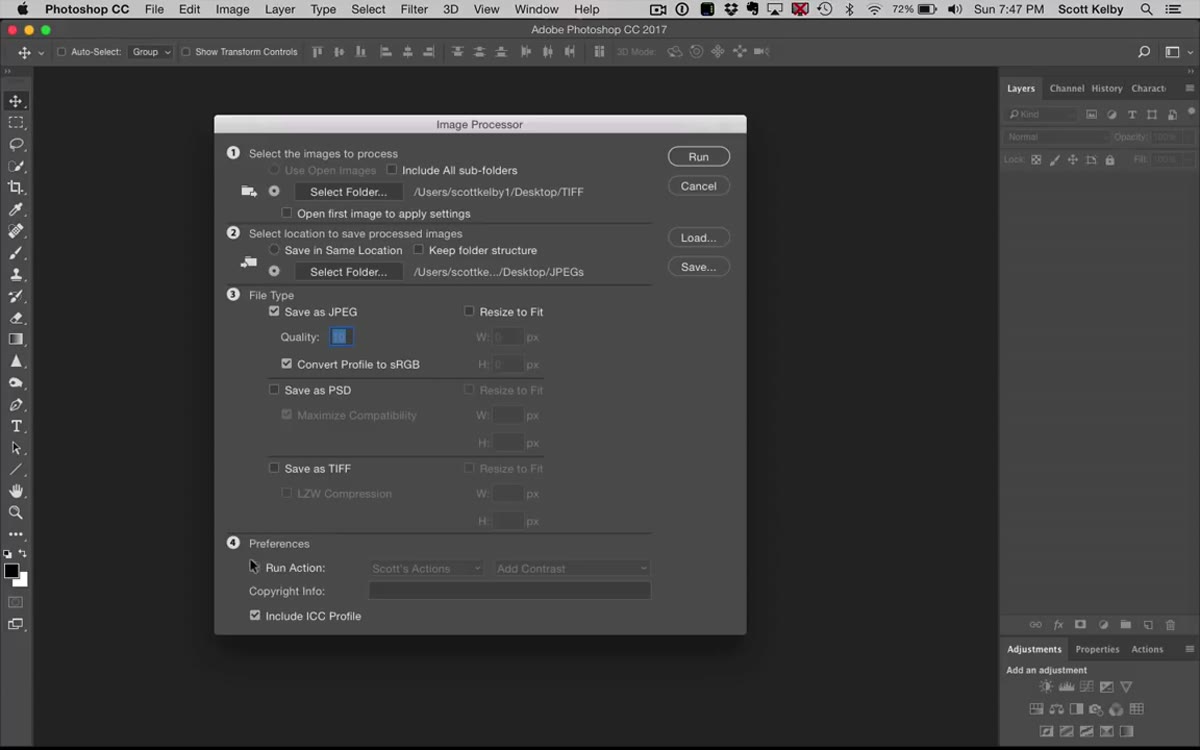 Run Action section with action dropdown showing “Add Contrast” selected
Section four is labeled as optional, but honestly it’s the part that makes this tool graduate from “useful” to “kind of incredible.” If you have Photoshop actions saved, you can tell Image Processor to run one of them on every single file before exporting. Kelby picks an action he made called “Add Contrast,” which uses surface blur and a few other adjustments. You can use any action you’ve built or recorded, whether that’s sharpening, adding a watermark layer, applying a color grade, or anything else your workflow requires. The action fires on each file automatically before the export happens. You’re essentially building a mini automated pipeline inside Photoshop without writing a single line of code.
Run Action section with action dropdown showing “Add Contrast” selected
Section four is labeled as optional, but honestly it’s the part that makes this tool graduate from “useful” to “kind of incredible.” If you have Photoshop actions saved, you can tell Image Processor to run one of them on every single file before exporting. Kelby picks an action he made called “Add Contrast,” which uses surface blur and a few other adjustments. You can use any action you’ve built or recorded, whether that’s sharpening, adding a watermark layer, applying a color grade, or anything else your workflow requires. The action fires on each file automatically before the export happens. You’re essentially building a mini automated pipeline inside Photoshop without writing a single line of code.
Step 6: Add Copyright Metadata and Hit Run
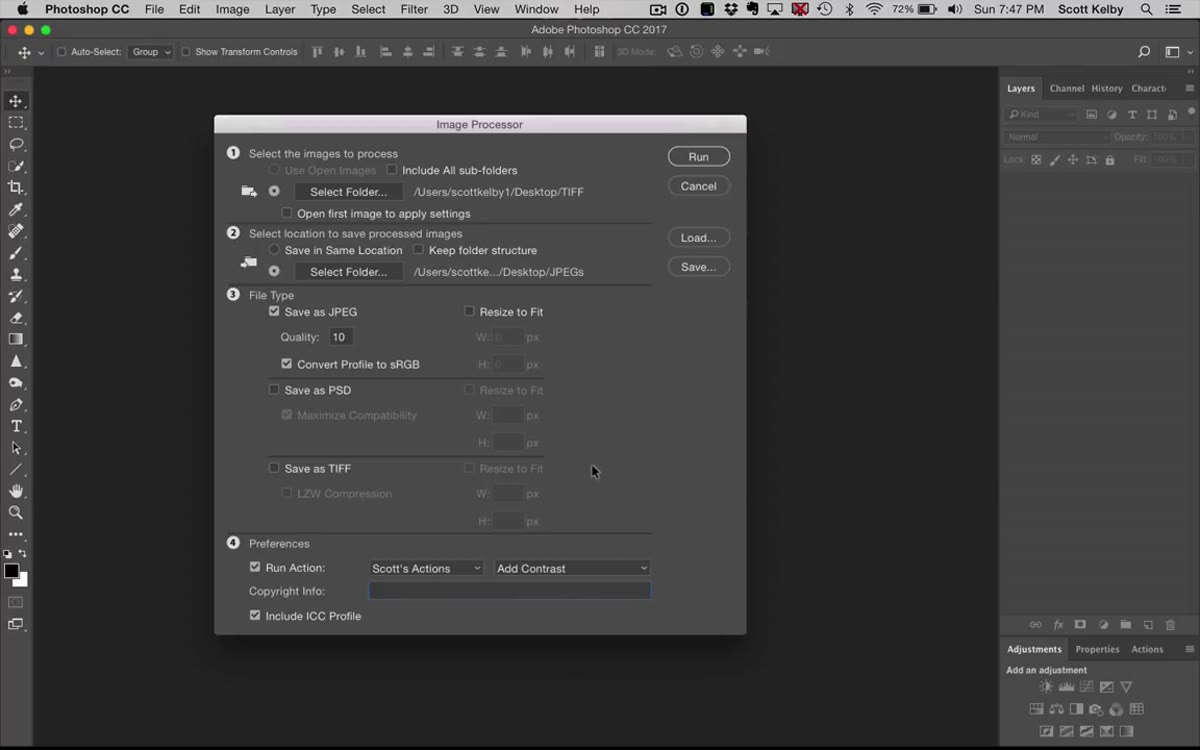 Copyright field filled in, Run button visible at bottom right
Still in section four, there’s a text field where you can type copyright information to embed in the file metadata. If you’re handing off images to a client, sending to a lab, or posting work publicly, this is worth filling in. Type your name, year, whatever format you use. Then click Run. Photoshop opens each file, runs your action if you set one, exports to every format you checked, and saves everything to your destination folder in tidy subfolders. You can go refill your coffee. Kelby processes 12 images in the tutorial and the whole batch finishes on its own while he narrates.
Copyright field filled in, Run button visible at bottom right
Still in section four, there’s a text field where you can type copyright information to embed in the file metadata. If you’re handing off images to a client, sending to a lab, or posting work publicly, this is worth filling in. Type your name, year, whatever format you use. Then click Run. Photoshop opens each file, runs your action if you set one, exports to every format you checked, and saves everything to your destination folder in tidy subfolders. You can go refill your coffee. Kelby processes 12 images in the tutorial and the whole batch finishes on its own while he narrates.
One Thing I’d Add: Pre-Build Your Actions Before You Run This
The Image Processor itself is simple, but the value it delivers scales directly with how good your actions are going in. When I first started using this, I pointed it at an “Add Sharpening” action I’d recorded in about 90 seconds and called it done. The results were fine. Later I built a proper export action that handles sharpening, adds a subtle vignette, and stamps a small copyright watermark into the image itself (not just the metadata). Running that through Image Processor on a 50-image folder turned a two-hour job into a 15-minute one.
The other thing worth knowing: if your action includes any step that opens a dialog box waiting for user input, it’ll pause the batch and sit there until you click through. Record your actions in a way that avoids manual confirmations, or use the “Insert Stop” feature sparingly. Automated workflows that require babysitting defeat the whole point.
Image Processor is one of those Photoshop features that makes you wonder how many other useful tools are buried in menus you’ve never clicked. The fact that it handles multi-format export, resizing, color profile conversion, action execution, and metadata embedding in a single 30-second setup is genuinely impressive. If batch exporting is any part of your regular workflow and you’re still doing it manually, this is the fix.
Watch the full tutorial on YouTube and see Kelby walk through a live batch run. The part where he accidentally hits his brightness key while typing the copyright info is also a good reminder that even the pros are just people sitting at computers.
Comments
Leave a Comment