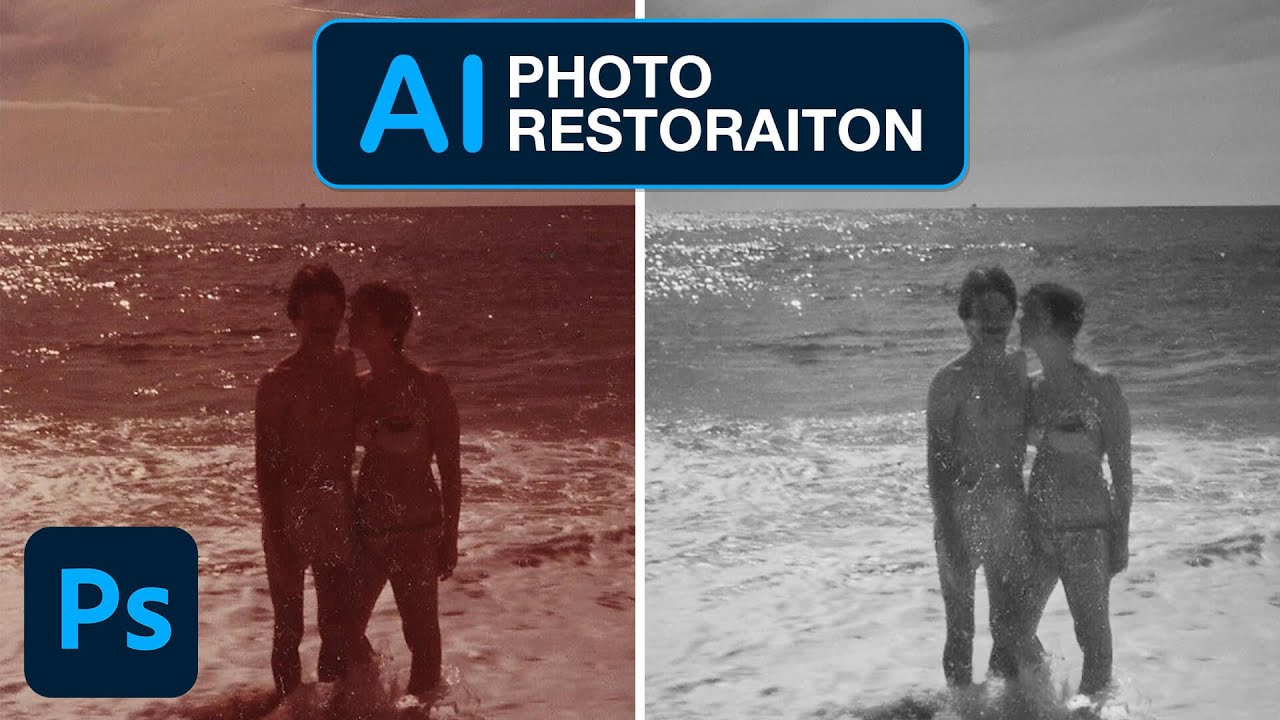
I have a folder on my hard drive called “someday” and it is exactly what it sounds like. Old scanned photos, damaged client images, faded family snapshots that someone emailed me hoping I’d “fix them up real quick.” I’ve been putting them off for years because the traditional route, clone stamp, healing brush, frequency separation, manual scratch removal, takes forever and never looks quite right on genuinely aged photographs. So when I came across this Aaron Nace (PHLEARN) tutorial on Photoshop’s new AI-powered Photo Restoration neural filter, I sat up a little straighter in my coffee shop chair. Watch the full tutorial on YouTube
Aaron’s working with a personal photo here, a scanned snapshot of his parents from what looks like a beach trip, probably Hawaii. The image has the classic damage: scratches, dust, color shift from age, that orange-red cast old photographs develop over decades. He runs it through the new neural filter and the results are genuinely impressive. Not “AI hype” impressive. Actually useful, actually saves time impressive.
This feature ships with Photoshop 2023, and since it’s still in beta, you may need to download it separately inside the Neural Filters panel. The good news: once it’s there, it works fast and the workflow is simpler than almost anything else in Photoshop.
Step 1: Convert Your Layer to a Smart Object
 Layer panel showing right-click menu with Smart Object option
Before you touch any filter, right-click your image layer in the Layers panel and choose “Convert to Smart Object.” I know, I know, it feels like an extra step. But smart objects mean your filter settings stay editable after you close the dialog. You can dial things back, tweak sliders, or remove the effect entirely without going back to square one. I learned this lesson the hard way on a client project years ago and I will never not do it first.
Layer panel showing right-click menu with Smart Object option
Before you touch any filter, right-click your image layer in the Layers panel and choose “Convert to Smart Object.” I know, I know, it feels like an extra step. But smart objects mean your filter settings stay editable after you close the dialog. You can dial things back, tweak sliders, or remove the effect entirely without going back to square one. I learned this lesson the hard way on a client project years ago and I will never not do it first.
Once the layer has that little icon in the corner confirming it’s a smart object, you’re protected. Any filter you apply now lives as a separate, adjustable layer effect rather than a permanent bake into the pixels.
Step 2: Open the Neural Filters Panel
 Filter menu open with Neural Filters option highlighted
Go to Filter in the top menu bar, then scroll down to Neural Filters. This opens a dedicated panel that’s separate from the regular filter gallery. Inside you’ll see filters organized by category, some fully released, some still in beta. The panel requires a Creative Cloud connection since several filters process in the cloud, though Photo Restoration can run locally on your device.
Filter menu open with Neural Filters option highlighted
Go to Filter in the top menu bar, then scroll down to Neural Filters. This opens a dedicated panel that’s separate from the regular filter gallery. Inside you’ll see filters organized by category, some fully released, some still in beta. The panel requires a Creative Cloud connection since several filters process in the cloud, though Photo Restoration can run locally on your device.
If you haven’t updated to Photoshop 2023 yet, this is your sign. The Neural Filters panel has matured a lot over the last couple of versions and Photo Restoration specifically is worth the update alone.
Step 3: Locate and Enable the Photo Restoration Filter
 Neural Filters panel showing Photo Restoration toggle in beta section
Scroll to the bottom of the Neural Filters panel to find Photo Restoration. It will be listed under the beta filters. If you see a small cloud icon next to it rather than a toggle, click that icon to download the filter first. It only takes a minute.
Neural Filters panel showing Photo Restoration toggle in beta section
Scroll to the bottom of the Neural Filters panel to find Photo Restoration. It will be listed under the beta filters. If you see a small cloud icon next to it rather than a toggle, click that icon to download the filter first. It only takes a minute.
Once downloaded, flip the toggle to enable it. That’s it. Photoshop immediately starts analyzing the image. You don’t need to make a selection, draw a mask, or tell it what’s a scratch versus what’s a detail. The AI figures that out on its own, and honestly, it does a solid job.
Step 4: Adjust the Scratch Reduction Slider
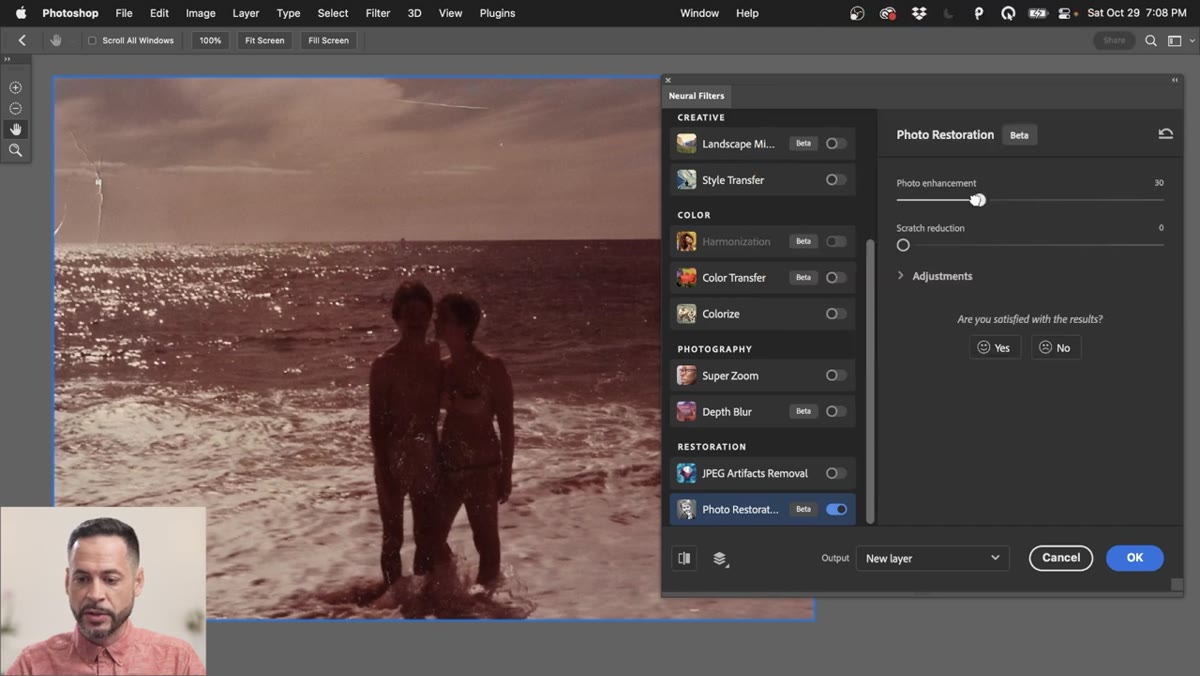 Neural Filters panel with Scratch Reduction slider being adjusted
The Photo Restoration filter gives you two primary sliders at the top: Photo Enhancement and Scratch Reduction. Start with Scratch Reduction since that’s usually the most visible problem in aged photos. Aaron cranks it toward the higher end because his image is covered in scratches and surface damage. You’ll see the preview update in real time as the filter processes.
Neural Filters panel with Scratch Reduction slider being adjusted
The Photo Restoration filter gives you two primary sliders at the top: Photo Enhancement and Scratch Reduction. Start with Scratch Reduction since that’s usually the most visible problem in aged photos. Aaron cranks it toward the higher end because his image is covered in scratches and surface damage. You’ll see the preview update in real time as the filter processes.
The before/after toggle inside the panel lets you flip between the original and the filtered version so you can judge how aggressively the filter is working. Some marks that look like scratches might actually be details you want to keep, like light catching water or texture in fabric, so don’t just go to 100 and call it done. Use your eyes.
Step 5: Bring Up the Photo Enhancement Slider
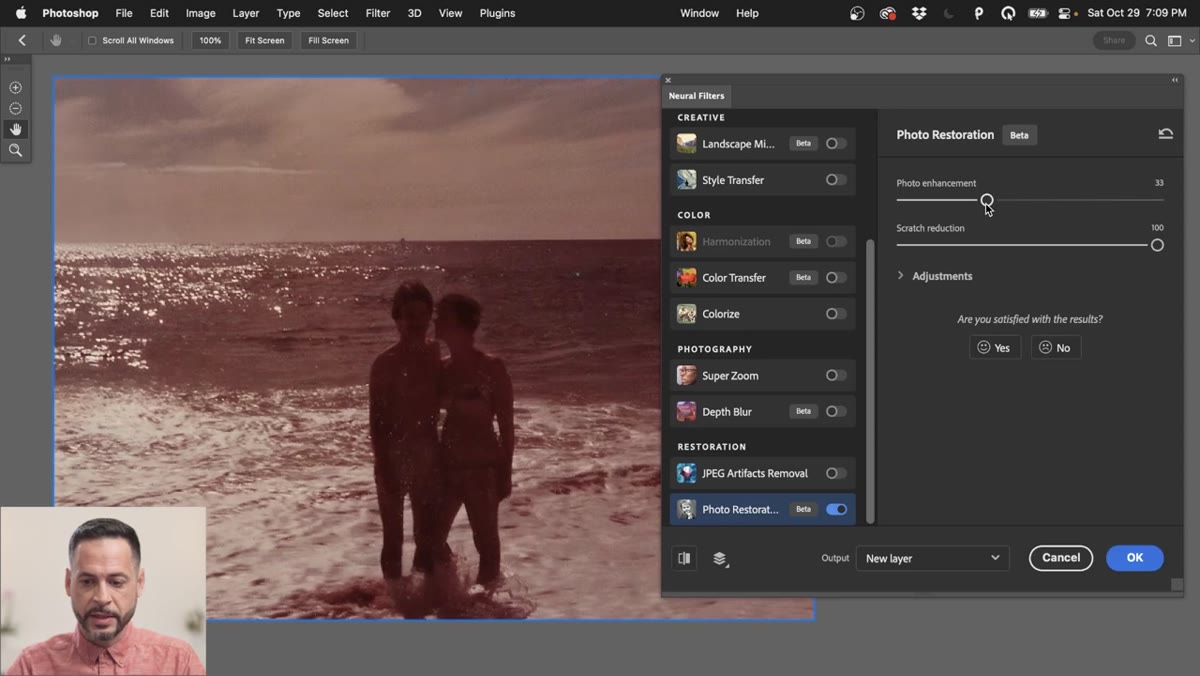 Photo Enhancement slider being raised in Neural Filters panel
Photo Enhancement is a broader quality improvement slider. It sharpens details, improves overall contrast, and generally makes the image feel less degraded. Raise it gradually and watch what happens to your subjects. Aaron notices his subjects get a little dark as the slider climbs, which is a fair trade-off to evaluate. Sometimes the overall image lift is worth it even if you need to do a minor brightness correction on a separate layer afterward.
Photo Enhancement slider being raised in Neural Filters panel
Photo Enhancement is a broader quality improvement slider. It sharpens details, improves overall contrast, and generally makes the image feel less degraded. Raise it gradually and watch what happens to your subjects. Aaron notices his subjects get a little dark as the slider climbs, which is a fair trade-off to evaluate. Sometimes the overall image lift is worth it even if you need to do a minor brightness correction on a separate layer afterward.
Think of this slider as a global “make it look less like a photo from a water-damaged box in someone’s attic” control. It won’t fix every problem but it takes the worst of the damage and smooths it out quickly.
Step 6: Fine-Tune with the Adjustments Controls
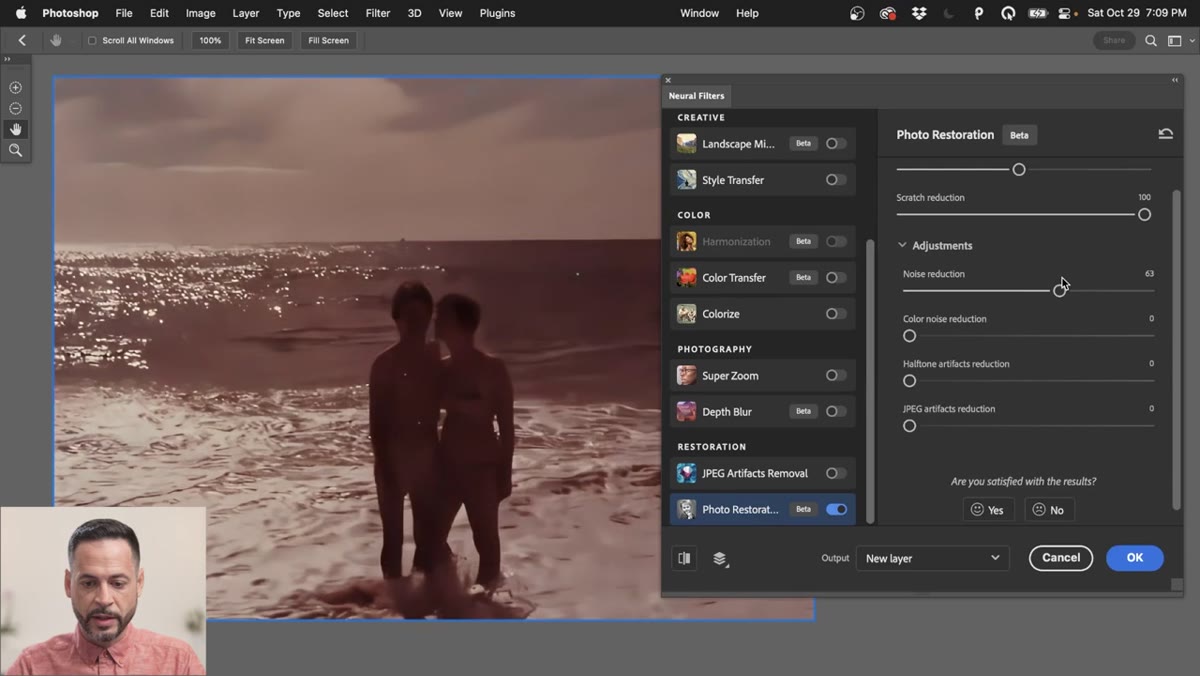 Adjustments section expanded showing Noise Reduction and Color Noise sliders
Below the two main sliders, there’s an Adjustments section with additional controls including Noise Reduction and Color Noise Reduction. Noise Reduction can help, but push it too far and you’ll lose real detail, so use it lightly. Color Noise Reduction is more useful on heavily discolored scans, especially photos with that characteristic orange or red cast that comes from age-related dye fading. Dialing this down can pull back some of the original tones without fully desaturating the image.
Adjustments section expanded showing Noise Reduction and Color Noise sliders
Below the two main sliders, there’s an Adjustments section with additional controls including Noise Reduction and Color Noise Reduction. Noise Reduction can help, but push it too far and you’ll lose real detail, so use it lightly. Color Noise Reduction is more useful on heavily discolored scans, especially photos with that characteristic orange or red cast that comes from age-related dye fading. Dialing this down can pull back some of the original tones without fully desaturating the image.
Aaron’s photo had a strong warm-red cast from the aging process, so the color adjustments gave it a more neutral starting point before any further color correction.
Step 7: Output to a New Layer
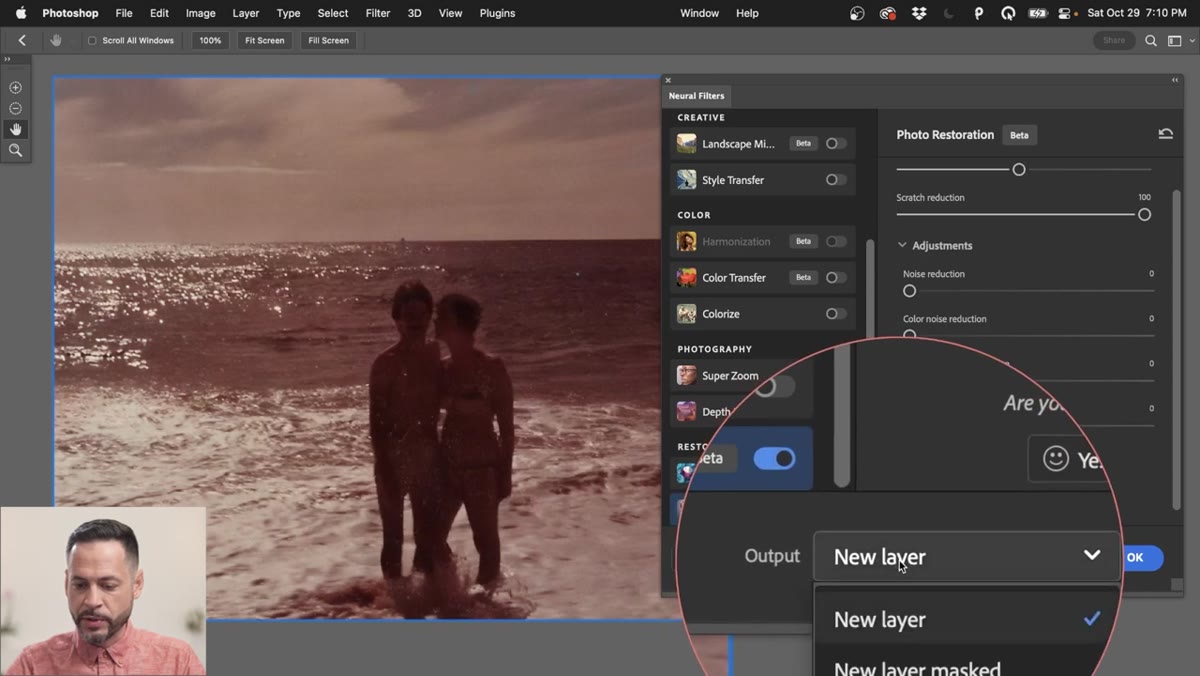 Output options in Neural Filters panel with New Layer selected
Before you click OK, check the output options at the bottom of the panel. Set it to output to a New Layer rather than applying directly to the smart object. This gives you the restored version on its own layer, with the original untouched underneath. You can then mask, blend, or adjust opacity on the restored layer if any area doesn’t look right. It also means you can revisit the neural filter settings at any time by double-clicking the smart filter in your Layers panel.
Output options in Neural Filters panel with New Layer selected
Before you click OK, check the output options at the bottom of the panel. Set it to output to a New Layer rather than applying directly to the smart object. This gives you the restored version on its own layer, with the original untouched underneath. You can then mask, blend, or adjust opacity on the restored layer if any area doesn’t look right. It also means you can revisit the neural filter settings at any time by double-clicking the smart filter in your Layers panel.
What I’d Add From Here
The neural filter does the heavy lifting but it’s not the finish line. My usual move after running Photo Restoration is to add a Curves adjustment layer clipped to the restored layer, which lets me correct any brightness or contrast shifts the filter introduced. For photos with faces, I’ll sometimes run the Face Enhancement neural filter afterward, which sharpens facial features that got softened during scratch removal. And if there are spots the filter missed, a small healing brush pass takes maybe two minutes rather than the hour it used to take before all of this existed.
One thing worth noting: image resolution matters. A small, low-resolution scan gives the AI less to work with. If you can get a higher-resolution scan, even from a phone using something like Google PhotoScan, you’ll get significantly better results from the filter.
The honest takeaway here is that this filter collapses what used to be a multi-hour job into something that takes under five minutes for most images. It won’t replace every restoration workflow, but for getting 80 percent of the way there automatically, nothing else in Photoshop comes close right now. Go clear out your own “someday” folder.
Watch the full tutorial on YouTube
Comments (1)
This is exactly what I needed today. Been struggling with this for weeks.
Leave a Comment