I’ll be honest with you. The first time I tried to texture a 3D object in Photoshop, I spent about 45 minutes dragging things into places where they didn’t belong, watching textures stretch across geometry like a grocery bag over a basketball, and ultimately just giving up and going back to flat design. Nobody talks about how disorienting Photoshop’s 3D workflow can be when you first get into it. There are panels everywhere, nothing behaves the way your muscle memory expects, and the relationship between your texture file and your 3D object feels weirdly indirect.
That’s exactly why this episode of PhotoshopUser TV stuck with me. In this KelbyOne tutorial featuring Corey Barker, the focus is narrow and practical: how to take a seamless texture, apply it to a 3D object, and then actually control how it looks instead of just accepting whatever Photoshop throws at you by default. The example he works through is a pair of interlocking carbon fiber rings, but the method transfers to anything, product mockups, design elements, logo treatments with dimension. Watch the full tutorial on YouTube if you want to follow along with the original, or keep reading for the breakdown.
The key insight I pulled from this whole thing is that texture mapping in Photoshop’s 3D environment is not a drag-and-drop situation. It’s a workflow with specific steps and specific panels, and once you understand the logic, it actually makes sense. Let me walk you through it.
Step 1: Start with a Seamless Texture
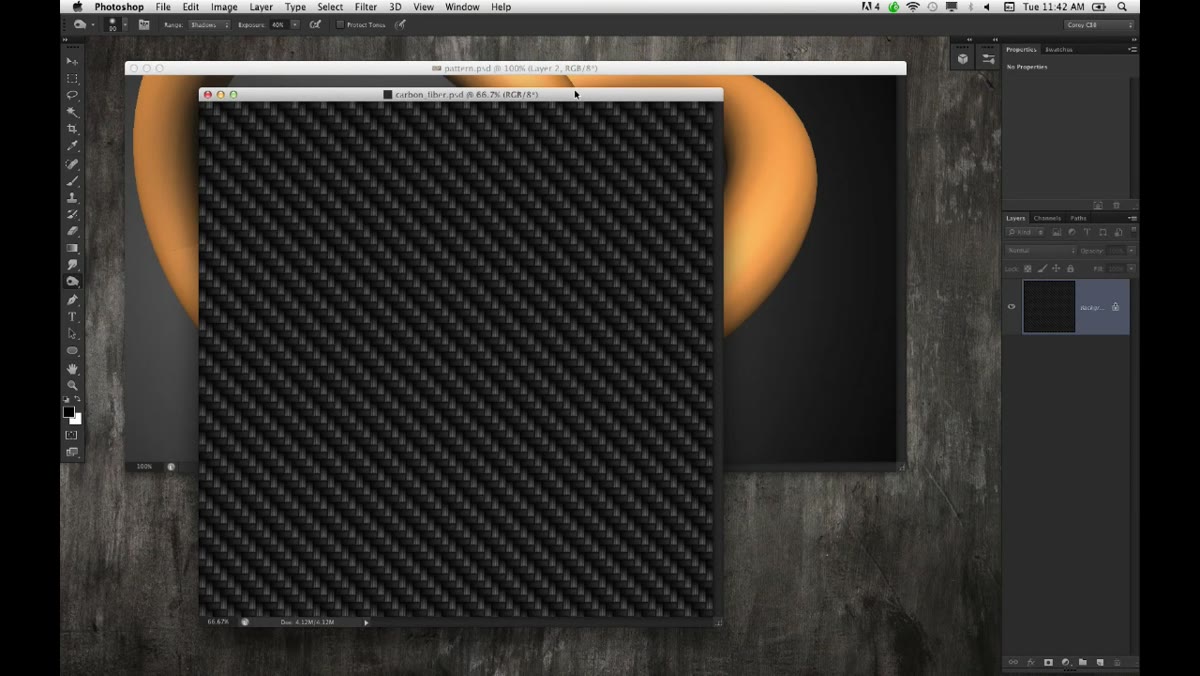 Carbon fiber seamless texture file open in Photoshop
Before you even touch your 3D object, the texture you bring in matters. Corey sources a carbon fiber texture from iStock and specifically calls out looking for seamless textures when you’re searching. A seamless texture is one that tiles without a visible seam, meaning when Photoshop repeats it across a surface, the edges blend into each other rather than creating a grid of obvious, jarring breaks.
Carbon fiber seamless texture file open in Photoshop
Before you even touch your 3D object, the texture you bring in matters. Corey sources a carbon fiber texture from iStock and specifically calls out looking for seamless textures when you’re searching. A seamless texture is one that tiles without a visible seam, meaning when Photoshop repeats it across a surface, the edges blend into each other rather than creating a grid of obvious, jarring breaks.
If you’re not sure whether your texture is actually seamless, there’s a dead simple way to test it. Go to Filter, then Other, then Offset. Use the horizontal and vertical sliders to shift the image. If a hard line appears across the canvas, the texture has a visible tile break and is not seamless. If the pattern shifts and still looks continuous, you’re good. This offset check is one of those tiny things that saves you from finding out the hard way after you’ve already applied the texture and rendered the whole scene.
Step 2: Open the 3D Panel and Properties Panel Together
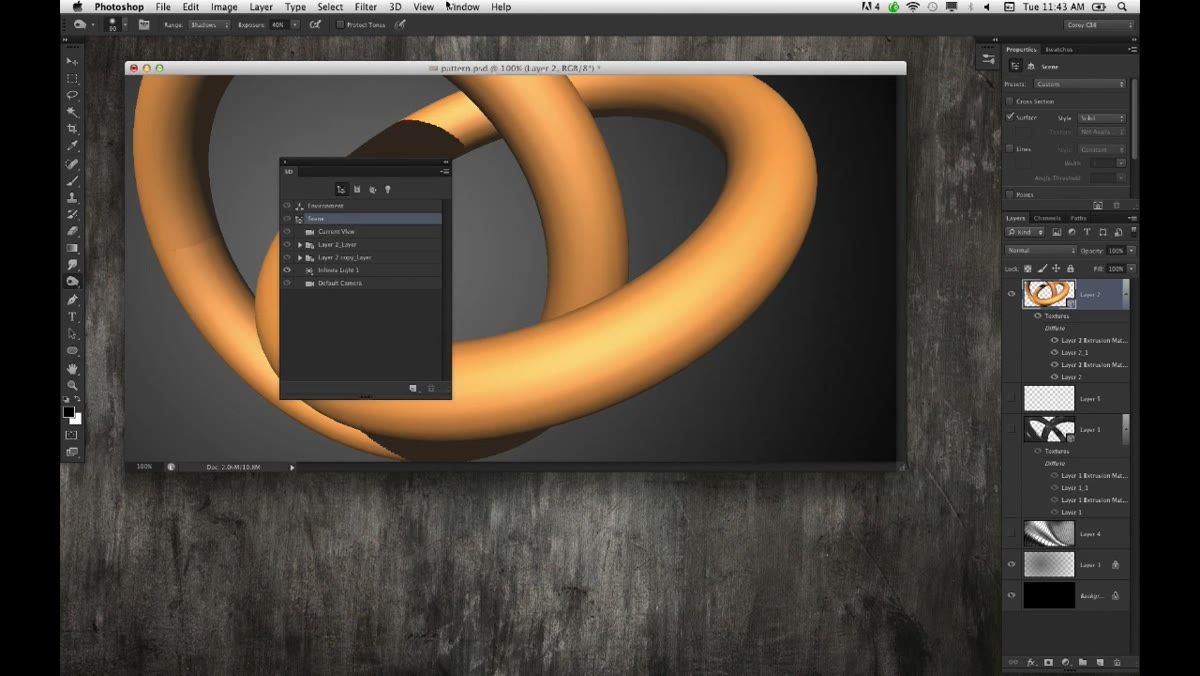 3D panel and Properties panel open side by side in Photoshop
The 3D panel and the Properties panel in Photoshop are a linked pair. Whatever item you have selected in the 3D panel drives what shows up in Properties. If you try to work from just one of these, you’ll be confused about where your settings are hiding. Open both, position them so you can see them simultaneously, and treat them as a single combined interface.
3D panel and Properties panel open side by side in Photoshop
The 3D panel and the Properties panel in Photoshop are a linked pair. Whatever item you have selected in the 3D panel drives what shows up in Properties. If you try to work from just one of these, you’ll be confused about where your settings are hiding. Open both, position them so you can see them simultaneously, and treat them as a single combined interface.
In the 3D panel, Corey selects one of the rings. Each 3D object in your scene gets broken down into surfaces and components in this panel, including things like the front inflation, back inflation, and the extrusion material. That last one, the extrusion material, is what wraps around the outside body of the shape, which is the surface you usually want to texture first.
Step 3: Select the Extrusion Material
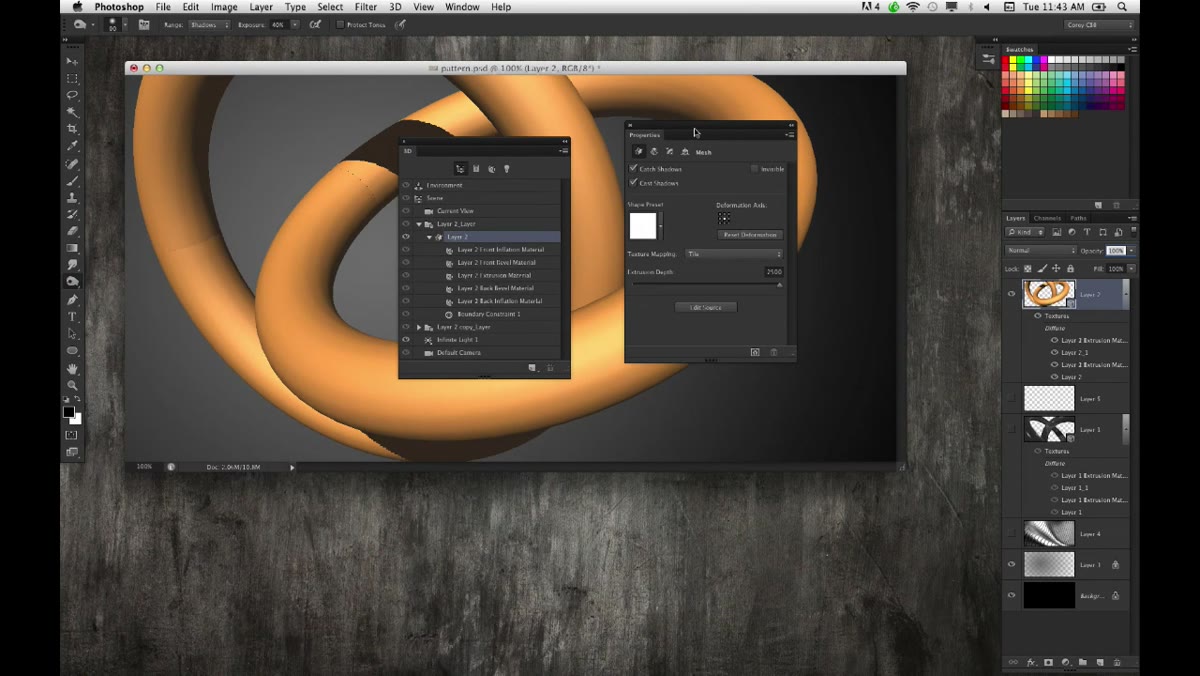 Extrusion material selected in the 3D panel
With your object selected in the 3D panel, look for the breakdown of its surfaces. Click on the extrusion material entry. This is the part of the 3D object that represents the extruded sides, which for a ring shape means the outer and inner surface of the band itself. Selecting the right surface component before you start messing with material settings is critical. If you apply a texture to the wrong surface, it won’t appear where you expect it to.
Extrusion material selected in the 3D panel
With your object selected in the 3D panel, look for the breakdown of its surfaces. Click on the extrusion material entry. This is the part of the 3D object that represents the extruded sides, which for a ring shape means the outer and inner surface of the band itself. Selecting the right surface component before you start messing with material settings is critical. If you apply a texture to the wrong surface, it won’t appear where you expect it to.
Once you’ve selected the extrusion material, the Properties panel updates to show you the material controls for that specific surface. This is where the actual texture work happens.
Step 4: Replace the Diffuse Texture
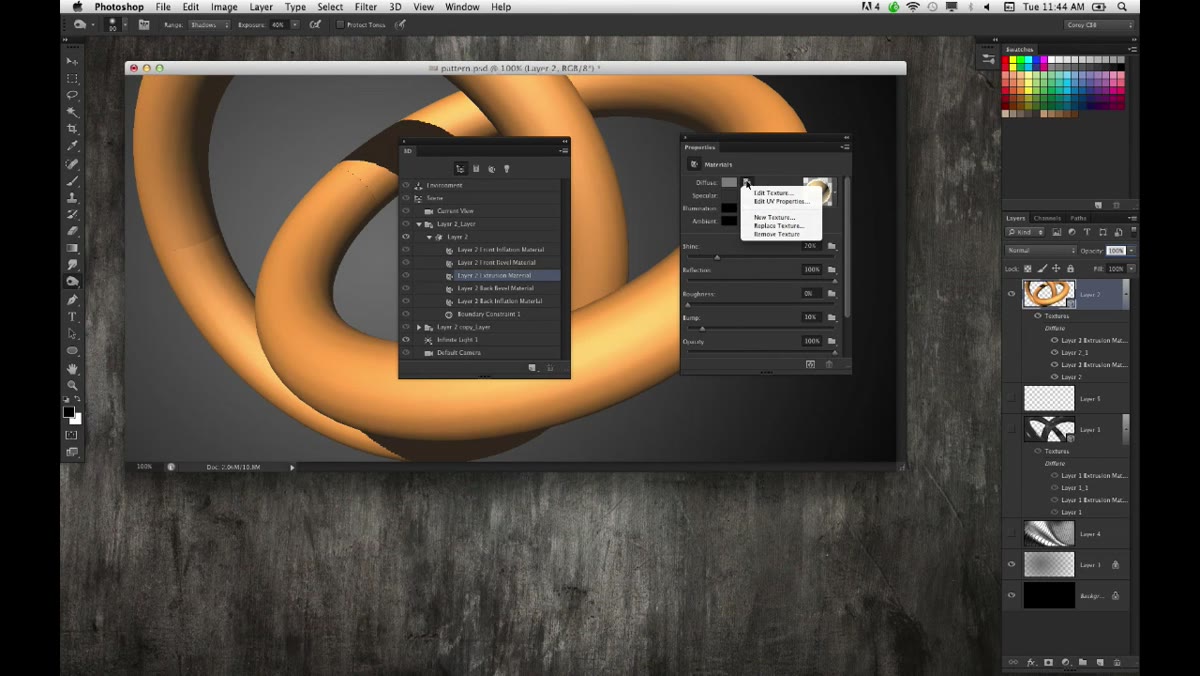 Diffuse setting with folder icon in Properties panel
In the Properties panel, near the top of the material settings, you’ll see a setting called Diffuse. This controls the base color and surface texture of the material. Next to it is a small folder icon. Click that icon and you’ll get a dropdown with an option called Replace Texture. Choose that.
Diffuse setting with folder icon in Properties panel
In the Properties panel, near the top of the material settings, you’ll see a setting called Diffuse. This controls the base color and surface texture of the material. Next to it is a small folder icon. Click that icon and you’ll get a dropdown with an option called Replace Texture. Choose that.
Photoshop opens a standard file browser. Navigate to your seamless texture file and open it. The texture will immediately wrap itself around your 3D object. It will probably look wrong at first, too large, stretched, or tiled in a way that doesn’t match the geometry. That’s expected. Getting the texture applied is just the first step. Controlling it is a separate operation.
Step 5: Edit the UV Properties to Scale and Reposition the Texture
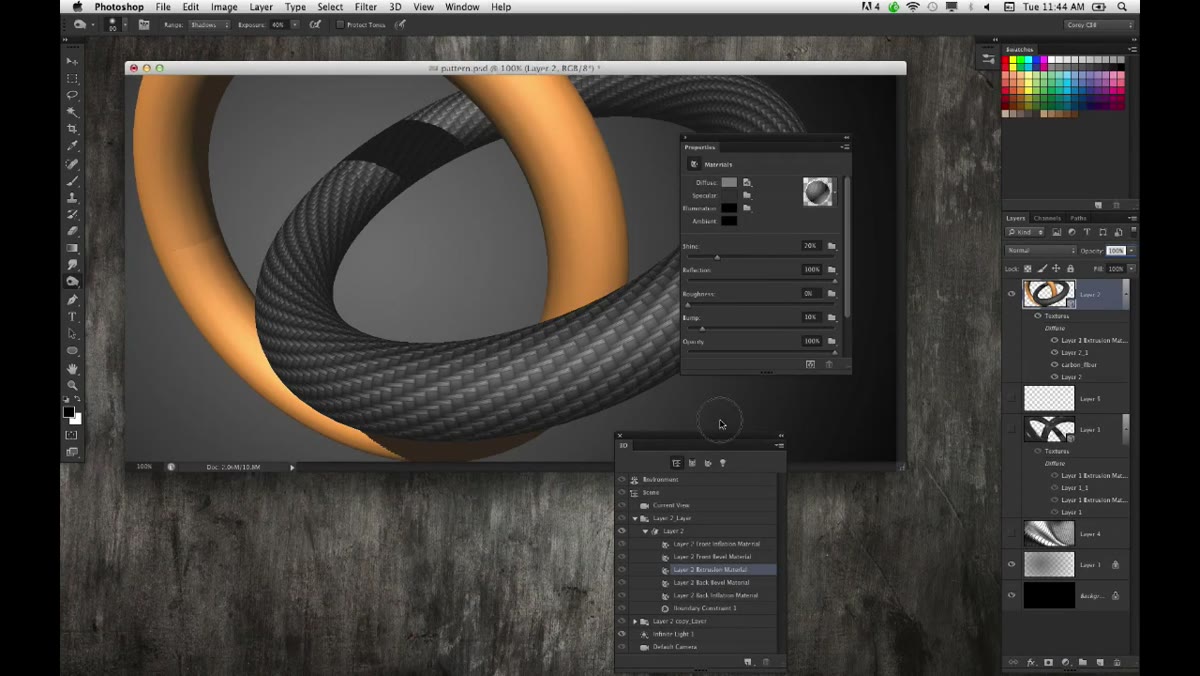 Texture mapping controls in Properties panel for UV adjustment
Here’s where most people get tripped up. Your instinct when a texture looks too large or stretched might be to open the texture file itself and resize it. But that’s not how this works in Photoshop’s 3D environment. Instead, you adjust the UV mapping settings directly in the Properties panel. Look for the texture tile options, which let you control how many times the texture repeats across the surface both horizontally and vertically, as well as offset values that let you shift the texture’s position on the object.
Texture mapping controls in Properties panel for UV adjustment
Here’s where most people get tripped up. Your instinct when a texture looks too large or stretched might be to open the texture file itself and resize it. But that’s not how this works in Photoshop’s 3D environment. Instead, you adjust the UV mapping settings directly in the Properties panel. Look for the texture tile options, which let you control how many times the texture repeats across the surface both horizontally and vertically, as well as offset values that let you shift the texture’s position on the object.
Increasing the tile values makes the texture appear smaller and repeat more. Decreasing them makes it appear larger and more zoomed in. You can nudge these values while watching the 3D canvas update, which gives you real-time visual feedback. It’s more like adjusting a pattern fill than resizing an image, and once that clicks, the whole system starts to feel logical.
What I’d Add: Apply This to Both Objects Consistently
The video covers one ring, but in any real project you’re going to have multiple surfaces and probably multiple objects. The thing I had to learn the hard way is that you need to apply and match your UV tile settings across every surface of every object if you want the texture to read as consistent. Carbon fiber on one ring at 3x3 tile and another at 2x2 tile will look off even if the texture source file is identical. Keep a note of your values and apply them uniformly, especially if you’re working with joined or intertwined objects where both surfaces are visible at once.
The single most important thing to take from this technique is the relationship between the 3D panel and the Properties panel. Every surface on every 3D object has its own material settings, and you access those settings by selecting the right item in the 3D panel first. Once you internalize that selection-drives-properties relationship, the rest of the texture workflow in Photoshop becomes a lot less mysterious.
Watch the full tutorial on YouTube to see Corey walk through the complete process, including the rendered result with both rings fully textured.
Comments (2)
Love how you break down complex stuff into manageable steps.
Clear and practical. No fluff. Appreciate that.
Leave a Comment