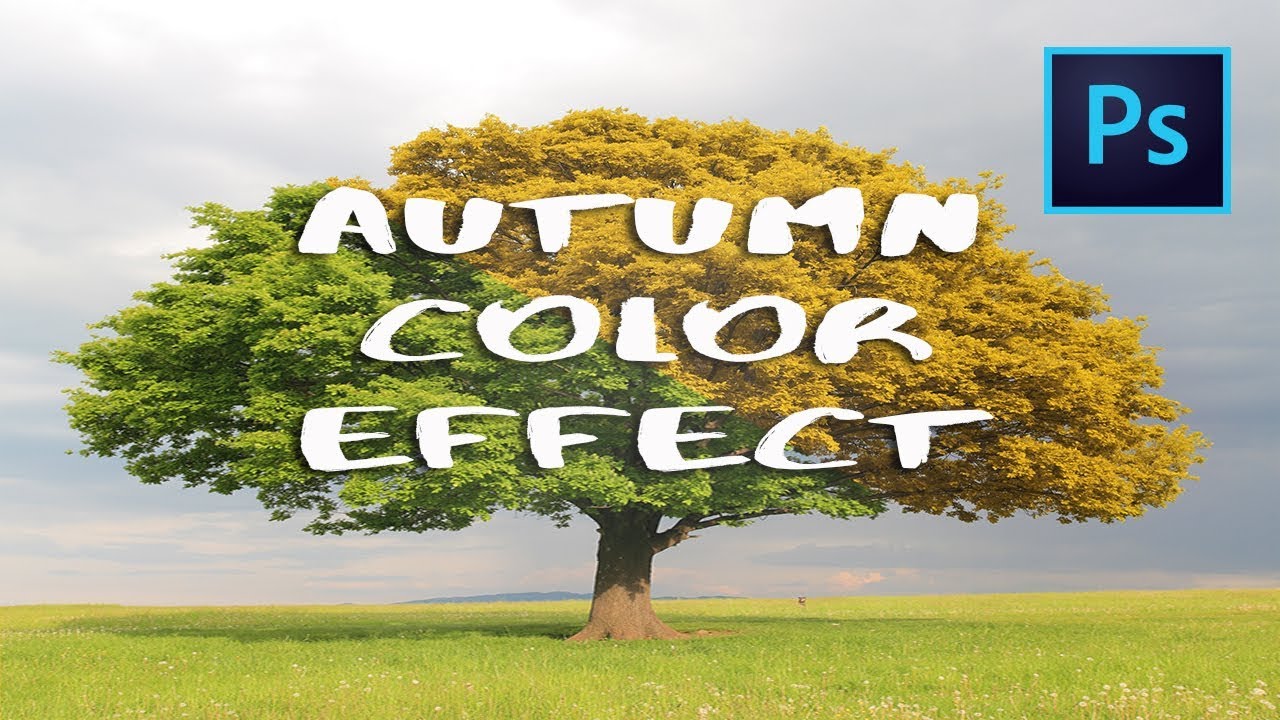
Living in Austin, I get maybe two weeks a year where the light turns golden and the trees do something interesting. By the time I’ve cleared my schedule and driven somewhere worth photographing, peak color is already halfway to bare branches. It’s a genuinely frustrating problem if you shoot landscapes or do any nature-adjacent editing work, because clients don’t care that the timing was bad. They want the moody, warm, amber-drenched image they had in their head when they hired you.
That’s why I kept coming back to this technique from Mark Denney. Watch the full tutorial on YouTube before or after reading through this. In it, he walks through a two-adjustment-layer approach that can take a perfectly green spring or summer landscape and push it convincingly into autumn territory. No sky replacements, no elaborate masking marathons. Just a Channel Mixer layer, a Selective Color layer, and a soft brush pass to keep things grounded.
What I like about this workflow is that it’s not about faking anything in a heavy-handed way. It’s more like nudging the image toward what it would look like if you’d shown up three weeks later. If you’ve already done your basic tone corrections in Lightroom (white point, black point, highlights, shadows), this picks up right where that leaves off inside Photoshop.
Step 1: Do Your Basic Edits First
 Lightroom with a landscape photo open, tone panel visible
Before you touch anything in Photoshop, get your tones in order inside Lightroom or Camera Raw. Set your white point, pull back blown highlights, lift or crush shadows to taste. Mark makes this point quickly but it matters: the color work you’re about to do will be more predictable and more controllable if your luminosity values are already where you want them. Throwing color adjustments at a flat, unedited raw file is working against yourself. Get the exposure right, then bring the image into Photoshop.
Lightroom with a landscape photo open, tone panel visible
Before you touch anything in Photoshop, get your tones in order inside Lightroom or Camera Raw. Set your white point, pull back blown highlights, lift or crush shadows to taste. Mark makes this point quickly but it matters: the color work you’re about to do will be more predictable and more controllable if your luminosity values are already where you want them. Throwing color adjustments at a flat, unedited raw file is working against yourself. Get the exposure right, then bring the image into Photoshop.
Step 2: Add a Channel Mixer Adjustment Layer
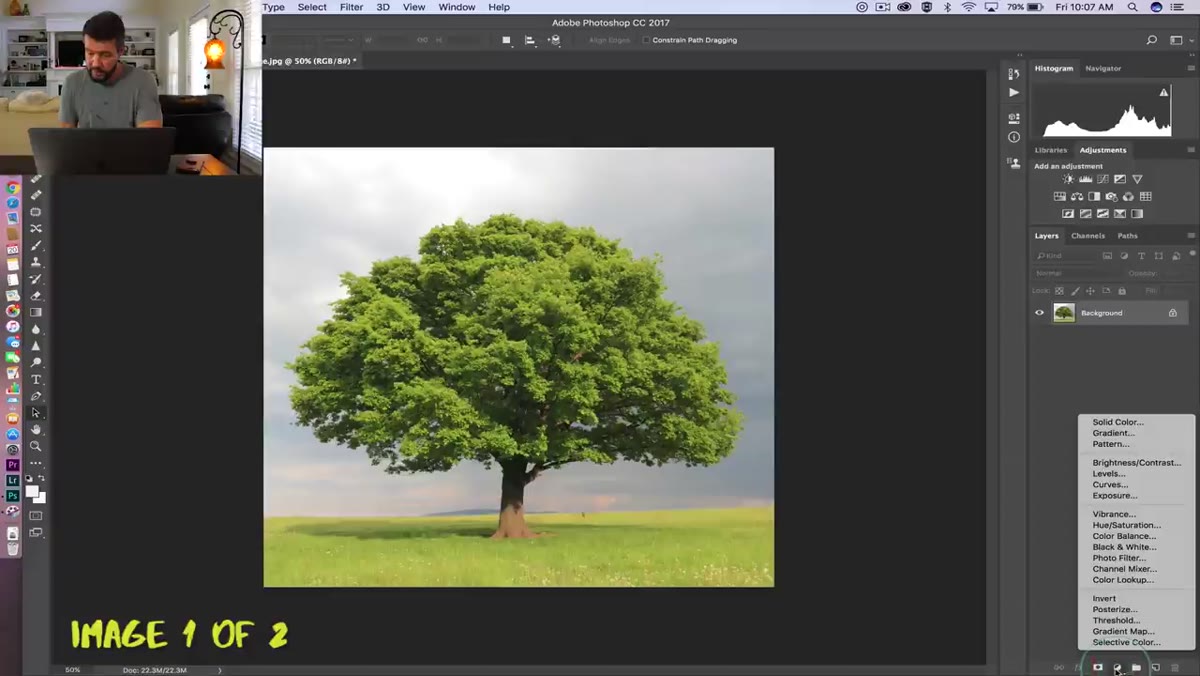 Photoshop Layers panel with Channel Mixer selected from adjustment layer menu
Once you’re inside Photoshop, go to your Adjustments panel (or use the Layer menu) and add a Channel Mixer adjustment layer. This is where the heavy lifting happens. Inside the Channel Mixer properties, confirm the Output Channel at the top is set to Red. From there, pull the Red slider down to around -50. Then bring the Green slider all the way up to +200. Finally, drop the Blue slider down to around -50 as well.
Photoshop Layers panel with Channel Mixer selected from adjustment layer menu
Once you’re inside Photoshop, go to your Adjustments panel (or use the Layer menu) and add a Channel Mixer adjustment layer. This is where the heavy lifting happens. Inside the Channel Mixer properties, confirm the Output Channel at the top is set to Red. From there, pull the Red slider down to around -50. Then bring the Green slider all the way up to +200. Finally, drop the Blue slider down to around -50 as well.
These values aren’t sacred. Mark is clear about this in the video, and it’s worth repeating: the right numbers depend on the specific image. A photo with a lot of sky will respond differently than one that’s mostly foliage. Start with these as a baseline and move sliders around until the warm, yellowy-orange tone starts showing up in the leaves or the canopy. You’ll know when it’s working.
Step 3: Switch the Blending Mode to Lighten
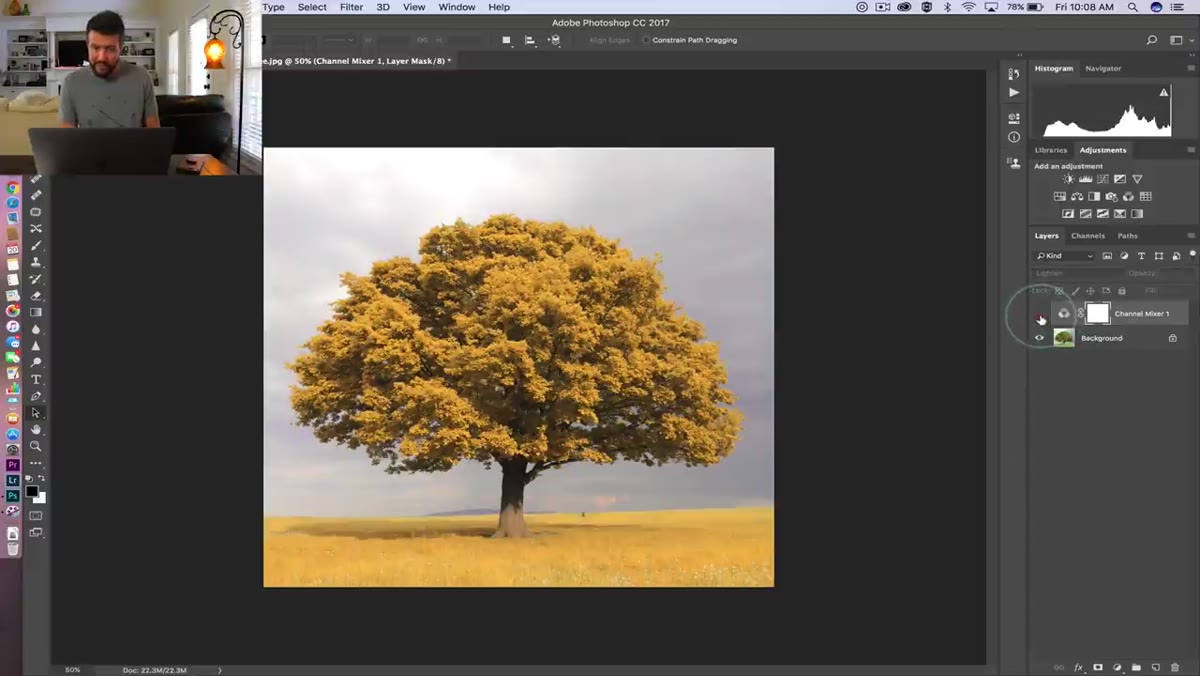 Layers panel showing Channel Mixer layer with Lighten blending mode applied
With the Channel Mixer layer selected, open the blending mode dropdown at the top of the Layers panel and switch it from Normal to Lighten. This is the step that makes the technique actually work rather than just blowing out your image. The Lighten mode means the adjustment only affects pixels where its output is brighter than the original, which tends to target the foliage and highlights in a landscape without wrecking the darker tones underneath.
Layers panel showing Channel Mixer layer with Lighten blending mode applied
With the Channel Mixer layer selected, open the blending mode dropdown at the top of the Layers panel and switch it from Normal to Lighten. This is the step that makes the technique actually work rather than just blowing out your image. The Lighten mode means the adjustment only affects pixels where its output is brighter than the original, which tends to target the foliage and highlights in a landscape without wrecking the darker tones underneath.
If the effect reads as too intense, pull the opacity down. Mark lands somewhere around 70-75% opacity on his example, but again, use your eyes. A little restraint here pays off later.
Step 4: Add a Selective Color Adjustment Layer
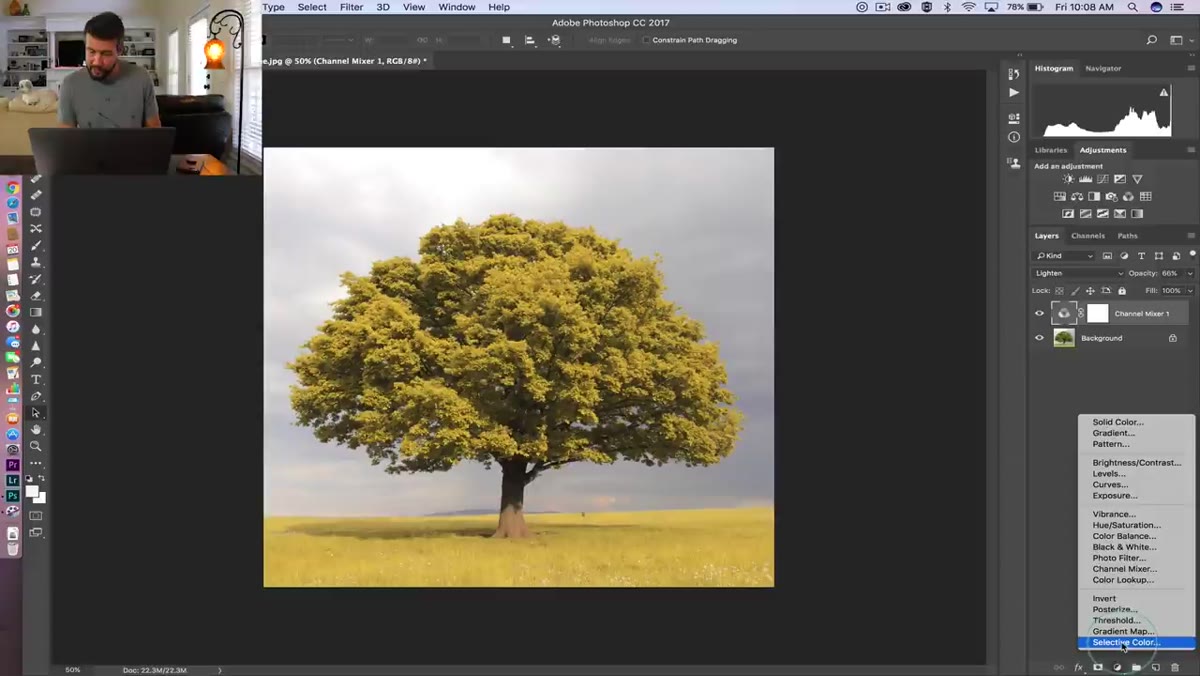 Selective Color properties panel with Yellows channel selected
Add a second adjustment layer, this time Selective Color. Inside the properties, set the Color dropdown to Yellows. Now take the Blue slider and drag it to around -66. This removes the cool cast that would otherwise make your yellows look slightly sickly or washed out. After that, push the Yellow slider up to around +60. What you’re doing is saturating and warming the yellow tones that your Channel Mixer layer just introduced. These two adjustments work together. Selective Color refines what Channel Mixer started.
Selective Color properties panel with Yellows channel selected
Add a second adjustment layer, this time Selective Color. Inside the properties, set the Color dropdown to Yellows. Now take the Blue slider and drag it to around -66. This removes the cool cast that would otherwise make your yellows look slightly sickly or washed out. After that, push the Yellow slider up to around +60. What you’re doing is saturating and warming the yellow tones that your Channel Mixer layer just introduced. These two adjustments work together. Selective Color refines what Channel Mixer started.
Like the first layer, you can dial back the opacity if the result feels too painted. Getting the image to look like a slightly better version of reality is the goal, not a Photoshop filter preset from 2009.
Step 5: Mask the Effect Off the Grass
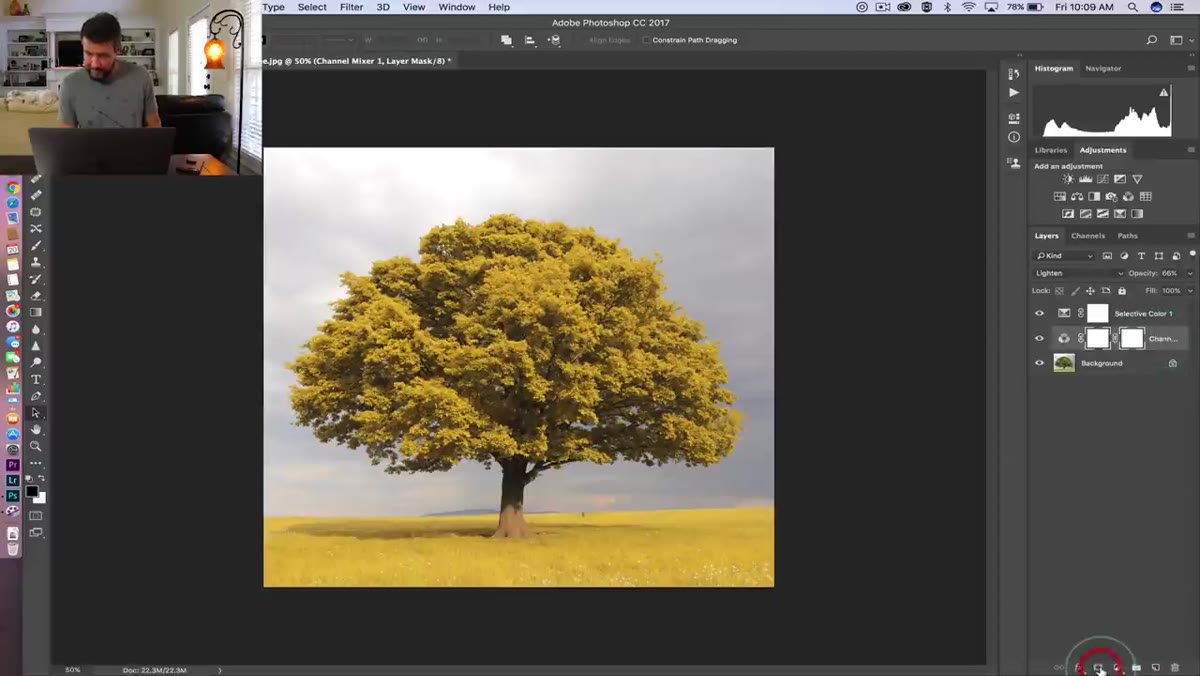 Layer mask being painted on grass area with soft brush in Photoshop
Here’s where the technique starts to look deliberate rather than lazy. After both adjustment layers are in place, you’ll probably notice that the grass at the bottom of the frame has gone the same warm yellow as the tree canopy. Grass does change color in autumn, but not to the same saturated extreme as leaves, so this tends to look wrong.
Layer mask being painted on grass area with soft brush in Photoshop
Here’s where the technique starts to look deliberate rather than lazy. After both adjustment layers are in place, you’ll probably notice that the grass at the bottom of the frame has gone the same warm yellow as the tree canopy. Grass does change color in autumn, but not to the same saturated extreme as leaves, so this tends to look wrong.
Click on the Channel Mixer layer and add a Layer Mask (Layer > Layer Mask > Reveal All). Select the mask thumbnail in the Layers panel so you’re painting on the mask and not the image itself. Grab a soft round brush, something large, around 1000px works well for a reasonably sized file. Set opacity to around 50% and flow to around 46%. Paint with black over the grass areas. You don’t need to be surgical about it. The low opacity and flow mean you’re gradually reducing the effect rather than hard-cutting it, which keeps the transition natural. A couple of passes over the ground is usually enough to bring it back to something that reads as believable autumn grass rather than a neon lawn.
One Thing I’d Layer On Top of This
The two adjustment layers Mark uses are doing color transformation work, but they’re not doing anything for the light quality that makes autumn shots feel like autumn. After I run this technique, I usually add a Color Lookup adjustment layer and try a few of the warm film emulation options (Kodak 5218 or Fuji 3510 are both worth trying) at 10-20% opacity, just to add a slight halation to the highlights. You can also add a Curves adjustment and very gently warm the midtones by pulling the Red channel up and the Blue channel down. None of this is required. But if you’re going for something that really sells the season rather than just approximating it, the light quality is the next thing to address once the colors are in the right neighborhood.
The core takeaway here is that Channel Mixer is wildly underused for color transformation work. Most people treat it as an advanced black-and-white conversion tool and leave it alone otherwise. But when you combine it with Lighten blending mode and back it up with Selective Color to refine the specific hue ranges, you get a result that’s fast, non-destructive, and actually adjustable per image. It took me longer to write this paragraph than it would to apply the technique to a photo.
Watch the full tutorial on YouTube to see Mark work through the actual image from start to finish. Seeing the before and after toggle in real time is worth it.
Comments
Leave a Comment