Client work has a way of teaching you lessons you didn’t ask for. I’ve lost count of how many times I’ve delivered a portrait edit only to have someone come back asking why the background “doesn’t look blurry enough” or “looks fake.” Background blur is one of those things that sounds simple until you’re actually trying to pull it off cleanly in post. So when Adobe dropped a Camera Raw update during Adobe Max week in October 2023, and one of the headlining features was a new Lens Blur tool built right into Camera Raw, I paid attention.
In this Matt Kloskowski tutorial on the new Camera Raw features, Watch the full tutorial on YouTube, Matt walks through the Lens Blur panel with the kind of honest, practical framing I appreciate. He’s not overselling it. He’s not telling you this replaces everything. He’s showing you what it does, where it fits, and where the Neural Filter depth blur in Photoshop proper might still be the better call. That’s the kind of tutorial worth bookmarking.
Here’s my breakdown of the actual steps, with some notes from putting it to use myself.
Step 1: Open the Lens Blur Panel and Click Apply
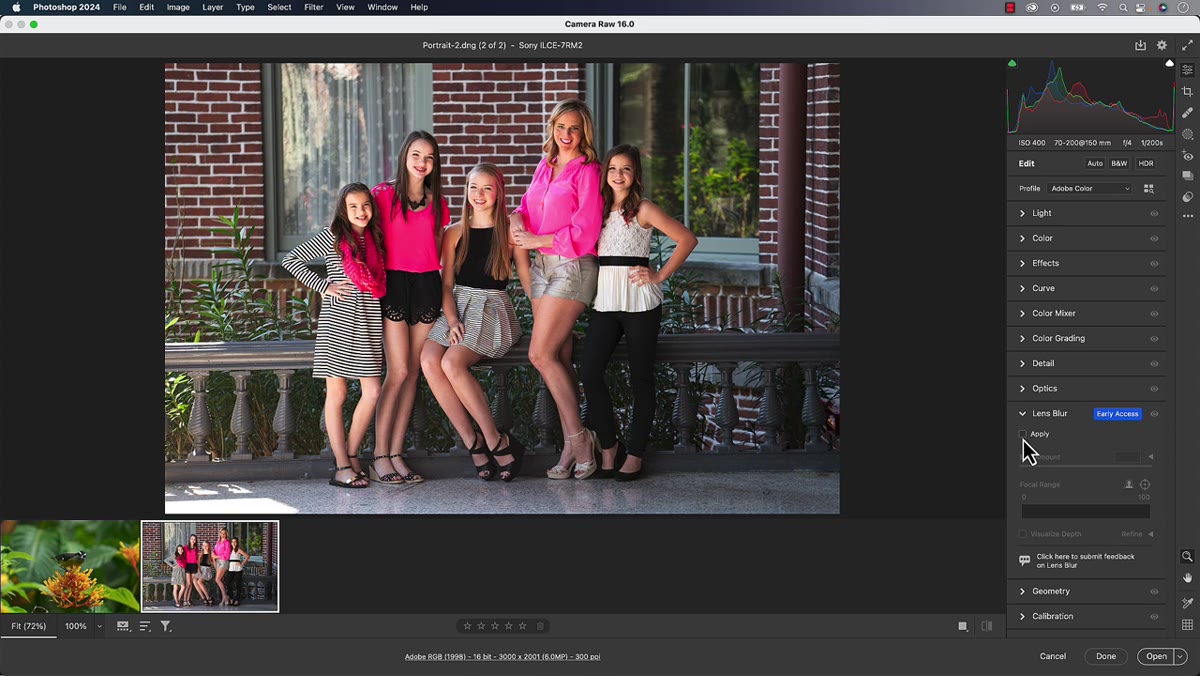 Lens Blur panel open with Apply button visible
The Lens Blur tool lives in its own panel inside Camera Raw. It’s labeled as an Early Access feature, which is Adobe’s way of saying “this works, but we want your feedback before we commit.” When you’re ready to use it, you click Apply and Camera Raw starts analyzing your photo automatically. No selections needed upfront, no masks to draw. It’s doing depth analysis behind the scenes to figure out what’s in the foreground versus the background.
Lens Blur panel open with Apply button visible
The Lens Blur tool lives in its own panel inside Camera Raw. It’s labeled as an Early Access feature, which is Adobe’s way of saying “this works, but we want your feedback before we commit.” When you’re ready to use it, you click Apply and Camera Raw starts analyzing your photo automatically. No selections needed upfront, no masks to draw. It’s doing depth analysis behind the scenes to figure out what’s in the foreground versus the background.
Worth noting: this analysis takes a moment. On a high-res file you’ll actually see it working. Don’t click anything else while it’s running or you’ll interrupt it and have to start over.
Step 2: Set Your Blur Amount
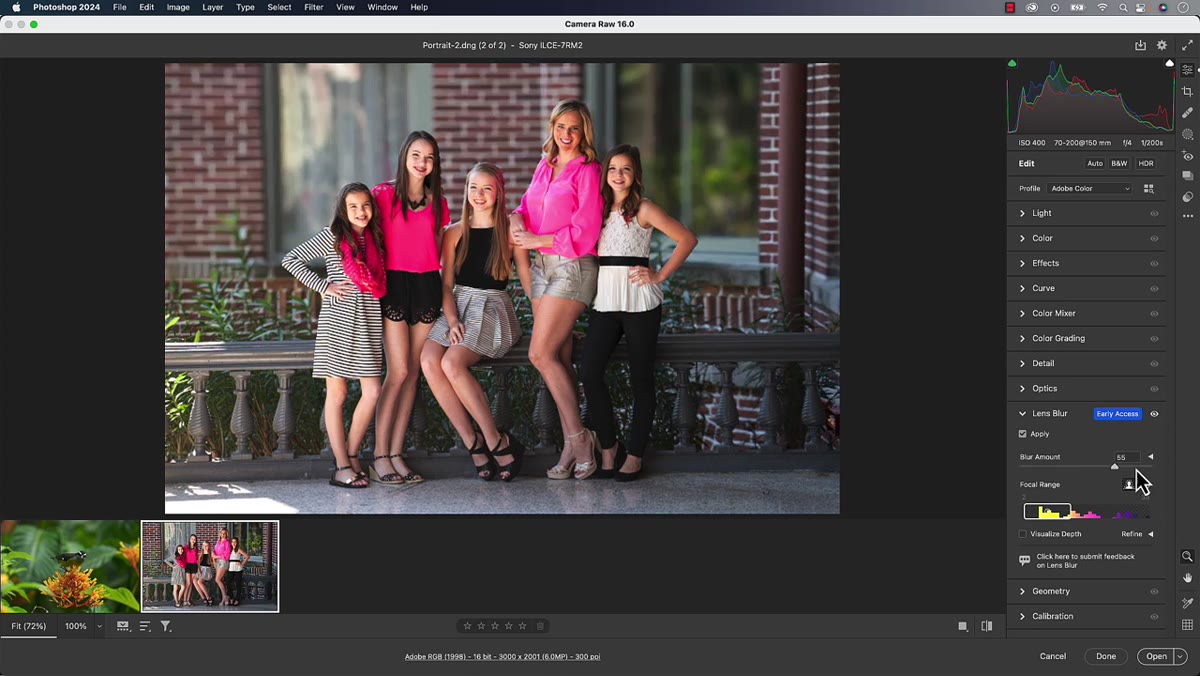 Blur Amount slider with photo showing background blur applied
Once the analysis finishes, your first real control is the Blur Amount slider. It runs from zero (nothing) to 100 (maximum blur). Matt is pretty direct here: moderation is your friend. Cranking this to 100 is a great way to make your photo look like a render from a video game cutscene circa 2009. For portraits, somewhere in the 30 to 60 range tends to look credible. For product shots where you really want separation, you might push a bit higher, but test it at actual print or screen size before you commit.
Blur Amount slider with photo showing background blur applied
Once the analysis finishes, your first real control is the Blur Amount slider. It runs from zero (nothing) to 100 (maximum blur). Matt is pretty direct here: moderation is your friend. Cranking this to 100 is a great way to make your photo look like a render from a video game cutscene circa 2009. For portraits, somewhere in the 30 to 60 range tends to look credible. For product shots where you really want separation, you might push a bit higher, but test it at actual print or screen size before you commit.
Step 3: Explore the Bokeh Style Options
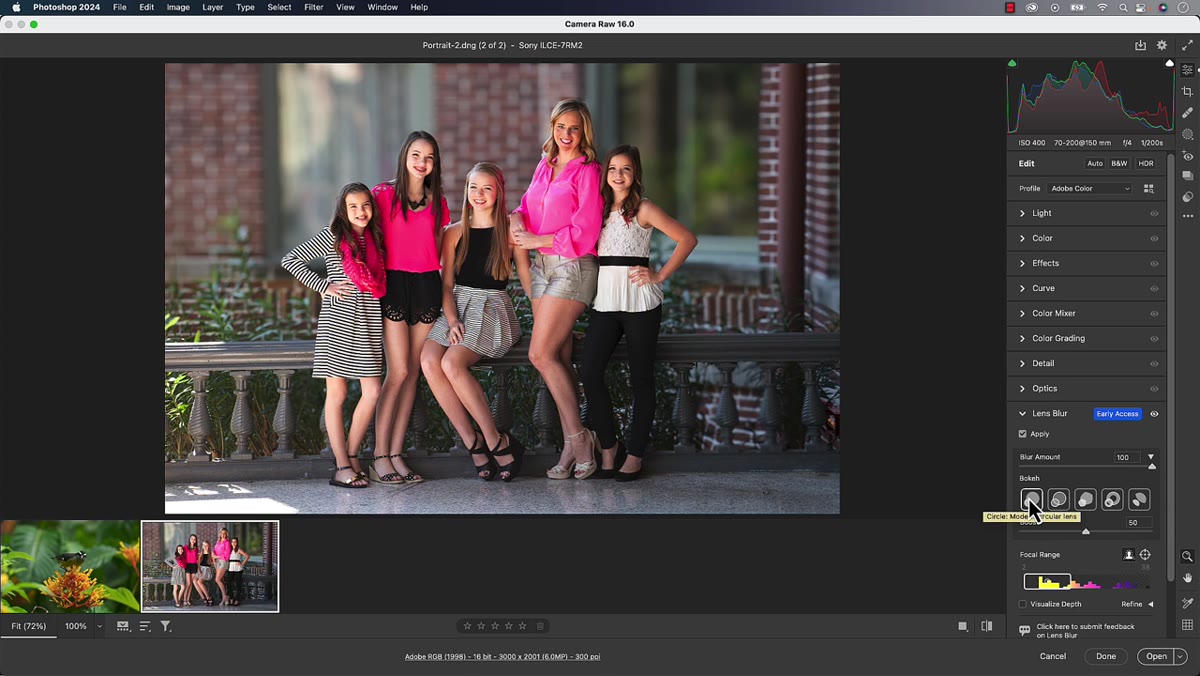 Bokeh style dropdown options expanded in panel
Below the blur slider you’ll find the bokeh section. Your default option mimics what a modern lens produces, which is usually what you want for clean, professional-looking results. But if you’re doing something more stylized, there are creative options in the dropdown that let you shape how the out-of-focus highlights render. Think of it like choosing between different lens personalities.
Bokeh style dropdown options expanded in panel
Below the blur slider you’ll find the bokeh section. Your default option mimics what a modern lens produces, which is usually what you want for clean, professional-looking results. But if you’re doing something more stylized, there are creative options in the dropdown that let you shape how the out-of-focus highlights render. Think of it like choosing between different lens personalities.
For most of my client work I stay on the default. The creative options are fun for personal projects or album artwork, but they can read as heavily processed if you’re not careful. Use them intentionally, not just because they’re there.
Step 4: Use Visualize Depth to Understand the Depth Map
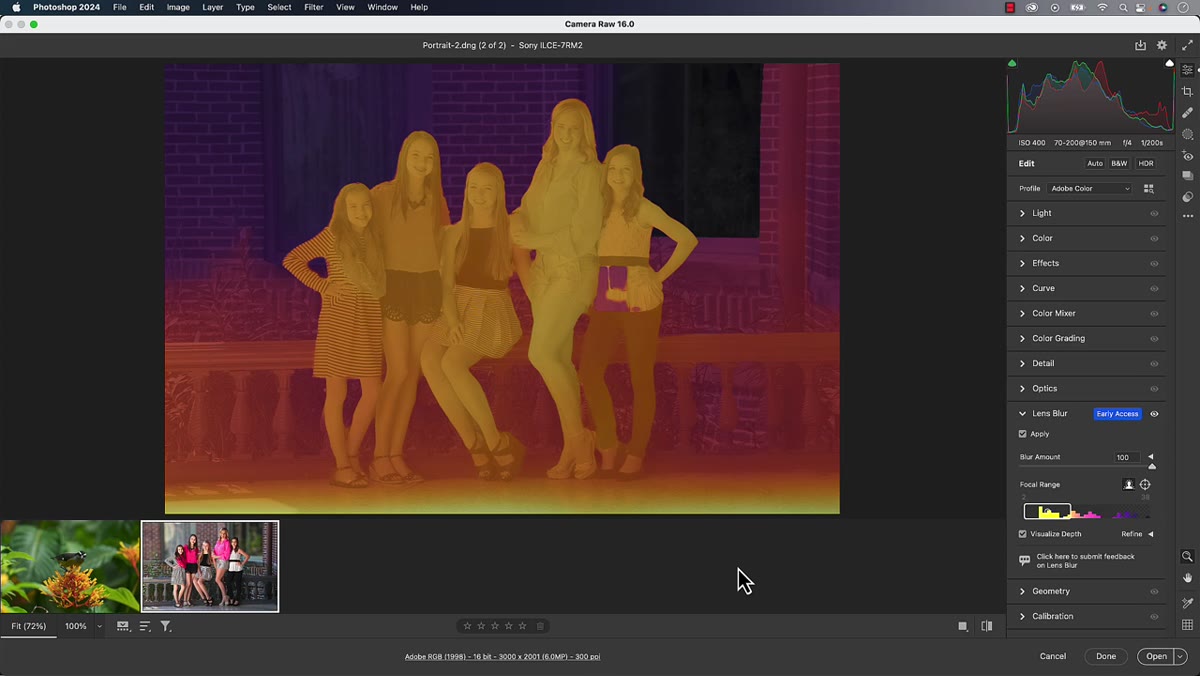 Visualize Depth view showing color-coded depth map overlay
This is where the tool gets genuinely interesting. There’s a Visualize Depth toggle that shows you the depth map Camera Raw built when it analyzed your photo. The color coding runs from white and yellow at the front of the scene, through oranges and pinks in the middle ground, and into purples and dark purples at the back. It’s essentially a heat map of distance.
Visualize Depth view showing color-coded depth map overlay
This is where the tool gets genuinely interesting. There’s a Visualize Depth toggle that shows you the depth map Camera Raw built when it analyzed your photo. The color coding runs from white and yellow at the front of the scene, through oranges and pinks in the middle ground, and into purples and dark purples at the back. It’s essentially a heat map of distance.
Why does this matter? Because it tells you whether the analysis actually understood your photo. If something that should be in the background is showing up as yellow, the blur is going to behave strangely and no amount of slider tweaking will fix it at the root. Check the depth map before you start fiddling with focal range settings. It saves a lot of head-scratching later.
Step 5: Choose Between Subject Focus and Point Focus
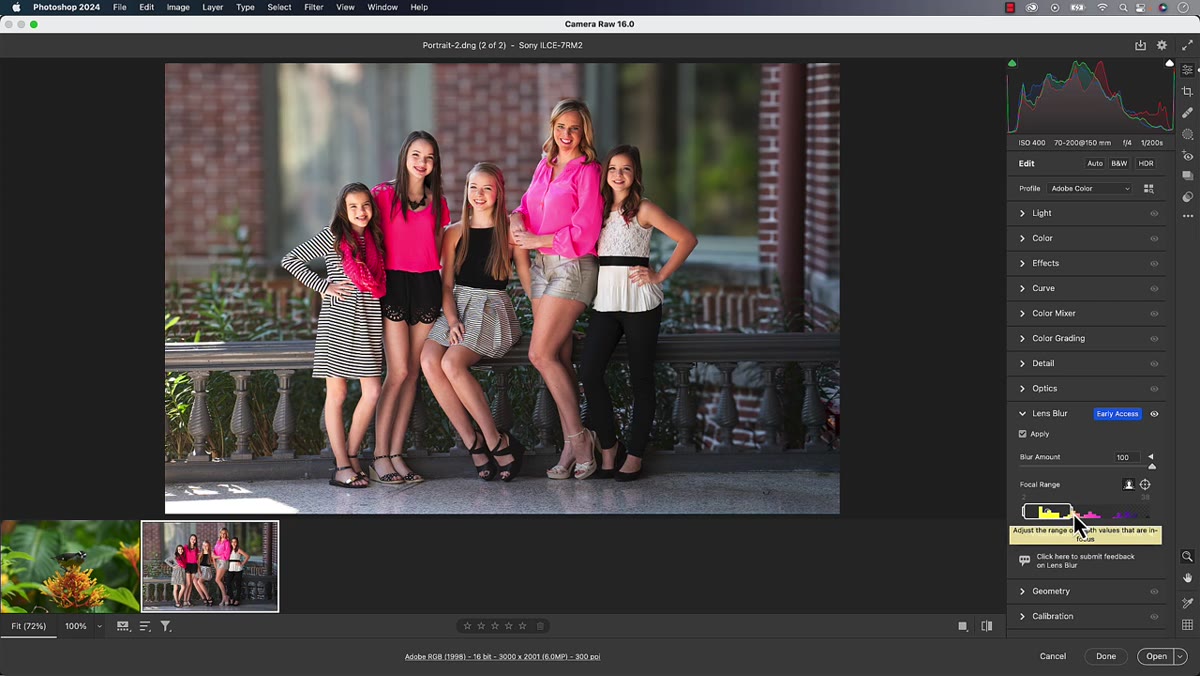 Subject Focus option selected with detected subject highlighted
After turning off the depth visualization, you get to pick your focus method. Subject Focus uses the same AI subject detection that powers Camera Raw’s masking tools. It tries to find the main subject automatically and keep them sharp while blurring everything else. Point Focus lets you click anywhere in the frame to manually set what should be in focus.
Subject Focus option selected with detected subject highlighted
After turning off the depth visualization, you get to pick your focus method. Subject Focus uses the same AI subject detection that powers Camera Raw’s masking tools. It tries to find the main subject automatically and keep them sharp while blurring everything else. Point Focus lets you click anywhere in the frame to manually set what should be in focus.
Subject Focus gives you the best results in most cases, especially with portraits. The subject detection in Camera Raw has gotten genuinely good over the past couple of years. Point Focus is more useful for landscapes, architecture, or anything where there isn’t a clear human or animal subject for the AI to latch onto.
Step 6: Adjust the Focal Range
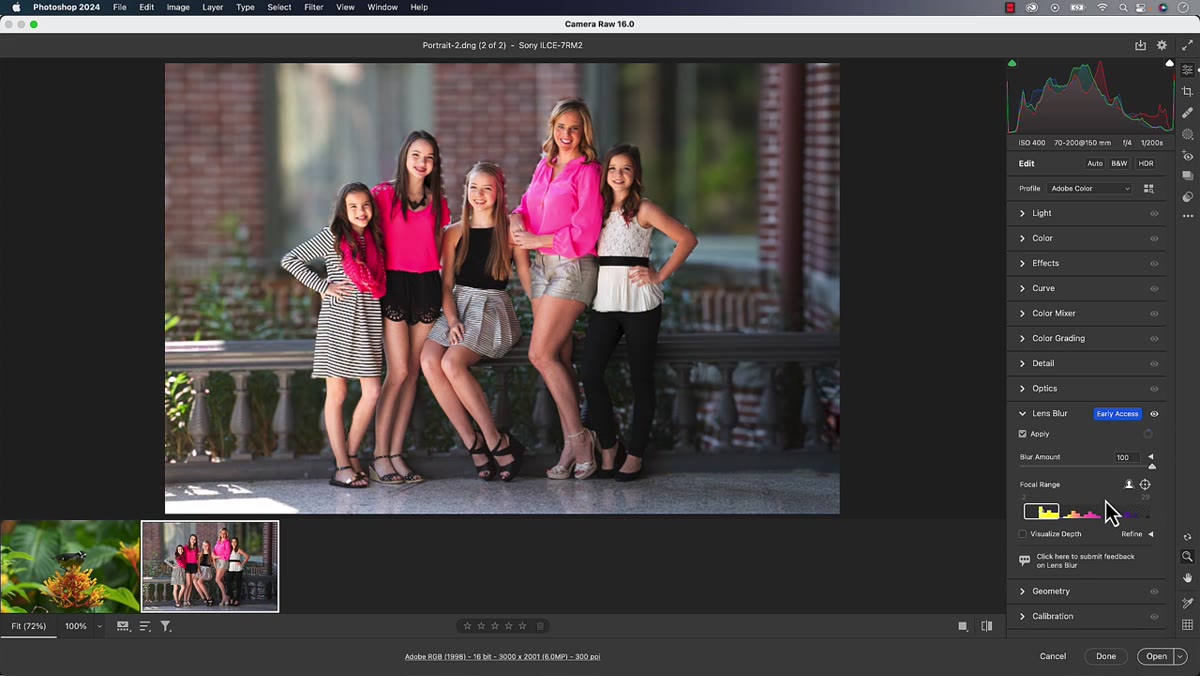 Focal Range section with sliders being adjusted across the depth map
The Focal Range section sits below the focus method selector and it’s where you control the depth of the in-focus zone. There’s a bar that maps to that same front-to-back color range from the depth visualization. Pulling the handles toward each other narrows the focal plane. Spreading them out widens it.
Focal Range section with sliders being adjusted across the depth map
The Focal Range section sits below the focus method selector and it’s where you control the depth of the in-focus zone. There’s a bar that maps to that same front-to-back color range from the depth visualization. Pulling the handles toward each other narrows the focal plane. Spreading them out widens it.
One important thing Matt flags here: the moment you touch these bars, Camera Raw switches you from Subject Focus over to Point Focus automatically. It’s not a bug, it’s just how the tool is structured. So if you want maximum AI-driven subject detection, leave the bars alone. If you want manual control over the focal plane, grab the bars and accept that you’re now driving manually.
My Take: Where This Tool Earns Its Place
I’ve tested this on a few portrait sessions since watching Matt’s tutorial and my honest read is this: it’s fast and it’s decent. If you’re already in Camera Raw doing your raw processing and you want a quick background blur without jumping into Photoshop, this handles it well enough. For anything that needs precise masking, tricky edges like flyaway hair, or really aggressive blur effects, I still go to the Neural Filter depth blur in Photoshop proper or do it manually with masks.
The early access label is earned. The depth analysis occasionally misreads complex scenes, and when it does, you don’t have a lot of ways to correct it short of switching to Point Focus and doing more manual work. But for clean, simple shots with clear subject-background separation, this is a genuinely useful addition to the Camera Raw workflow. And honestly, the Visualize Depth view alone is worth poking around with just to understand how Camera Raw is reading your images.
The single most important thing to take away from this feature is the moderation principle. Every blur tool in every application tempts you to push it too far. The depth analysis in Camera Raw is doing real work to make this look credible, but it can’t save you from an unrealistic blur amount. Start at 30, preview at actual size, and ask yourself if it looks like a lens did it or a slider did it. That question is the difference between a finishing touch and an obvious edit.
Watch the full tutorial on YouTube to see Matt walk through all of this on a real photo, including a better example he shows toward the end that really demonstrates what the tool can do at its best.
Comments
Leave a Comment