I have a complicated relationship with Lightroom. Not a hostile one, just. complicated. I’ve tried to commit to it more times than I’ve tried to commit to going to the gym, and the results have been roughly the same. The catalog system, the import dance, the general feeling that I need to ask permission to edit my own photos. It’s not for me. So when I saw that Adobe’s October 2026 update quietly gave Camera Raw a feature set that starts to look a lot like a standalone photo management app, I paid attention fast.
In this Matt Kloskowski tutorial, Watch the full tutorial on YouTube, he walks through the new Camera Raw and Lightroom updates dropping early October 2026, starting with something that honestly snuck up on me: a new grid view and filter panel inside Camera Raw itself. If you’re a Bridge-and-Camera-Raw person like me, this is the update you didn’t know you were waiting for. If you’re a Lightroom Classic loyalist, you might want to stick around anyway, because there’s a useful reframe here about why people use these tools the way they do.
Step 1: Open a Large Batch of RAW Files Through Adobe Bridge
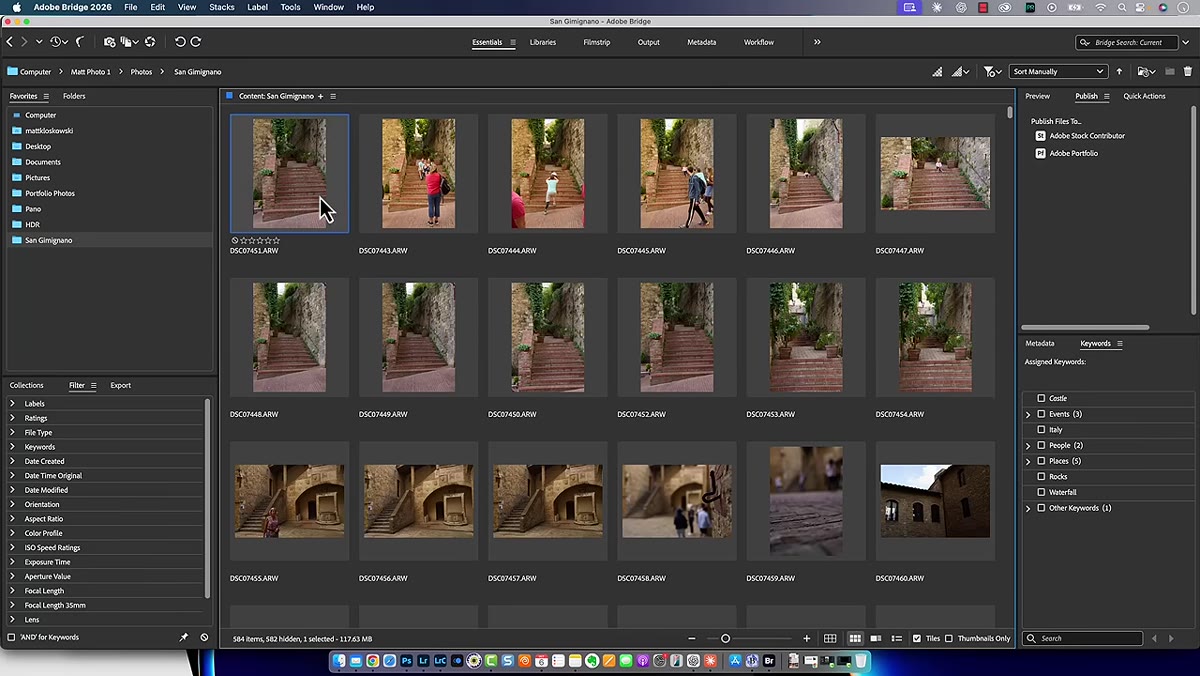 Adobe Bridge open with a folder of RAW photos selected
Start in Adobe Bridge. Navigate to a folder of RAW files, hit Select All, and open them in Camera Raw. Kloskowski demos this with a folder of 580 RAW photos, which is a real-world shooting scenario, not a curated demo with five pretty landscapes. The point is scale. The feature you’re about to use needs volume to make sense.
Adobe Bridge open with a folder of RAW photos selected
Start in Adobe Bridge. Navigate to a folder of RAW files, hit Select All, and open them in Camera Raw. Kloskowski demos this with a folder of 580 RAW photos, which is a real-world shooting scenario, not a curated demo with five pretty landscapes. The point is scale. The feature you’re about to use needs volume to make sense.
Once your files are selected in Bridge, open them in Camera Raw the same way you always have: right-click and open, or use the keyboard shortcut. All 580 load up, and they load fast.
Step 2: Find the New Grid Mode Icon in Camera Raw
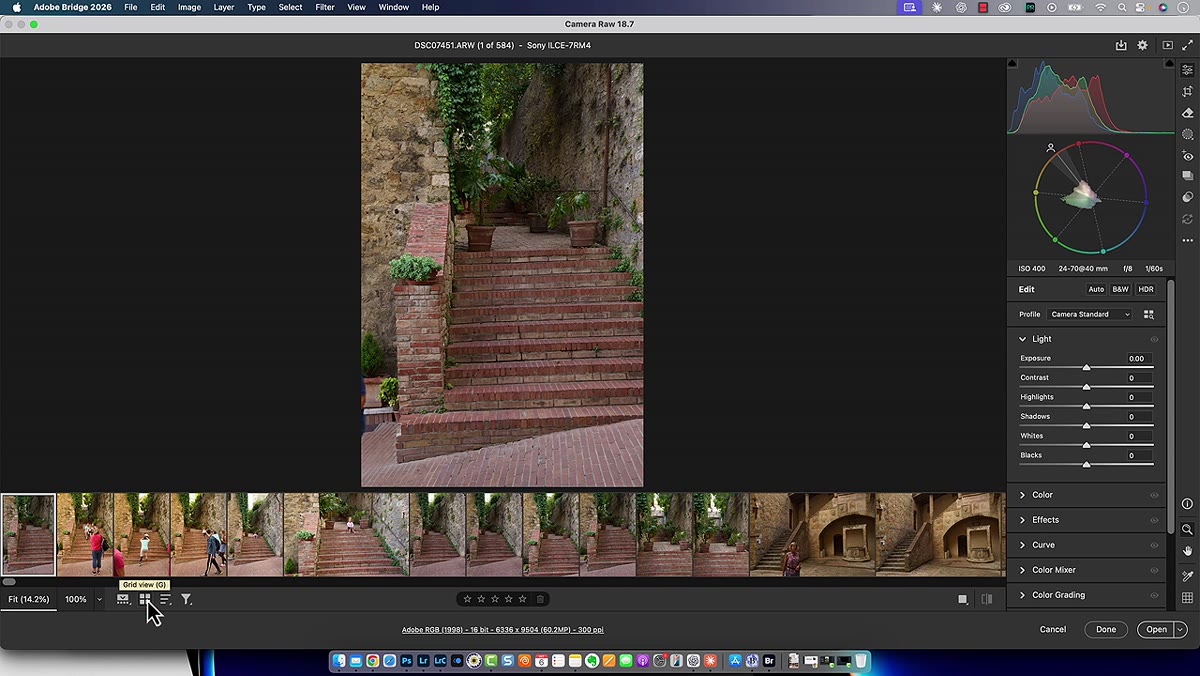 Camera Raw interface showing new grid mode icon at bottom
At the bottom of the Camera Raw interface, you’ve always had the filmstrip icon for toggling between images. In this update, a second icon has appeared right next to it: grid mode. Click it. Instead of seeing one photo with a filmstrip below, you now get a full thumbnail grid of every file you opened. All 580 of them, displayed cleanly, loaded quickly.
Camera Raw interface showing new grid mode icon at bottom
At the bottom of the Camera Raw interface, you’ve always had the filmstrip icon for toggling between images. In this update, a second icon has appeared right next to it: grid mode. Click it. Instead of seeing one photo with a filmstrip below, you now get a full thumbnail grid of every file you opened. All 580 of them, displayed cleanly, loaded quickly.
This sounds small. It isn’t. Filmstrip mode is fine when you’re editing a handful of images, but when you’ve got hundreds of files from a shoot, flipping through them one at a time is miserable. The grid is a completely different experience.
Step 3: Resize Thumbnails Using the New Slider
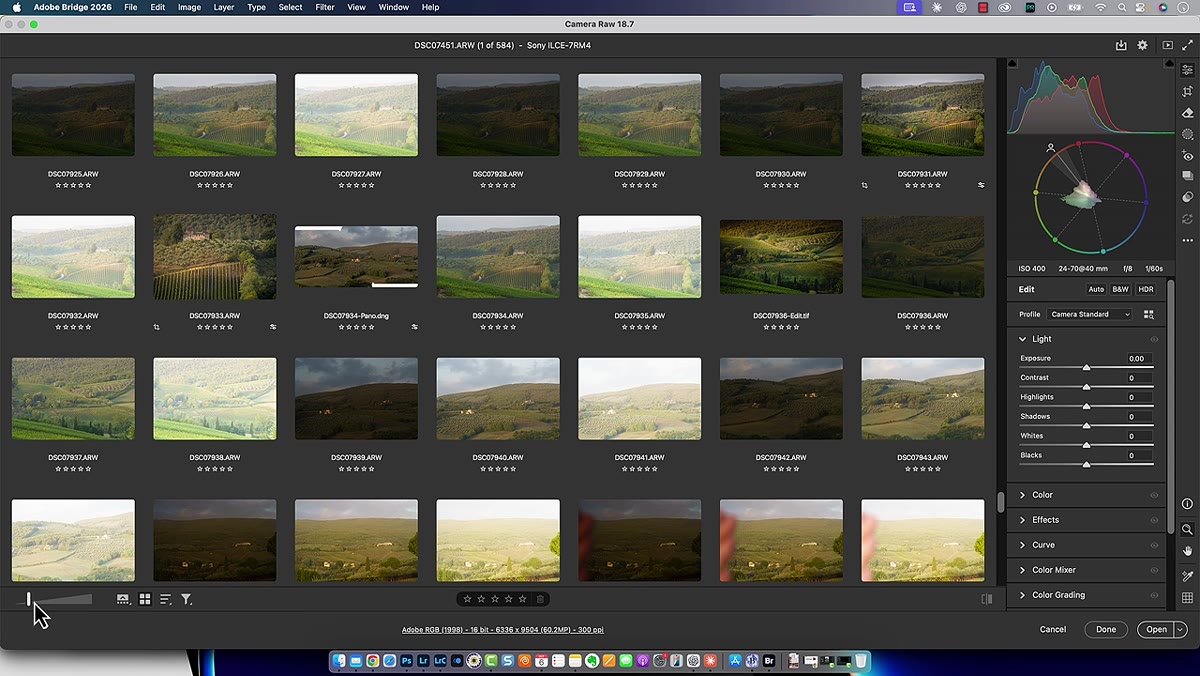 Thumbnail size slider visible at bottom of Camera Raw grid view
Look for the thumbnail size slider at the bottom of the grid view. Drag it left to shrink thumbnails and see more images at once. Drag right to make them bigger when you need to actually evaluate a shot. This is a small UI detail that matters more than it sounds. Lightroom Classic and Bridge have had this for years, and its absence from Camera Raw always made large-batch work feel cramped. Now it’s here.
Thumbnail size slider visible at bottom of Camera Raw grid view
Look for the thumbnail size slider at the bottom of the grid view. Drag it left to shrink thumbnails and see more images at once. Drag right to make them bigger when you need to actually evaluate a shot. This is a small UI detail that matters more than it sounds. Lightroom Classic and Bridge have had this for years, and its absence from Camera Raw always made large-batch work feel cramped. Now it’s here.
Step 4: Rate, Label, and Flag Photos Directly in Grid Mode
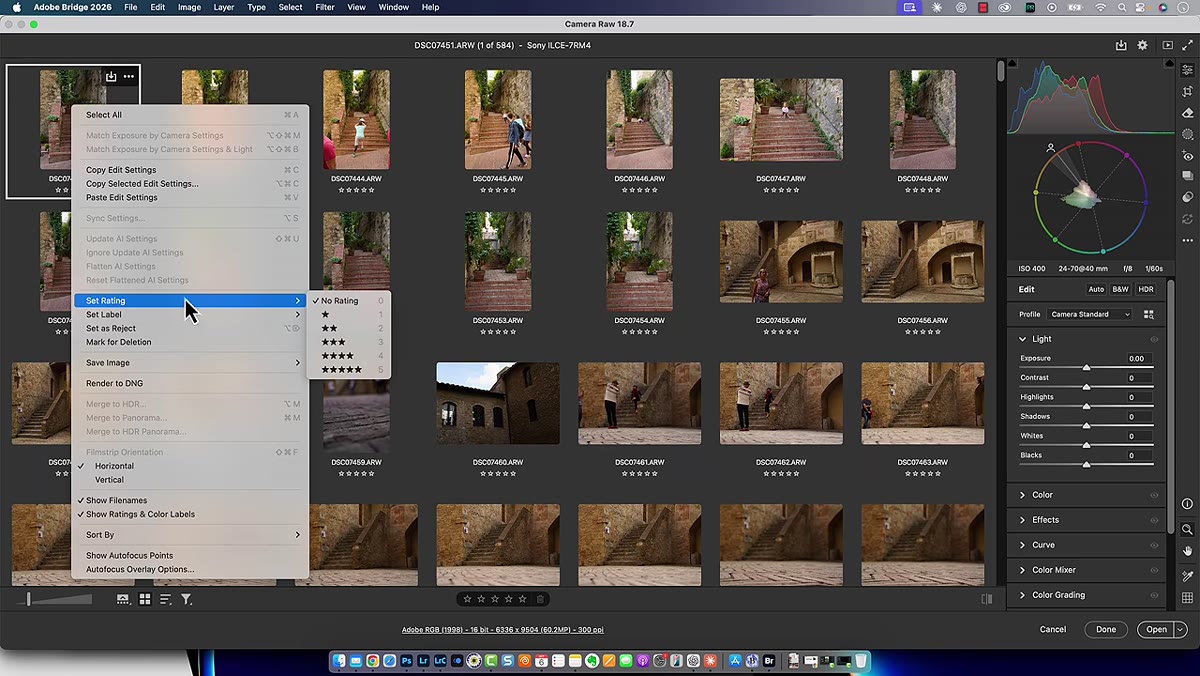 Right-click context menu showing rating and color label options in grid
Right-click any thumbnail in grid mode and you get a context menu with rating options, color labels, and flag markers (picked and rejected). All of them have keyboard shortcuts too, so if you’ve already built muscle memory from Lightroom or Bridge, you’re not starting from scratch. Kloskowski quickly stars a few images and applies a green color label to a handful to show how naturally it flows.
Right-click context menu showing rating and color label options in grid
Right-click any thumbnail in grid mode and you get a context menu with rating options, color labels, and flag markers (picked and rejected). All of them have keyboard shortcuts too, so if you’ve already built muscle memory from Lightroom or Bridge, you’re not starting from scratch. Kloskowski quickly stars a few images and applies a green color label to a handful to show how naturally it flows.
The key thing to understand: this metadata saves with the file. Come back to that folder in Camera Raw six months from now and your stars and labels are still there. No catalog required, no sync needed. It just lives with the photo.
Step 5: Use the New Filter Panel to Narrow Your View
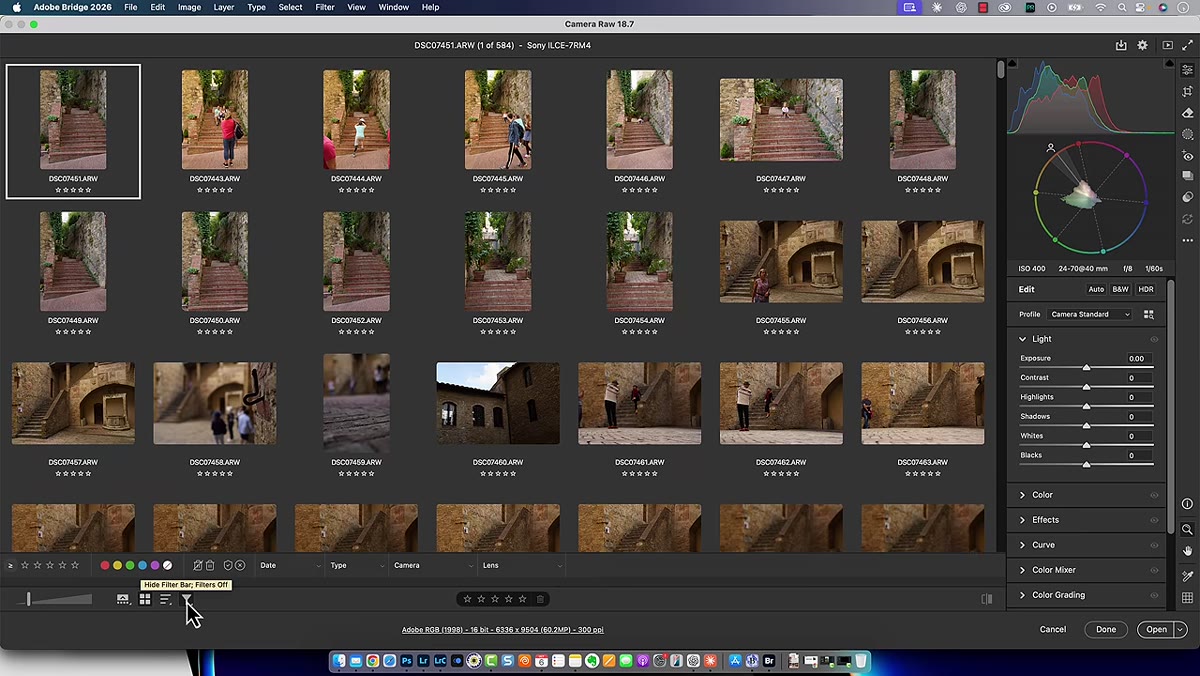 Filter panel open in Camera Raw showing rating and label filter options
Here’s where it starts to feel like a real photo management tool. Enable the filter panel, and you get a sidebar that looks strikingly similar to the filter panel in Lightroom Classic or Bridge. You can filter your visible images by star rating, color label, pick/reject status, date, file type, camera body, and lens.
Filter panel open in Camera Raw showing rating and label filter options
Here’s where it starts to feel like a real photo management tool. Enable the filter panel, and you get a sidebar that looks strikingly similar to the filter panel in Lightroom Classic or Bridge. You can filter your visible images by star rating, color label, pick/reject status, date, file type, camera body, and lens.
So if you shot a weekend event with two camera bodies and want to pull only the five-star shots from one specific camera, you can do that without leaving Camera Raw. No export, no third-party browser, no crossing your fingers and hoping Bridge cooperates today. Filter down to the shots you care about, then edit right there.
Step 6: Edit and Adjust Right in the Same View
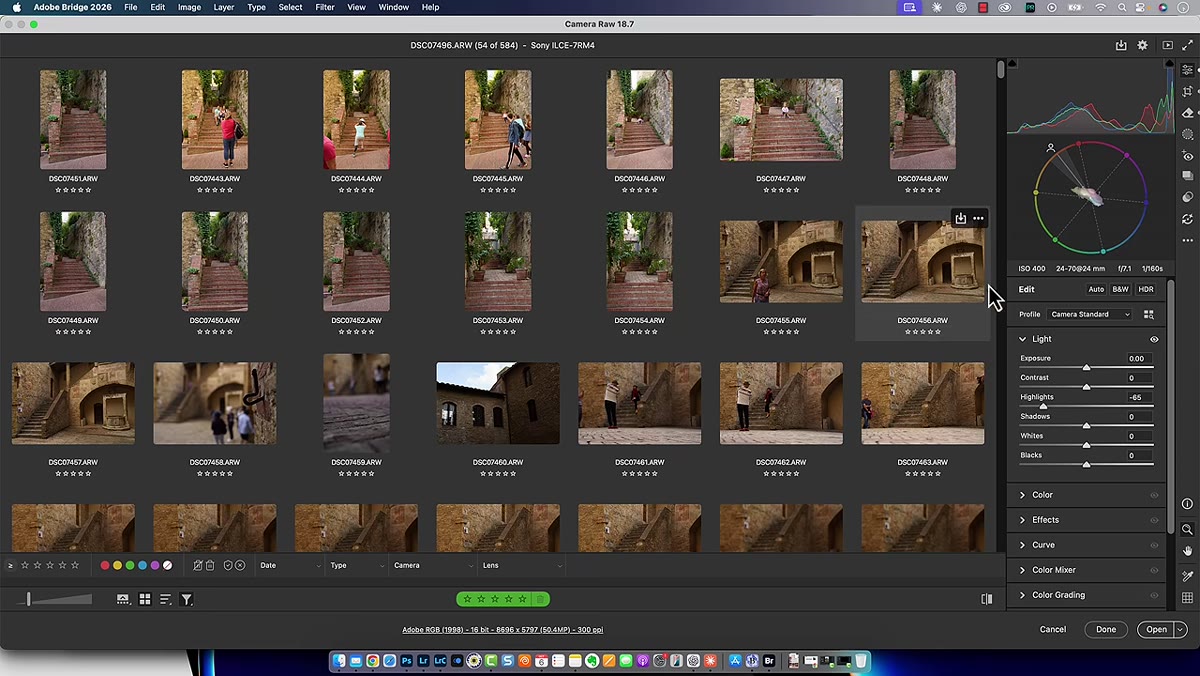 Camera Raw edit panel open alongside filtered grid of photos
Once you’ve filtered down to your selects, click any image to open it in the standard Camera Raw editing view. All your usual tools are right there: exposure, tone curve, HSL, masking, the works. This isn’t a separate app you’re bouncing between. The grid and the filter panel are sitting right inside the same interface where you’ve always made your adjustments.
Camera Raw edit panel open alongside filtered grid of photos
Once you’ve filtered down to your selects, click any image to open it in the standard Camera Raw editing view. All your usual tools are right there: exposure, tone curve, HSL, masking, the works. This isn’t a separate app you’re bouncing between. The grid and the filter panel are sitting right inside the same interface where you’ve always made your adjustments.
When you’re done editing and want to go back to culling or filtering, flip back to grid mode. The whole loop, culling, filtering, editing, happens inside Camera Raw without ever needing Lightroom or its catalog.
What This Actually Changes for Non-Lightroom People
I want to be real about something here. People who use Lightroom Classic look at workflows like this and go, “Why not just use Lightroom?” I’ve had that conversation more times than I can count, usually while someone who loves Lightroom stares at me like I told them I eat cereal with water.
The answer is simple: some photographers just want to open their file explorer, find their folder, and start working. No import, no catalog, no “where did Lightroom put that?” The Bridge-to-Camera-Raw pipeline has always supported that, and now with grid view and filtering baked in, it’s actually competitive for culling workflows that used to require a dedicated DAM app. I’m not saying Lightroom is wrong. I’m saying this is a legitimate path that just got significantly more capable. Matt makes this point well, and it’s worth hearing even if you’re a committed Lightroom user, because understanding why other tools exist makes you better at choosing the right one for each job.
The single biggest takeaway from this update: Camera Raw is no longer just where you go to edit a handful of RAW files before jumping into Photoshop. With grid view, resizable thumbnails, ratings, color labels, and a filter panel, it’s a functional photo browser that keeps your metadata intact without a catalog. For anyone already living in Bridge and Photoshop, this closes a meaningful gap.
Watch the full tutorial on YouTube to see Kloskowski walk through the Lightroom-side updates as well. The Camera Raw stuff is the headline, but there’s more in there worth your time.
Comments
Leave a Comment