Client work has a way of exposing every gap in your skill set. For the longest time, my video work in Photoshop stopped at color grading and slapping some text on screen. If a client wanted a logo reveal or a title that actually did something, I’d either fake it with a hard cut or quietly apologize and suggest they “keep it minimal.” Minimalism is a great cover story until a client asks why their competitor’s intro looks so much slicker than theirs.
That’s exactly why this Aaron Nace tutorial from PHLEARN landed differently than most. Watch the full tutorial on YouTube — it’s part four of a four-part series on video in Photoshop, and honestly, you could watch just this one and walk away with a genuinely useful technique. The core idea is deceptively simple: add a layer mask to a logo or title layer, then animate that mask moving across the canvas over time. The result is a smooth, directional reveal that looks intentional instead of accidental.
What I like about this approach is that it lives entirely inside Photoshop. No round-tripping to After Effects, no “just use Premiere” suggestions from helpful strangers on Reddit. If you’re already editing video in Photoshop, this slots right in without breaking your workflow.
Step 1: Set Up Your Video and Create a New Video Group
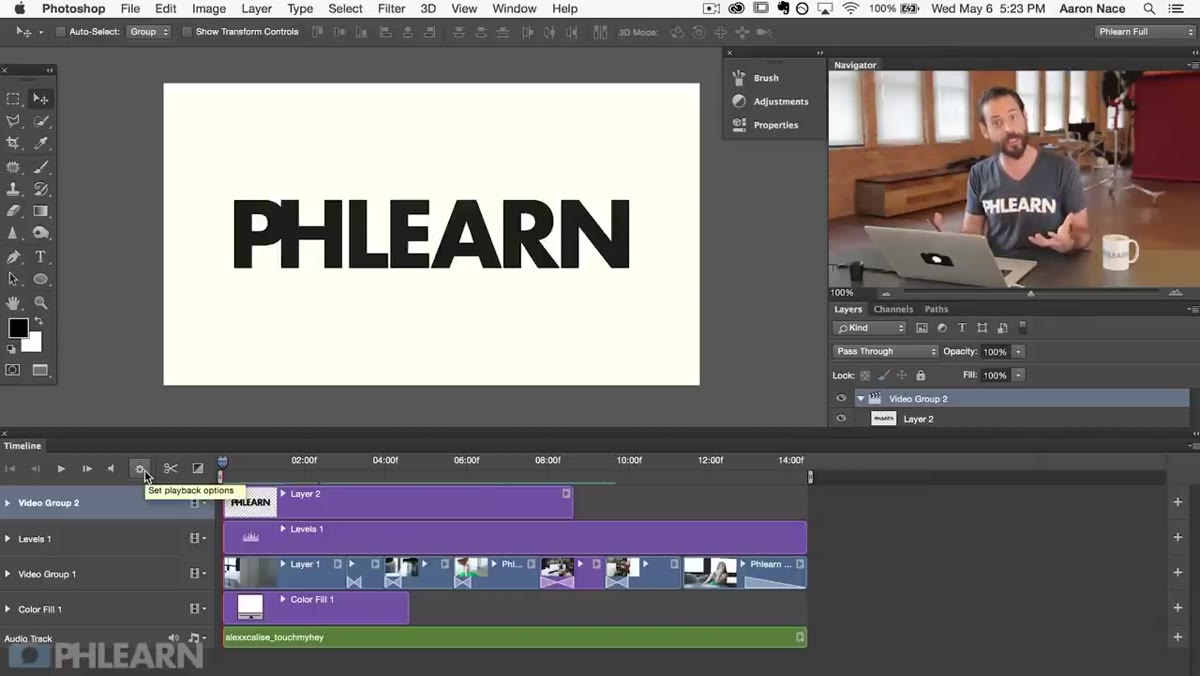
 Timeline panel showing existing video groups and adjustment layers
Before anything else, you need your existing video project open in Photoshop with the Timeline panel visible. Aaron’s working from a project that already has color grading, transitions, and audio in place, which is the context for adding the title screen on top. The key move here is creating a new Video Group specifically for your title element. Click the film strip icon in the Timeline panel and select “New Video Group.” This keeps your title separate from your footage layers, which matters when you start animating things independently. Think of it as giving your title its own lane.
Timeline panel showing existing video groups and adjustment layers
Before anything else, you need your existing video project open in Photoshop with the Timeline panel visible. Aaron’s working from a project that already has color grading, transitions, and audio in place, which is the context for adding the title screen on top. The key move here is creating a new Video Group specifically for your title element. Click the film strip icon in the Timeline panel and select “New Video Group.” This keeps your title separate from your footage layers, which matters when you start animating things independently. Think of it as giving your title its own lane.
Step 2: Place Your Logo or Title Element
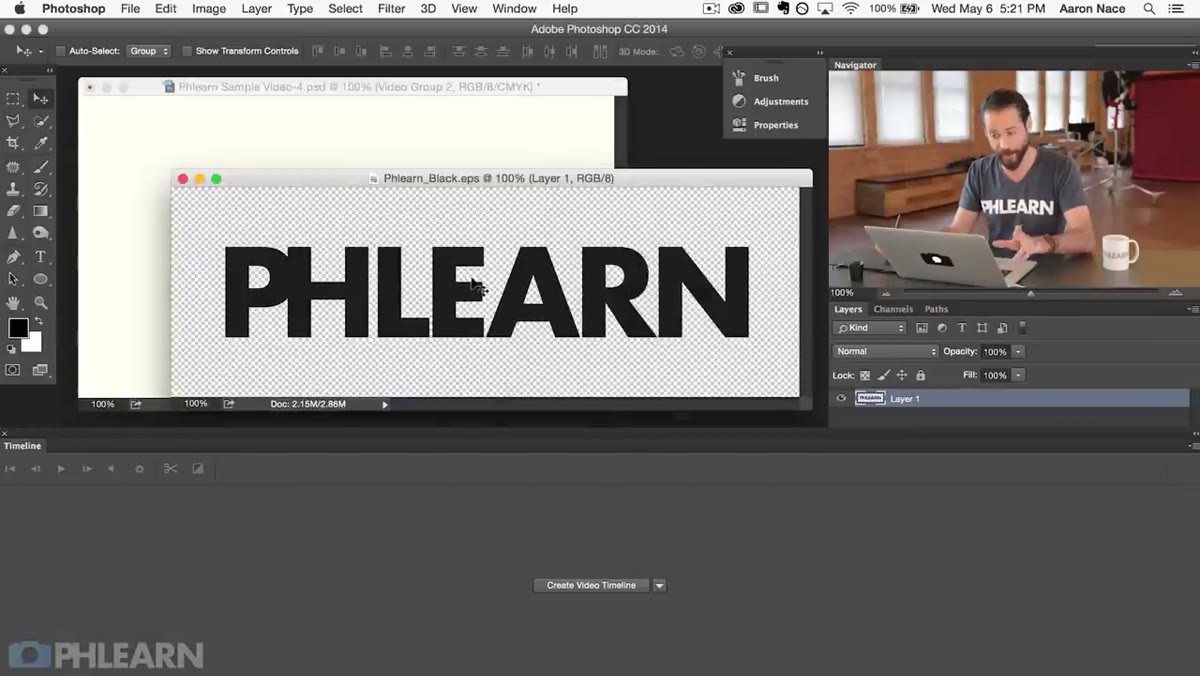 PHLEARN logo placed on canvas inside video group
With the new video group ready, place your logo or title graphic onto the canvas. This doesn’t have to be video footage. A still image, a PNG with transparency, a text layer, it all works here. Aaron drops in the PHLEARN logo as a still image and uses Free Transform (Cmd/Ctrl + T) to scale it to a size that fills enough of the frame to actually be readable without covering everything underneath. A practical tip from my own work: lock the aspect ratio while transforming and watch your canvas edges, because a logo that bleeds off frame in any direction is going to look weird when it animates.
PHLEARN logo placed on canvas inside video group
With the new video group ready, place your logo or title graphic onto the canvas. This doesn’t have to be video footage. A still image, a PNG with transparency, a text layer, it all works here. Aaron drops in the PHLEARN logo as a still image and uses Free Transform (Cmd/Ctrl + T) to scale it to a size that fills enough of the frame to actually be readable without covering everything underneath. A practical tip from my own work: lock the aspect ratio while transforming and watch your canvas edges, because a logo that bleeds off frame in any direction is going to look weird when it animates.
Once it’s placed and sized, you’ll see it sitting inside the video group in the Timeline. By default it’s just on or off, it appears, it disappears, and there’s nothing in between. That’s exactly what we’re fixing.
Step 3: Add a Layer Mask to the Logo Layer
 Layer mask thumbnail appearing on logo layer in Layers panel
Here’s where it gets interesting. Click on your logo layer inside the video group (not the group itself), and then click the Add Layer Mask button at the bottom of the Layers panel. That white rectangle should appear next to your layer thumbnail. The important thing to notice is what happens in the Timeline panel when you do this: two new keyframe properties appear under the video group. “Layer Mask Position” and “Layer Mask Enable.” Ignore Enable for now. Position is where all the action happens, because it lets you move the mask independently of the layer across time.
Layer mask thumbnail appearing on logo layer in Layers panel
Here’s where it gets interesting. Click on your logo layer inside the video group (not the group itself), and then click the Add Layer Mask button at the bottom of the Layers panel. That white rectangle should appear next to your layer thumbnail. The important thing to notice is what happens in the Timeline panel when you do this: two new keyframe properties appear under the video group. “Layer Mask Position” and “Layer Mask Enable.” Ignore Enable for now. Position is where all the action happens, because it lets you move the mask independently of the layer across time.
Step 4: Create the Mask Shape
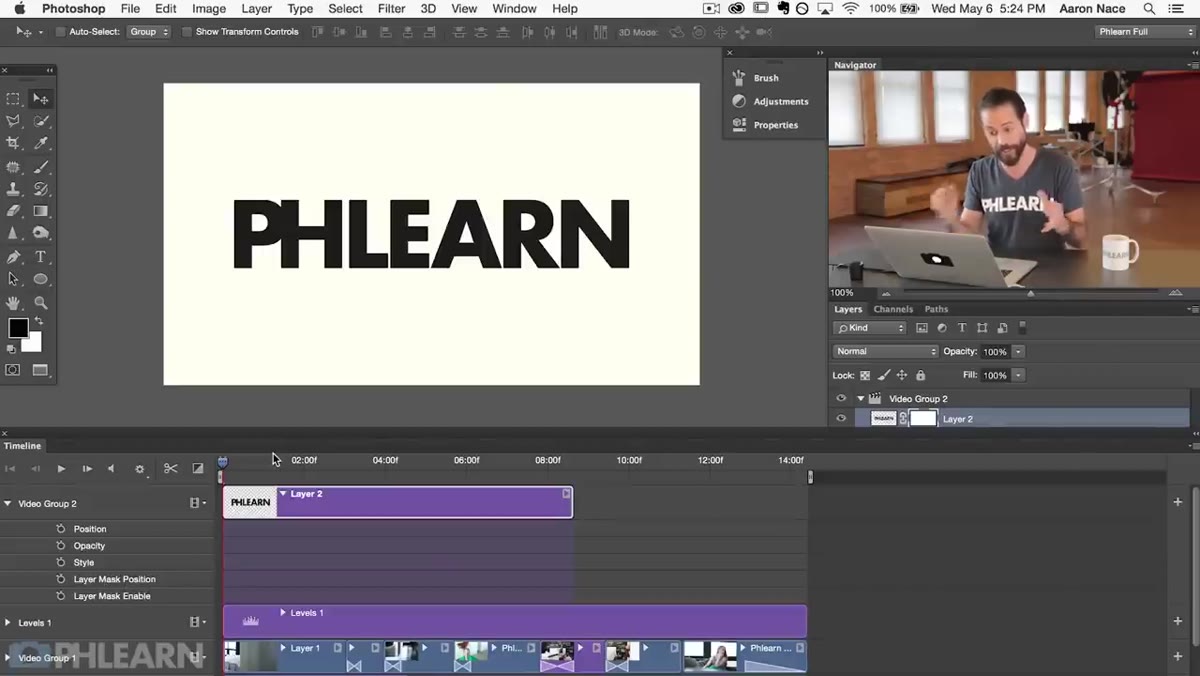 White-filled rectangular mask covering the logo layer
With the layer mask thumbnail selected (click it to make sure, there will be a border around it), grab the Rectangular Marquee Tool and draw a selection that covers the entire logo. Fill it with white. In Photoshop’s mask logic, white reveals and black conceals, so a white mask over the whole logo just means the logo is fully visible, which is your starting point. Nothing looks different yet on screen, and that’s fine. You’re building the mechanism before you run it.
White-filled rectangular mask covering the logo layer
With the layer mask thumbnail selected (click it to make sure, there will be a border around it), grab the Rectangular Marquee Tool and draw a selection that covers the entire logo. Fill it with white. In Photoshop’s mask logic, white reveals and black conceals, so a white mask over the whole logo just means the logo is fully visible, which is your starting point. Nothing looks different yet on screen, and that’s fine. You’re building the mechanism before you run it.
Step 5: Set Your Start Keyframe for the Mask
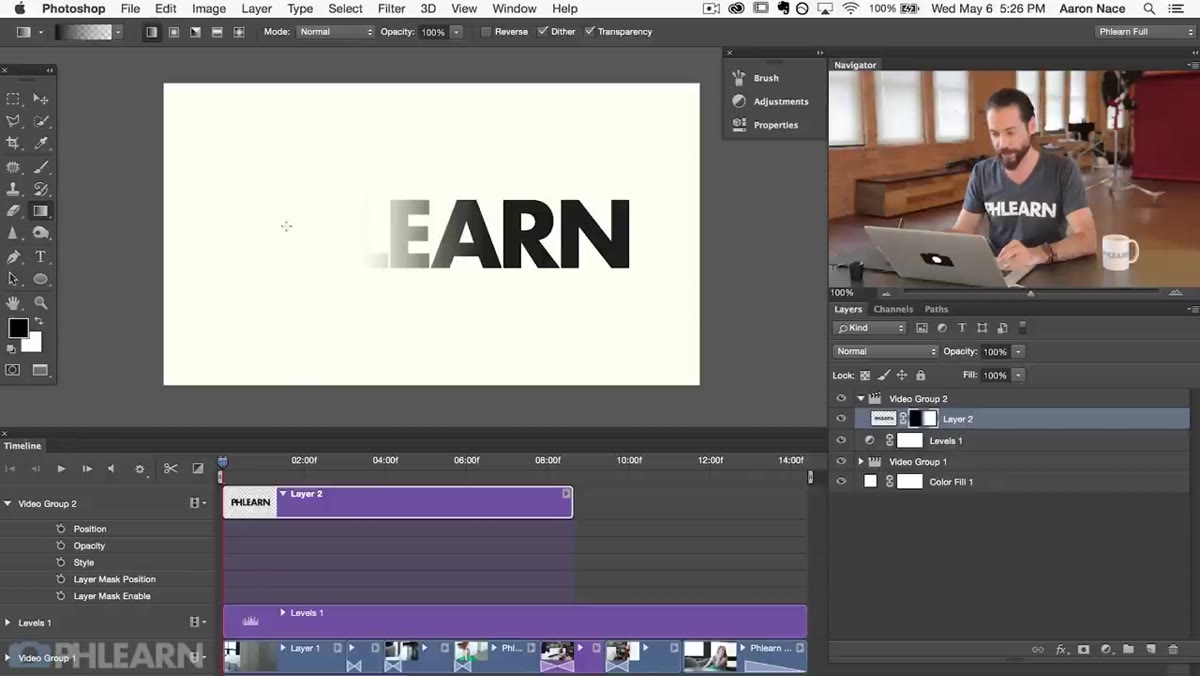 Keyframe stopwatch activated for Layer Mask Position in Timeline
Move your playhead in the Timeline to the point where you want the reveal to begin. Click the stopwatch icon next to “Layer Mask Position” in the Timeline. This sets your first keyframe and tells Photoshop you want to animate this property. At this frame, the logo should be fully hidden, which means you need to reposition the mask off to one side so that only black (hidden) area sits over the logo. The cleanest way to do this is to select the mask thumbnail and use the Move Tool to slide the white-filled mask completely off screen to the right, or left, depending on which direction you want the reveal to come from.
Keyframe stopwatch activated for Layer Mask Position in Timeline
Move your playhead in the Timeline to the point where you want the reveal to begin. Click the stopwatch icon next to “Layer Mask Position” in the Timeline. This sets your first keyframe and tells Photoshop you want to animate this property. At this frame, the logo should be fully hidden, which means you need to reposition the mask off to one side so that only black (hidden) area sits over the logo. The cleanest way to do this is to select the mask thumbnail and use the Move Tool to slide the white-filled mask completely off screen to the right, or left, depending on which direction you want the reveal to come from.
Step 6: Set Your End Keyframe and Complete the Reveal
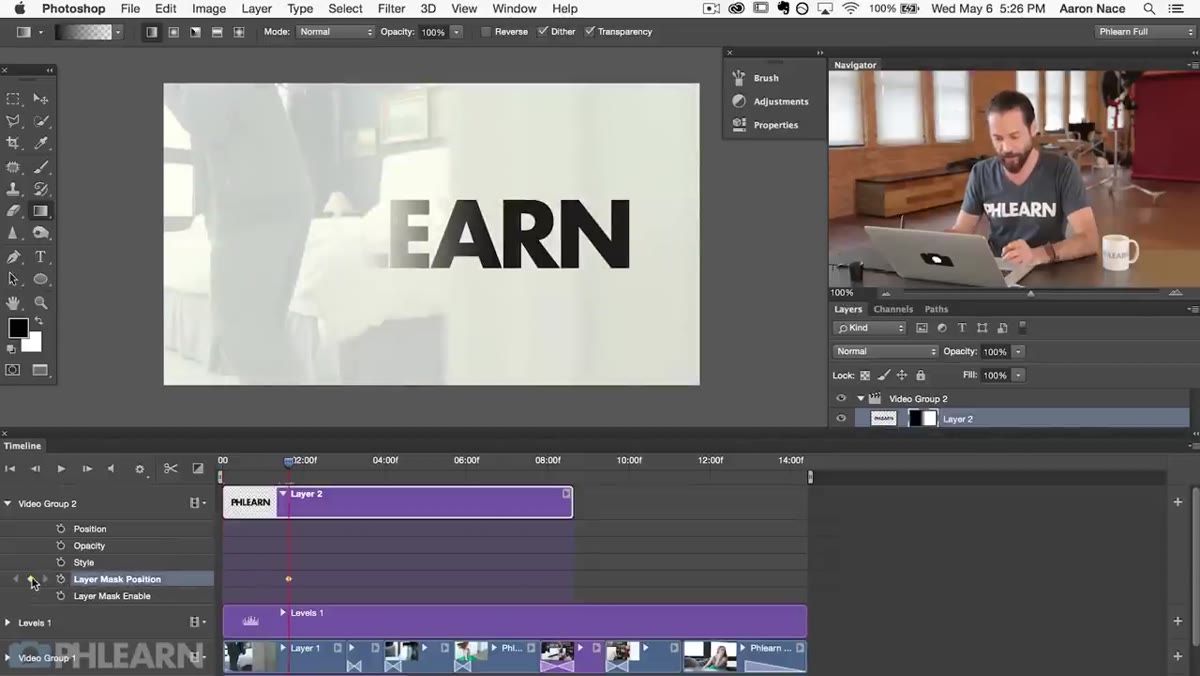 Second keyframe added with mask moved to reveal logo fully
Move the playhead forward to the point where you want the logo to be fully visible. Then move the mask back so the white area covers the logo completely. Photoshop automatically adds a second keyframe when you move the mask with the stopwatch already active. Hit play and watch the mask slide across the layer, progressively revealing the logo as it goes. The speed of the reveal is controlled entirely by how far apart those two keyframes are on the Timeline. Wider gap, slower reveal. Closer together, snappier. Adjust until it feels right for the pacing of your video.
Second keyframe added with mask moved to reveal logo fully
Move the playhead forward to the point where you want the logo to be fully visible. Then move the mask back so the white area covers the logo completely. Photoshop automatically adds a second keyframe when you move the mask with the stopwatch already active. Hit play and watch the mask slide across the layer, progressively revealing the logo as it goes. The speed of the reveal is controlled entirely by how far apart those two keyframes are on the Timeline. Wider gap, slower reveal. Closer together, snappier. Adjust until it feels right for the pacing of your video.
What I’d Do Differently (After Breaking It a Few Times)
The first time I tried this, I kept accidentally moving the logo layer instead of the mask, which produces this weird sliding effect where the whole graphic drifts across the screen. Make absolutely sure you have the mask thumbnail selected in the Layers panel before you touch the Move Tool. The thumbnail for the layer and the thumbnail for the mask look similar enough that it’s easy to grab the wrong one, especially when you’re moving fast. I now zoom into the Layers panel every time before I move anything. Boring? Yes. Embarrassing to explain to a client why their logo is flying off screen? Much worse.
It’s also worth knowing this technique works on text layers too. I’ve used animated masks to create typewriter-style text reveals without any plugins, just a mask moving left to right over a static text layer. Same logic, same workflow.
The biggest thing this tutorial unlocked for me is that Photoshop’s video tools are more capable than they look. Most people (myself included, for longer than I’d like to admit) treat it like a last resort for video. But animated layer masks are legitimately powerful, they’re non-destructive, they’re easy to adjust, and they render cleanly. If you’re already living in Photoshop, there’s no reason to jump to another app just to add a decent title sequence.
Watch the full tutorial on YouTube and follow along with the PHLEARN source files if you can grab them. Watching Aaron build this in real time fills in the small details that are hard to describe in text, especially around the timeline interactions.
Comments
Leave a Comment