
If you’ve been using Photoshop long enough to have a muscle memory for certain workflows, you know how disorienting it is when Adobe quietly reshuffles something fundamental. A few weeks back, that’s exactly what happened with Save As, and the fallout was loud. Adobe changed how saving copies of files works, and if you were the kind of person who opened a RAW file, made some edits, and hit Save As to kick out a JPEG, you suddenly found yourself staring at a dialog box that seemed to be missing half its options. Not great when you’re moving through a client batch at speed.
In this Matt Kloskowski tutorial, he walks through exactly what Adobe changed, why they changed it, and most importantly, how to flip it back to the old behavior using a couple of new checkboxes tucked inside Photoshop’s preferences. Watch the full tutorial on YouTube if you want to see it in real time, but everything you need to actually do this is right here.
I’ll be honest, when this change first rolled out I didn’t even notice immediately because I happened to be deep in a project that didn’t involve saving a lot of copies. But the moment I hit that workflow, I understood why people were furious. Removing JPEG from the Save As dialog without a clear heads-up is the kind of thing that makes you feel like the software is working against you instead of with you.
Step 1: Understand What Actually Changed
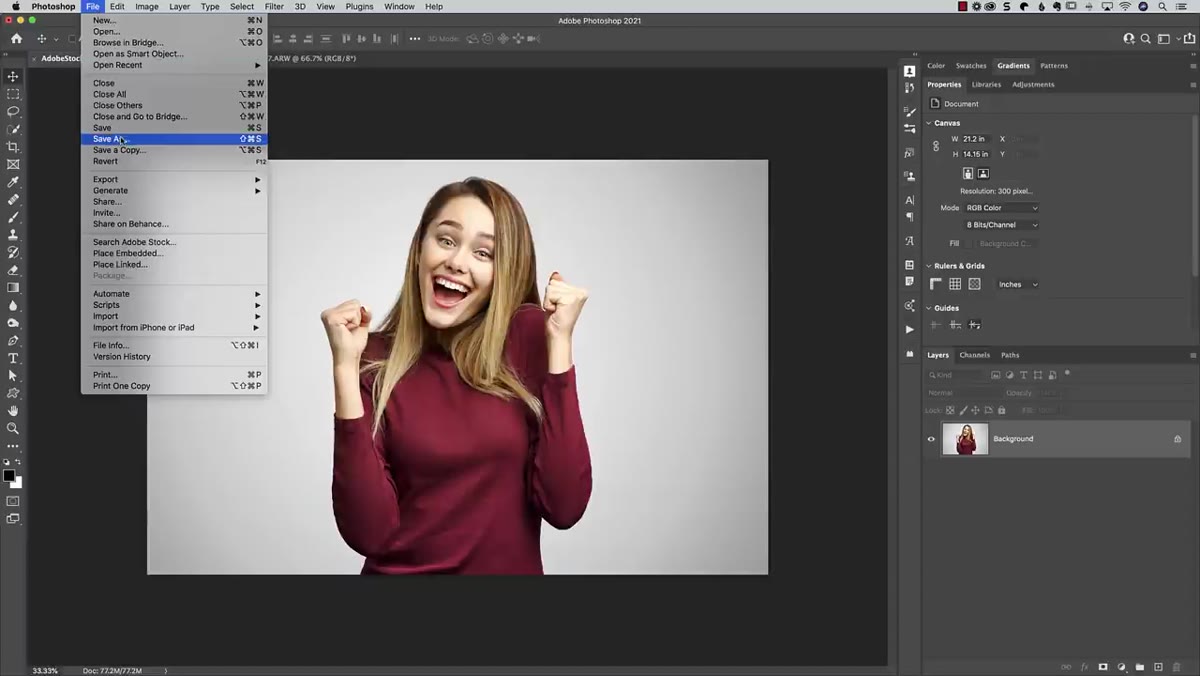 File menu open showing Save As and Save a Copy options
Before you fix anything, it helps to know what you’re actually undoing. Adobe’s change split the old Save As behavior into two separate options. The traditional Save As dialog lost format options like JPEG, which meant you couldn’t use it to export a copy of a RAW file in a different format the way you always had. Instead, Adobe added a new “Save a Copy” option lower in the File menu to handle that job.
File menu open showing Save As and Save a Copy options
Before you fix anything, it helps to know what you’re actually undoing. Adobe’s change split the old Save As behavior into two separate options. The traditional Save As dialog lost format options like JPEG, which meant you couldn’t use it to export a copy of a RAW file in a different format the way you always had. Instead, Adobe added a new “Save a Copy” option lower in the File menu to handle that job.
The problem with Save a Copy wasn’t just that it was in a different place. It automatically appended the word “copy” to your filename every single time. If you’re saving one file, annoying. If you’re processing a hundred images and manually deleting “copy” from each filename, that’s a legitimate chunk of your day gone.
Step 2: Update Photoshop to Version 22.4.2 or Later
 Creative Cloud app showing available Photoshop update
The fix Adobe released only exists in a specific update, so the first thing you need to do is make sure Photoshop is actually current. Open the Creative Cloud desktop app and check for available updates. You’re looking for Photoshop version 22.4.2 or later. If you don’t see an update available, try restarting your machine and checking again.
Creative Cloud app showing available Photoshop update
The fix Adobe released only exists in a specific update, so the first thing you need to do is make sure Photoshop is actually current. Open the Creative Cloud desktop app and check for available updates. You’re looking for Photoshop version 22.4.2 or later. If you don’t see an update available, try restarting your machine and checking again.
This is the version where Adobe added the new preference options that restore the old behavior. Without it, the settings we’re about to change simply won’t be there. Any questions about why an update isn’t showing up or troubleshooting update issues should go straight to Adobe support, but in most cases a restart and a fresh check will surface it.
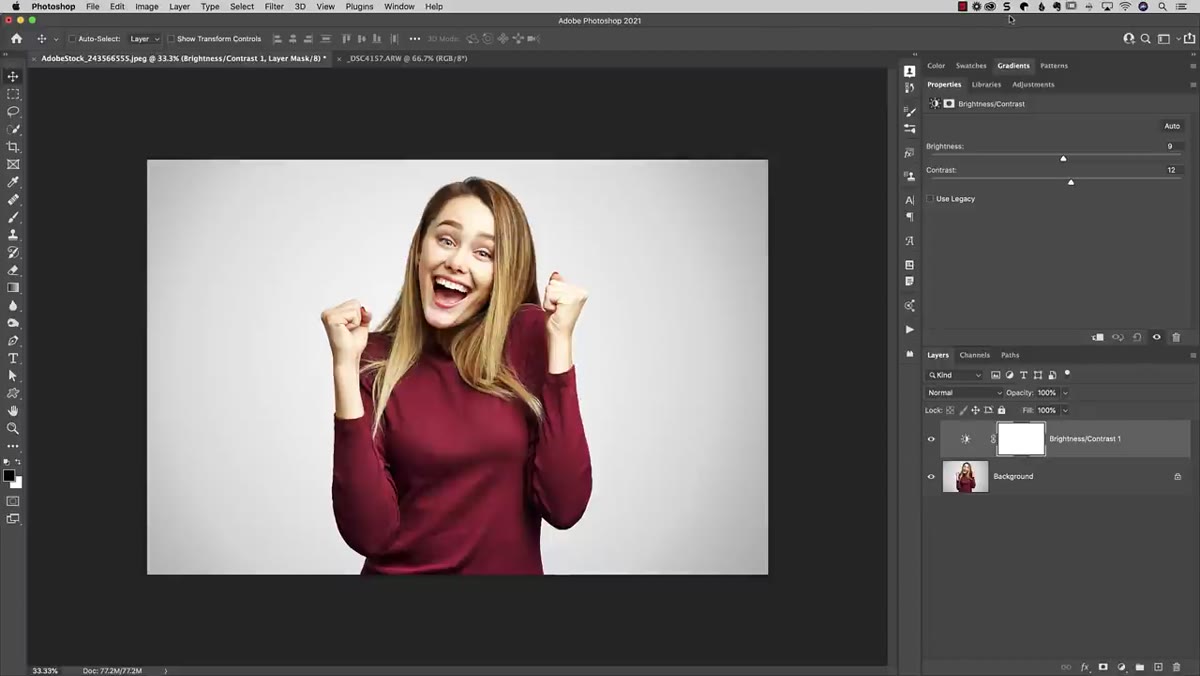
Step 3: Open Photoshop Preferences and Navigate to File Handling
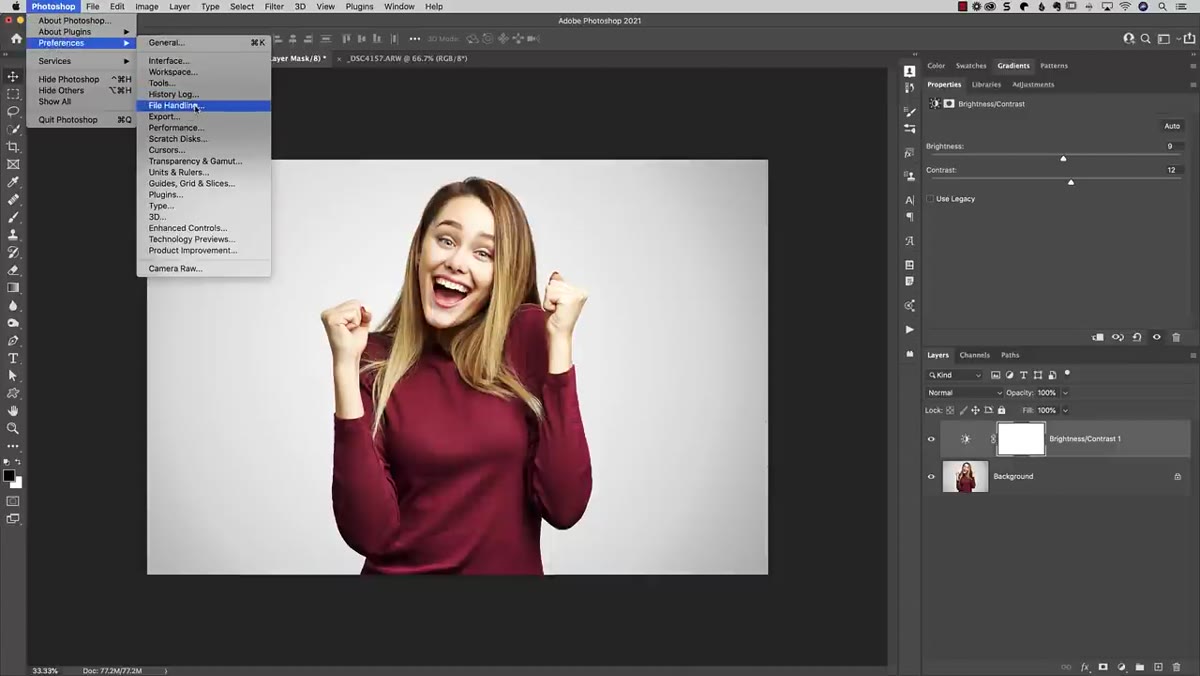 Photoshop Preferences window open at File Handling section
Once you’re on the right version, go into Photoshop’s Preferences. On a Mac that’s Photoshop in the top menu bar, then Preferences. On a PC, you’ll find it under the Edit menu. From there, click into the File Handling section.
Photoshop Preferences window open at File Handling section
Once you’re on the right version, go into Photoshop’s Preferences. On a Mac that’s Photoshop in the top menu bar, then Preferences. On a PC, you’ll find it under the Edit menu. From there, click into the File Handling section.
This is where things get interesting. If your Photoshop was updated correctly, the File Handling panel will look slightly different from what you’re used to. Specifically, you’ll see two new checkboxes that weren’t there before. If your preferences panel still looks exactly the same as it always did with no new options, double-check your version number, because the update may not have installed properly.
Step 4: Enable Legacy Save As
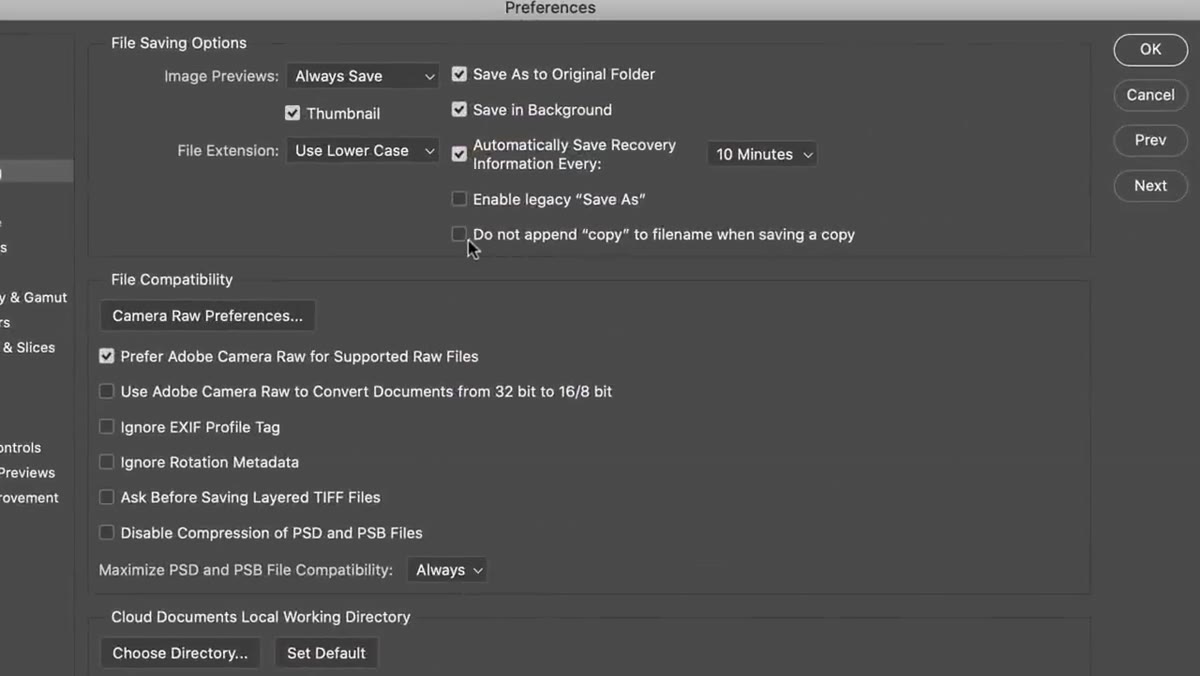 File Handling preferences showing new Legacy Save As checkboxes
The first checkbox to look for is labeled “Enable Legacy Save As.” This is the main toggle that restores the old Save As behavior, meaning JPEG and other format options will come back to the Save As dialog the way they used to be.
File Handling preferences showing new Legacy Save As checkboxes
The first checkbox to look for is labeled “Enable Legacy Save As.” This is the main toggle that restores the old Save As behavior, meaning JPEG and other format options will come back to the Save As dialog the way they used to be.
Go ahead and check that box. What you’ll likely notice is that the second checkbox below it gets automatically checked at the same time. Adobe has linked them together, so enabling legacy Save As also triggers the next setting. You don’t get to enable one without the other, which is a reasonable call on Adobe’s part given that the two behaviors are logically connected.
Step 5: Confirm the “Do Not Append Copy” Setting Is Active
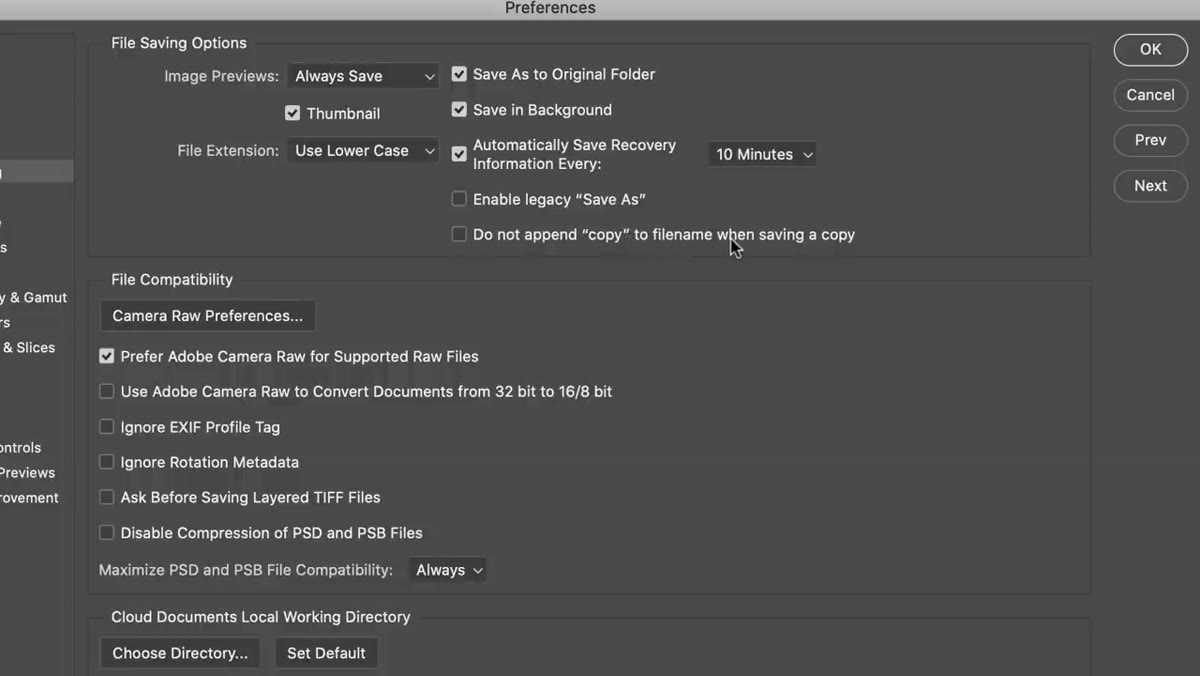 Both checkboxes checked in File Handling preferences panel
The second checkbox is labeled something along the lines of “Do not append copy to the file name when saving a copy.” This is the one that stops Photoshop from automatically tacking the word “copy” onto every filename when you use Save a Copy.
Both checkboxes checked in File Handling preferences panel
The second checkbox is labeled something along the lines of “Do not append copy to the file name when saving a copy.” This is the one that stops Photoshop from automatically tacking the word “copy” onto every filename when you use Save a Copy.
Because enabling Legacy Save As forces this one on automatically, you may not need to do anything here manually. But it’s worth confirming both boxes are checked before you click OK. Think of this step as just making sure the whole package is applied correctly rather than assuming the automatic behavior did what you expected.
Step 6: Click OK and Test Your Save As Dialog
 File menu open showing restored Save As format options including JPEG
Click OK to close preferences and then go up to File and hit Save As. On the surface the menu might look identical to before, but now when the Save As dialog opens, your full list of format options including JPEG should be back. You can also test Save a Copy if you want to confirm that the filename no longer auto-appends the word “copy.”
File menu open showing restored Save As format options including JPEG
Click OK to close preferences and then go up to File and hit Save As. On the surface the menu might look identical to before, but now when the Save As dialog opens, your full list of format options including JPEG should be back. You can also test Save a Copy if you want to confirm that the filename no longer auto-appends the word “copy.”
At this point your workflow should be back to exactly what it was before Adobe made the change. Open RAW, edit, Save As, choose JPEG, done.
A Quick Word of Caution Before You Celebrate
Here’s the thing Matt touches on that’s worth sitting with for a second. The reason Adobe made this change in the first place was that a significant number of people were accidentally overwriting their original files. We’re talking tens of thousands of complaints about lost originals. When you have Legacy Save As enabled, that risk comes back. If you open a file and Save As without paying attention to where you’re saving and what you’re naming it, you can overwrite the source.
My personal habit is to keep originals in a locked folder or to work from duplicates whenever I’m processing anything I can’t recreate. It’s a workflow thing, not a Photoshop thing, but this setting change is a good reminder to be intentional about it. The old behavior is faster and more familiar, and the tradeoff is that it puts slightly more responsibility back on you to not shoot yourself in the foot.
The single biggest thing to take away here is that Adobe does provide a path back when changes don’t land well, but you have to update first before any of the preference options appear. Check your version, update if needed, then go into File Handling and check both boxes. Two minutes and your Save As is back to normal.
Watch the full tutorial on YouTube to see Matt walk through the whole thing visually, including a side-by-side of the old and new preferences panels that makes it very clear what changed.
Comments (1)
Printing this out and pinning it next to my monitor. That good.
Leave a Comment